ホームサンドボックスショーケースアプリ文書ブログ
    • English英語
      EN
    • русскийロシア語
      RU
    • 日本語日本語
      JA
    • françaisフランス語
      FR
    • 한국어韓国語
      KO
    • 中文中国語
      ZH
    • españolスペイン語
      ES
    • Deutschドイツ語
      DE
    • العربيةアラビア語
      AR
    • italianoイタリア語
      IT
    • British Englishイギリス英語
      EN-GB
    • portuguêsポルトガル語
      PT
    • हिन्दीヒンディー語
      HI
    • Türkçeトルコ語
      TR
    • polskiポーランド語
      PL
    • Indonesiaインドネシア語
      ID
    • Tiếng Việtベトナム語
      VI
    • українськаウクライナ語
      UK
    /
    フレームワークでドキュメントをフィルター
    Alt+←
    なぜIntlayer?
    始める
    コンセプト
    • Intlayerの仕組み
    • 設定
    • TestFillBuildWatchExtractLoginPushPullConfigurationListVersionEditorLiveDebugDoc ReviewDoc TranslateSDK
    • ビジュアルエディター
    • CMS
    • CI/CD統合
    • 翻訳複数形列挙条件性別挿入ファイルネスティングMarkdownHTML関数取得
    • ロケールごとのファイル
    • コンパイラー
    • 自動入力
    • テスト
    • バンドル最適化
    環境
    • Next.js 14とApp Router
      Next.js 15
      Next.js ロケールなし URL
      Next.jsとページルーター
      コンパイラ
    • Tanstack Start Solid
    • AstroおよびReact
      AstroおよびSvelte
      AstroおよびVue
      AstroおよびSolid
      AstroおよびPreact
      AstroおよびLit
      AstroおよびVanilla JS
    • React Router v7
      React Router v7 (fs-routes)
      Compiler
    • NuxtおよびVue
    • ViteおよびSolid
    • SvelteKit
    • ViteおよびPreact
    • ViteおよびVanilla JS
    • ViteおよびLit
    • Angular 19 (Webpack)
      Analog
    • React CRA
    • React NativeとExpo
    • Express.js
      NestJS
      Fastify
      Hono
      Adonis
    • LynxおよびReact
    Plugins
    • JSON
    • gettext (.po)
    VS Code拡張機能
    エージェント
    • MCPサーバー
    • エージェントのスキル
    リリース
    • v8
    • v7
    • v6
    ベンチマーク
    • Next.js
    • TanStack
    • Vue
    • Solid
    • Svelte
    ブログ
    質問をする
    1. Documentation
    2. 環境
    3. Angular 21
    作成:2025-04-18最終更新:2026-05-06
    GitHubでアプリケーションテンプレートを見る

    このページにはアプリケーションテンプレートが用意されています。

    ショーケースアプリケーションを見る

    このページはテンプレートのライブデモにリンクしています。

    このドキュメントをあなたの好きなAIアシスタントに参照してください
    ChatGPT
    Claude
    DeepSeek
    Google AI mode
    Gemini
    Perplexity
    Mistral
    Grok

    このページとあなたの好きなAIアシスタントを使ってドキュメントを要約します

    バージョン履歴

    1. "Solid useIntlayer APIのプロパティへの直接アクセスへの変更"
      v8.9.02026/5/4
    2. "安定版リリース"
      v8.0.02026/1/26
    3. "initコマンドの追加"
      v8.0.02025/12/30
    4. "初期履歴"
      v5.5.102025/6/29

    このページのコンテンツはAIを使用して翻訳されました。

    英語の元のコンテンツの最新バージョンを見る
    このドキュメントを編集

    このドキュメントを改善するアイデアがある場合は、GitHubでプルリクエストを送信することで自由に貢献してください。

    ドキュメントへのGitHubリンク
    コピー

    ドキュメントのMarkdownをクリップボードにコピー

    Intlayerを使用してAngular 21(Vite)Webサイトを翻訳する | 国際化(i18n)

    目次

    Intlayerとは?

    Intlayerは、現代のWebアプリケーションにおける多言語サポートを簡素化するために設計された、革新的なオープンソースの国際化(i18n)ライブラリです。

    Intlayerを使用すると、次のことができます:

    • コンポーネントレベルで宣言型辞書を使用して翻訳を簡単に管理。
    • メタデータ、ルート、コンテンツを動的にローカライズ。
    • 自動生成された型でTypeScriptサポートを保証し、オートコンプリートとエラー検出を改善。
    • 動的なロケール検出や切り替えなどの高度な機能を活用。

    AngularアプリケーションでIntlayerをセットアップするためのステップバイステップガイド

    ide.intlayer.org
    intlayer-angular-21-template.vercel.app

    GitHubでアプリケーションテンプレートを参照してください。

    ステップ1:依存関係のインストール

    npmを使用して必要なパッケージをインストールします:

    bash
    コードをコピー

    コードをクリップボードにコピー

    npm install intlayer angular-intlayernpm install @angular-builders/custom-esbuild --save-devnpx intlayer init
    • intlayer

      構成管理、翻訳、コンテンツ宣言、トランスパイル、CLIコマンドのための国際化ツールを提供するコアパッケージ。

    • angular-intlayer IntlayerをAngularアプリケーションに統合するパッケージ。Angularの国際化のためのコンテキストプロバイダとフックを提供します。

    • @angular-builders/custom-esbuild Angular CLIのesbuild構成をカスタマイズするために必要です。

    ステップ2:プロジェクトの構成

    アプリケーションの言語を構成するための構成ファイルを作成します:

    intlayer.config.ts
    コードをコピー

    コードをクリップボードにコピー

    import { Locales, type IntlayerConfig } from "intlayer";
    
    const config: IntlayerConfig = {
      internationalization: {
        locales: [
          Locales.ENGLISH,
          Locales.FRENCH,
          Locales.SPANISH,
          // その他の言語
        ],
        defaultLocale: Locales.ENGLISH,
      },
    };
    
    export default config;
    この設定ファイルを通じて、ローカライズされたURL、ミドルウェアのリダイレクト、Cookie名、コンテンツ宣言の場所と拡張子、コンソールでのIntlayerログの無効化などを設定できます。利用可能なパラメーターの完全なリストについては、設定ドキュメントを参照してください。

    ステップ3:Angular構成へのIntlayerの統合

    IntlayerをAngular CLIと統合するには、カスタムビルダーを使用する必要があります。このガイドでは、Vite/esbuild(Angular 21プロジェクトのデフォルト)を使用していることを前提としています。

    まず、カスタムesbuildビルダーを使用するようにangular.jsonを変更します。buildとserveの構成を更新します:

    angular.json
    コードをコピー

    コードをクリップボードにコピー

    {  "projects": {    "your-app-name": {      "architect": {        "build": {          "builder": "@angular-builders/custom-esbuild:application", // replace "@angular/build:application"          "options": {            "define": {              "process.env": "{}",            },            "plugins": ["./esbuild.plugins.ts"],            "browser": "src/main.ts",            // ...          },        },        "serve": {          "builder": "@angular-builders/custom-esbuild:dev-server", // replace "@angular/build:dev-server"          "options": {            "prebundle": {              "exclude": [                "intlayer",                "angular-intlayer",                "@intlayer/config/built",                "@intlayer/core"              ]          },        },      },    },  },}
    angular.json内のyour-app-nameをプロジェクトの実際のプロジェクト名に置き換えることを忘れないでください。

    次に、プロジェクトのルートにesbuild.plugins.tsファイルを作成します:

    esbuild.plugins.ts
    コードをコピー

    コードをクリップボードにコピー

    import { intlayerEsbuildPlugin } from "angular-intlayer/esbuild";export default [intlayerEsbuildPlugin()];
    intlayerEsbuildPlugin関数はesbuildにIntlayerを設定します。コンテンツ宣言ファイルを処理するプラグインを注入し、最適なパフォーマンスのためのエイリアスを設定します。

    NX ユーザー: NX の Angular ビルダーは、Node のネイティブ ESM 解決を介してプラグインファイルをロードし、TypeScript プラグインファイルをその場でコンパイルしません。代わりに .mjs ファイルを使用し、それに応じて angular.json の plugins 参照を更新してください:

    esbuild.plugins.mjs
    コードをコピー

    コードをクリップボードにコピー

    import { intlayerEsbuildPlugin } from "angular-intlayer/esbuild";export default [intlayerEsbuildPlugin()];

    その後、angular.json で "./esbuild.plugins.ts" の代わりに "./esbuild.plugins.mjs" を指定します。

    ステップ4:コンテンツの宣言

    翻訳を保存するためにコンテンツ宣言を作成および管理します:

    コンテンツ宣言は、contentDirディレクトリ(デフォルトでは./src)に含まれている限り、アプリケーション内のどこにでも定義できます。また、コンテンツ宣言ファイルの拡張子(デフォルトでは.content.{json,ts,tsx,js,jsx,mjs,cjs})と一致している必要があります。
    詳細については、コンテンツ宣言のドキュメントを参照してください。

    ステップ5:コードでIntlayerを活用する

    Angularアプリケーション全体でIntlayerの国際化機能を活用するには、アプリケーションの構成でIntlayerを提供する必要があります。

    src/app/app.config.ts
    コードをコピー

    コードをクリップボードにコピー

    import { ApplicationConfig } from "@angular/core";import { provideRouter } from "@angular/router";import { provideIntlayer } from "angular-intlayer";import { routes } from "./app.routes";export const appConfig: ApplicationConfig = {  providers: [    provideRouter(routes),    provideIntlayer(), // ここにIntlayerプロバイダを追加します  ],};

    次に、任意のコンポーネント内でuseIntlayer機能を使用できます。

    src/app/app.component.ts
    コードをコピー

    コードをクリップボードにコピー

    import { Component } from "@angular/core";import { RouterOutlet } from "@angular/router";import { useIntlayer } from "angular-intlayer";@Component({  selector: "app-root",  standalone: true,  imports: [RouterOutlet],  templateUrl: "./app.component.html",  styleUrl: "./app.component.css",})export class AppComponent {  content = useIntlayer("app");}

    そして、テンプレートでは:

    src/app/app.component.html
    コードをコピー

    コードをクリップボードにコピー

    <div class="content">  <h1>{{ content().title }}</h1>  <p>{{ content().congratulations }}</p></div>

    IntlayerのコンテンツはSignalとして返されるため、シグナルを呼び出すことで値にアクセスします:content().title。

    (オプション)ステップ6:コンテンツの言語を変更する

    コンテンツの言語を変更するには、useLocale関数によって提供されるsetLocale関数を使用できます。これにより、アプリケーションのロケールを設定し、それに応じてコンテンツを更新できます。

    言語を切り替えるためのコンポーネントを作成します:

    src/app/locale-switcher.component.ts
    コードをコピー

    コードをクリップボードにコピー

    import { Component } from "@angular/core";import { CommonModule } from "@angular/common";import { useLocale } from "angular-intlayer";@Component({  selector: "app-locale-switcher",  standalone: true,  imports: [CommonModule],  template: `    <div class="locale-switcher">      <select        [value]="locale()"        (change)="setLocale($any($event.target).value)"      >        @for (loc of availableLocales; track loc) {          <option [value]="loc">{{ loc }}</option>        }      </select>    </div>  `,})export class LocaleSwitcherComponent {  localeCtx = useLocale();  locale = this.localeCtx.locale;  availableLocales = this.localeCtx.availableLocales;  setLocale = this.localeCtx.setLocale;}

    次に、このコンポーネントをapp.component.tsで使用します:

    src/app/app.component.ts
    コードをコピー

    コードをクリップボードにコピー

    import { Component } from "@angular/core";import { RouterOutlet } from "@angular/router";import { useIntlayer } from "angular-intlayer";import { LocaleSwitcherComponent } from "./locale-switcher.component";@Component({  selector: "app-root",  standalone: true,  imports: [RouterOutlet, LocaleSwitcherComponent],  templateUrl: "./app.component.html",  styleUrl: "./app.component.css",})export class AppComponent {  content = useIntlayer("app");}

    TypeScriptの設定

    Intlayerは、TypeScriptの利便性を高め、コードベースをより堅牢にするためにモジュール拡張を使用します。

    オートコンプリート

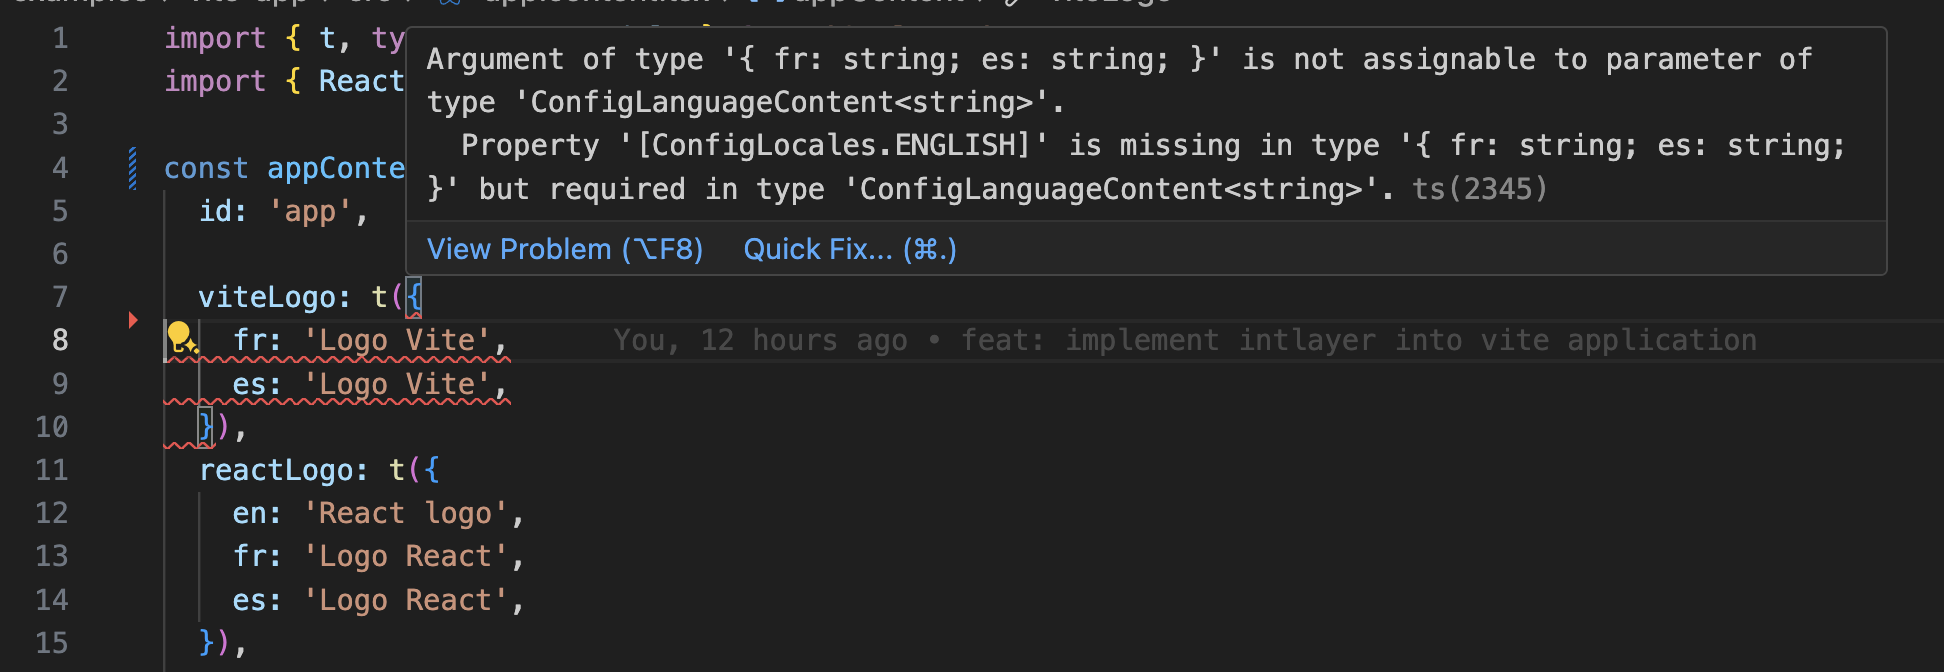
    翻訳エラー

    TypeScript構成に自動生成された型が含まれていることを確認してください。

    tsconfig.json
    コードをコピー

    コードをクリップボードにコピー

    {  // ... 既存のTypeScript構成  "include": [    // ... 既存のTypeScript構成    ".intlayer/**/*.ts", // 自動生成された型を含める  ],}

    Gitの設定

    Intlayerによって生成されたファイルを無視することをお勧めします。これにより、Gitリポジトリへのコミットを避けることができます。

    これを行うには、.gitignoreファイルに次の指示を追加できます:

    bash
    コードをコピー

    コードをクリップボードにコピー

    # Intlayerによって生成されたファイルを無視.intlayer

    VS Code拡張機能

    Intlayerでの開発エクスペリエンスを向上させるために、公式のIntlayer VS Code拡張機能をインストールできます。

    VS Code Marketplaceからインストール

    この拡張機能は次を提供します:

    • 翻訳キーのオートコンプリート。
    • 欠落している翻訳のリアルタイムエラー検出。
    • 翻訳されたコンテンツのインラインプレビュー。
    • 翻訳を簡単に作成および更新するためのクイックアクション。

    拡張機能の使い方の詳細については、Intlayer VS Code拡張機能のドキュメントを参照してください。


    さらに進む

    さらに進むには、ビジュアルエディターを実装したり、CMSを使用してコンテンツを外部化したりできます。


    ViteおよびLit
    Angular 19 (Webpack)
    Alt+→

    このページについて

      ディスカッションは匿名で、よくある問題に対処するために定期的に確認されます。機能のアイデア、ドキュメントへのフィードバック、Intlayerに関することなど、お気軽にお聞かせください, このフィードバックをロードマップの作成と製品の改善に活用しています。

      npm install intlayer angular-intlayernpm install @angular-builders/custom-esbuild --save-devnpx intlayer init
      {  "projects": {    "your-app-name": {      "architect": {        "build": {          "builder": "@angular-builders/custom-esbuild:application", // replace "@angular/build:application"          "options": {            "define": {              "process.env": "{}",            },            "plugins": ["./esbuild.plugins.ts"],            "browser": "src/main.ts",            // ...          },        },        "serve": {          "builder": "@angular-builders/custom-esbuild:dev-server", // replace "@angular/build:dev-server"          "options": {            "prebundle": {              "exclude": [                "intlayer",                "angular-intlayer",                "@intlayer/config/built",                "@intlayer/core"              ]          },        },      },    },  },}
      import { intlayerEsbuildPlugin } from "angular-intlayer/esbuild";export default [intlayerEsbuildPlugin()];
      import { intlayerEsbuildPlugin } from "angular-intlayer/esbuild";export default [intlayerEsbuildPlugin()];
      import { ApplicationConfig } from "@angular/core";import { provideRouter } from "@angular/router";import { provideIntlayer } from "angular-intlayer";import { routes } from "./app.routes";export const appConfig: ApplicationConfig = {  providers: [    provideRouter(routes),    provideIntlayer(), // ここにIntlayerプロバイダを追加します  ],};
      import { Component } from "@angular/core";import { RouterOutlet } from "@angular/router";import { useIntlayer } from "angular-intlayer";@Component({  selector: "app-root",  standalone: true,  imports: [RouterOutlet],  templateUrl: "./app.component.html",  styleUrl: "./app.component.css",})export class AppComponent {  content = useIntlayer("app");}
      <div class="content">  <h1>{{ content().title }}</h1>  <p>{{ content().congratulations }}</p></div>
      import { Component } from "@angular/core";import { CommonModule } from "@angular/common";import { useLocale } from "angular-intlayer";@Component({  selector: "app-locale-switcher",  standalone: true,  imports: [CommonModule],  template: `    <div class="locale-switcher">      <select        [value]="locale()"        (change)="setLocale($any($event.target).value)"      >        @for (loc of availableLocales; track loc) {          <option [value]="loc">{{ loc }}</option>        }      </select>    </div>  `,})export class LocaleSwitcherComponent {  localeCtx = useLocale();  locale = this.localeCtx.locale;  availableLocales = this.localeCtx.availableLocales;  setLocale = this.localeCtx.setLocale;}
      import { Component } from "@angular/core";import { RouterOutlet } from "@angular/router";import { useIntlayer } from "angular-intlayer";import { LocaleSwitcherComponent } from "./locale-switcher.component";@Component({  selector: "app-root",  standalone: true,  imports: [RouterOutlet, LocaleSwitcherComponent],  templateUrl: "./app.component.html",  styleUrl: "./app.component.css",})export class AppComponent {  content = useIntlayer("app");}
      {  // ... 既存のTypeScript構成  "include": [    // ... 既存のTypeScript構成    ".intlayer/**/*.ts", // 自動生成された型を含める  ],}
      # Intlayerによって生成されたファイルを無視.intlayer