홈샌드박스쇼케이스앱문서블로그
    • English영어
      EN
    • русский러시아어
      RU
    • 日本語일본어
      JA
    • français프랑스어
      FR
    • 한국어한국어
      KO
    • 中文중국어
      ZH
    • español스페인어
      ES
    • Deutsch독일어
      DE
    • العربية아랍어
      AR
    • italiano이탈리아어
      IT
    • British English영어(영국)
      EN-GB
    • português포르투갈어
      PT
    • हिन्दी힌디어
      HI
    • Türkçe튀르키예어
      TR
    • polski폴란드어
      PL
    • Indonesia인도네시아어
      ID
    • Tiếng Việt베트남어
      VI
    • українська우크라이나어
      UK
    /
    프레임워크로 문서 필터링
    Alt+←
    Intlayer의 이점
    시작하기
    개념
    • Intlayer 작동 방식
    • 구성
    • TestFillBuildWatchExtractLoginPushPullConfigurationListVersionEditorLiveDebugDoc ReviewDoc TranslateSDK
    • 비주얼 편집기
    • CMS
    • CI/CD 통합
    • 번역복수형열거조건성별삽입파일중첩MarkdownHTML함수 가져오기
    • 로케일별 파일
    • 컴파일러
    • 자동 채우기
    • 테스트
    • 번들 최적화
    환경
    • Next.js 14 및 앱 라우터
      Next.js 15
      Next.js 로케일 없는 URL
      Next.js 및 페이지 라우터
      컴파일러
    • Tanstack Start Solid
    • Astro 및 React
      Astro 및 Svelte
      Astro 및 Vue
      Astro 및 Solid
      Astro 및 Preact
      Astro 및 Lit
      Astro 및 Vanilla JS
    • React Router v7
      React Router v7 (fs-routes)
      Compiler
    • Nuxt 및 Vue
    • Vite 및 Solid
    • SvelteKit
    • Vite 및 Preact
    • Vite 및 Vanilla JS
    • Vite 및 Lit
    • Angular 19 (Webpack)
      Analog
    • React CRA
    • React Native 및 Expo
    • Express.js
      NestJS
      Fastify
      Hono
      Adonis
    • Lynx 및 React
    Plugins
    • JSON
    • gettext (.po)
    VS Code 확장 기능
    에이전트
    • MCP 서버
    • 에이전트 기술
    릴리스
    • v8
    • v7
    • v6
    벤치마크
    • Next.js
    • TanStack
    • Vue
    • Solid
    • Svelte
    블로그
    질문 발표
    1. Documentation
    2. 환경
    3. Angular 21
    생성:2025-04-18마지막 업데이트:2026-05-06
    GitHub에서 애플리케이션 템플릿 보기

    이 페이지에는 애플리케이션 템플릿이 제공됩니다.

    쇼케이스 애플리케이션 보기

    이 페이지는 템플릿의 라이브 데모로 연결됩니다.

    이 문서를 원하는 AI 어시스턴트에 참조하세요
    ChatGPT
    Claude
    DeepSeek
    Google AI mode
    Gemini
    Perplexity
    Mistral
    Grok

    이 페이지와 원하는 AI 어시스턴트를 사용하여 문서를 요약합니다

    버전 기록

    1. "Solid useIntlayer API 사용을 직접 속성 액세스로 업데이트"
      v8.9.02026. 5. 4.
    2. "안정화 버전 출시"
      v8.0.02026. 1. 26.
    3. "init 명령어 추가"
      v8.0.02025. 12. 30.
    4. "초기 기록"
      v5.5.102025. 6. 29.

    이 페이지의 콘텐츠는 AI를 사용하여 번역되었습니다.

    영어 원본 내용의 최신 버전을 보기
    문서 수정

    이 문서를 개선할 아이디어가 있으시면 GitHub에 풀 리퀘스트를 제출하여 자유롭게 기여해 주세요.

    문서에 대한 GitHub 링크
    복사

    문서의 Markdown을 클립보드에 복사

    Intlayer를 사용하여 Angular 21(Vite) 웹사이트 번역하기 | 국제화(i18n)

    목차

    Intlayer란 무엇인가요?

    Intlayer는 최신 웹 애플리케이션에서 다국어 지원을 단순화하도록 설계된 혁신적인 오픈 소스 국제화(i18n) 라이브러리입니다.

    Intlayer를 통해 다음을 수행할 수 있습니다:

    • 컴포넌트 수준에서 선언적 사전을 사용하여 번역을 쉽게 관리합니다.
    • 메타데이터, 경로 및 콘텐츠를 동적으로 로컬라이즈합니다.
    • 자동 생성된 유형으로 TypeScript 지원을 보장하여 자동 완성 및 오류 감지를 개선합니다.
    • 동적 로캘 감지 및 전환과 같은 고급 기능의 이점을 활용합니다.

    Angular 애플리케이션에 Intlayer를 설정하는 단계별 가이드

    ide.intlayer.org
    intlayer-angular-21-template.vercel.app

    GitHub에서 애플리케이션 템플릿을 확인하세요.

    1단계: 종속성 설치

    npm을 사용하여 필요한 패키지를 설치합니다:

    bash
    코드 복사

    코드를 클립보드에 복사

    npm install intlayer angular-intlayernpm install @angular-builders/custom-esbuild --save-devnpx intlayer init
    • intlayer

      구성 관리, 번역, 콘텐츠 선언, 트랜스파일링 및 CLI 명령을 위한 국제화 도구를 제공하는 코어 패키지입니다.

    • angular-intlayer Intlayer를 Angular 애플리케이션과 통합하는 패키지입니다. Angular 국제화를 위한 컨텍스트 공급자와 훅을 제공합니다.

    • @angular-builders/custom-esbuild Angular CLI의 esbuild 구성을 사용자 정의하는 데 필요합니다.

    2단계: 프로젝트 구성

    애플리케이션의 언어를 구성하기 위해 구성 파일을 만듭니다:

    intlayer.config.ts
    코드 복사

    코드를 클립보드에 복사

    import { Locales, type IntlayerConfig } from "intlayer";
    
    const config: IntlayerConfig = {
      internationalization: {
        locales: [
          Locales.ENGLISH,
          Locales.FRENCH,
          Locales.SPANISH,
          // 기타 언어
        ],
        defaultLocale: Locales.ENGLISH,
      },
    };
    
    export default config;
    이 구성 파일을 통해 로컬라이즈된 URL, 미들웨어 리디렉션, 쿠키 이름, 콘텐츠 선언의 위치 및 확장자를 설정하고 콘솔에서 Intlayer 로그를 비활성화할 수 있습니다. 사용 가능한 매개변수의 전체 목록은 구성 문서를 참조하세요.

    3단계: Angular 구성에 Intlayer 통합

    Intlayer를 Angular CLI와 통합하려면 사용자 지정 빌더를 사용해야 합니다. 이 가이드에서는 Vite/esbuild(Angular 21 프로젝트의 기본값)를 사용한다고 가정합니다.

    먼저 사용자 지정 esbuild 빌더를 사용하도록 angular.json을 수정합니다. build 및 serve 구성을 업데이트합니다:

    angular.json
    코드 복사

    코드를 클립보드에 복사

    {  "projects": {    "your-app-name": {      "architect": {        "build": {          "builder": "@angular-builders/custom-esbuild:application", // replace "@angular/build:application"          "options": {            "define": {              "process.env": "{}",            },            "plugins": ["./esbuild.plugins.ts"],            "browser": "src/main.ts",            // ...          },        },        "serve": {          "builder": "@angular-builders/custom-esbuild:dev-server", // replace "@angular/build:dev-server"          "options": {            "prebundle": {              "exclude": [                "intlayer",                "angular-intlayer",                "@intlayer/config/built",                "@intlayer/core"              ]          },        },      },    },  },}
    angular.json에서 your-app-name을 프로젝트의 실제 이름으로 바꾸는 것을 잊지 마세요.

    다음으로 프로젝트 루트에 esbuild.plugins.ts 파일을 만듭니다:

    esbuild.plugins.ts
    코드 복사

    코드를 클립보드에 복사

    import { intlayerEsbuildPlugin } from "angular-intlayer/esbuild";export default [intlayerEsbuildPlugin()];
    intlayerEsbuildPlugin 함수는 esbuild를 Intlayer로 구성합니다. 콘텐츠 선언 파일을 처리하는 플러그인을 주입하고 최적의 성능을 위한 구성을 설정합니다.

    NX 사용자: NX의 Angular 빌더는 Node의 네이티브 ESM 해상도를 통해 플러그인 파일을 로드하며 TypeScript 플러그인 파일을 즉석에서 컴파일하지 않습니다. 대신 .mjs 파일을 사용하고 이에 따라 angular.json에서 plugins 참조를 업데이트하십시오:

    esbuild.plugins.mjs
    코드 복사

    코드를 클립보드에 복사

    import { intlayerEsbuildPlugin } from "angular-intlayer/esbuild";export default [intlayerEsbuildPlugin()];

    그런 다음 angular.json에서 "./esbuild.plugins.ts" 대신 "./esbuild.plugins.mjs"를 가리킵니다.

    4단계: 콘텐츠 선언

    번역을 저장하기 위해 콘텐츠 선언을 만들고 관리합니다:

    콘텐츠 선언은 contentDir 디렉터리(기본값은 ./src)에 포함되어 있는 한 애플리케이션의 아무 곳에나 정의할 수 있습니다. 그리고 콘텐츠 선언 파일 확장자(기본값은 .content.{json,ts,tsx,js,jsx,mjs,cjs})와 일치해야 합니다.
    자세한 내용은 콘텐츠 선언 문서를 참조하세요.

    5단계: 코드에서 Intlayer 활용

    전체 Angular 애플리케이션에서 Intlayer의 국제화 기능을 활용하려면 애플리케이션 구성에 Intlayer를 제공해야 합니다.

    src/app/app.config.ts
    코드 복사

    코드를 클립보드에 복사

    import { ApplicationConfig } from "@angular/core";import { provideRouter } from "@angular/router";import { provideIntlayer } from "angular-intlayer";import { routes } from "./app.routes";export const appConfig: ApplicationConfig = {  providers: [    provideRouter(routes),    provideIntlayer(), // 여기에 Intlayer 공급자를 추가합니다  ],};

    그런 다음 임의의 컴포넌트 내에서 useIntlayer 기능을 사용할 수 있습니다.

    src/app/app.component.ts
    코드 복사

    코드를 클립보드에 복사

    import { Component } from "@angular/core";import { RouterOutlet } from "@angular/router";import { useIntlayer } from "angular-intlayer";@Component({  selector: "app-root",  standalone: true,  imports: [RouterOutlet],  templateUrl: "./app.component.html",  styleUrl: "./app.component.css",})export class AppComponent {  content = useIntlayer("app");}

    템플릿에서:

    src/app/app.component.html
    코드 복사

    코드를 클립보드에 복사

    <div class="content">  <h1>{{ content().title }}</h1>  <p>{{ content().congratulations }}</p></div>

    Intlayer 콘텐츠는 Signal로 반환되므로 신호를 호출하여 값에 액세스합니다: content().title.

    (선택 사항) 6단계: 콘텐츠 언어 변경

    콘텐츠 언어를 변경하려면 useLocale 함수에서 제공하는 setLocale 함수를 사용할 수 있습니다. 이를 통해 애플리케이션의 로캘을 설정하고 이에 따라 콘텐츠를 업데이트할 수 있습니다.

    언어를 전환하는 컴포넌트를 만듭니다:

    src/app/locale-switcher.component.ts
    코드 복사

    코드를 클립보드에 복사

    import { Component } from "@angular/core";import { CommonModule } from "@angular/common";import { useLocale } from "angular-intlayer";@Component({  selector: "app-locale-switcher",  standalone: true,  imports: [CommonModule],  template: `    <div class="locale-switcher">      <select        [value]="locale()"        (change)="setLocale($any($event.target).value)"      >        @for (loc of availableLocales; track loc) {          <option [value]="loc">{{ loc }}</option>        }      </select>    </div>  `,})export class LocaleSwitcherComponent {  localeCtx = useLocale();  locale = this.localeCtx.locale;  availableLocales = this.localeCtx.availableLocales;  setLocale = this.localeCtx.setLocale;}

    그런 다음 이 컴포넌트를 app.component.ts에서 사용합니다:

    src/app/app.component.ts
    코드 복사

    코드를 클립보드에 복사

    import { Component } from "@angular/core";import { RouterOutlet } from "@angular/router";import { useIntlayer } from "angular-intlayer";import { LocaleSwitcherComponent } from "./locale-switcher.component";@Component({  selector: "app-root",  standalone: true,  imports: [RouterOutlet, LocaleSwitcherComponent],  templateUrl: "./app.component.html",  styleUrl: "./app.component.css",})export class AppComponent {  content = useIntlayer("app");}

    TypeScript 구성

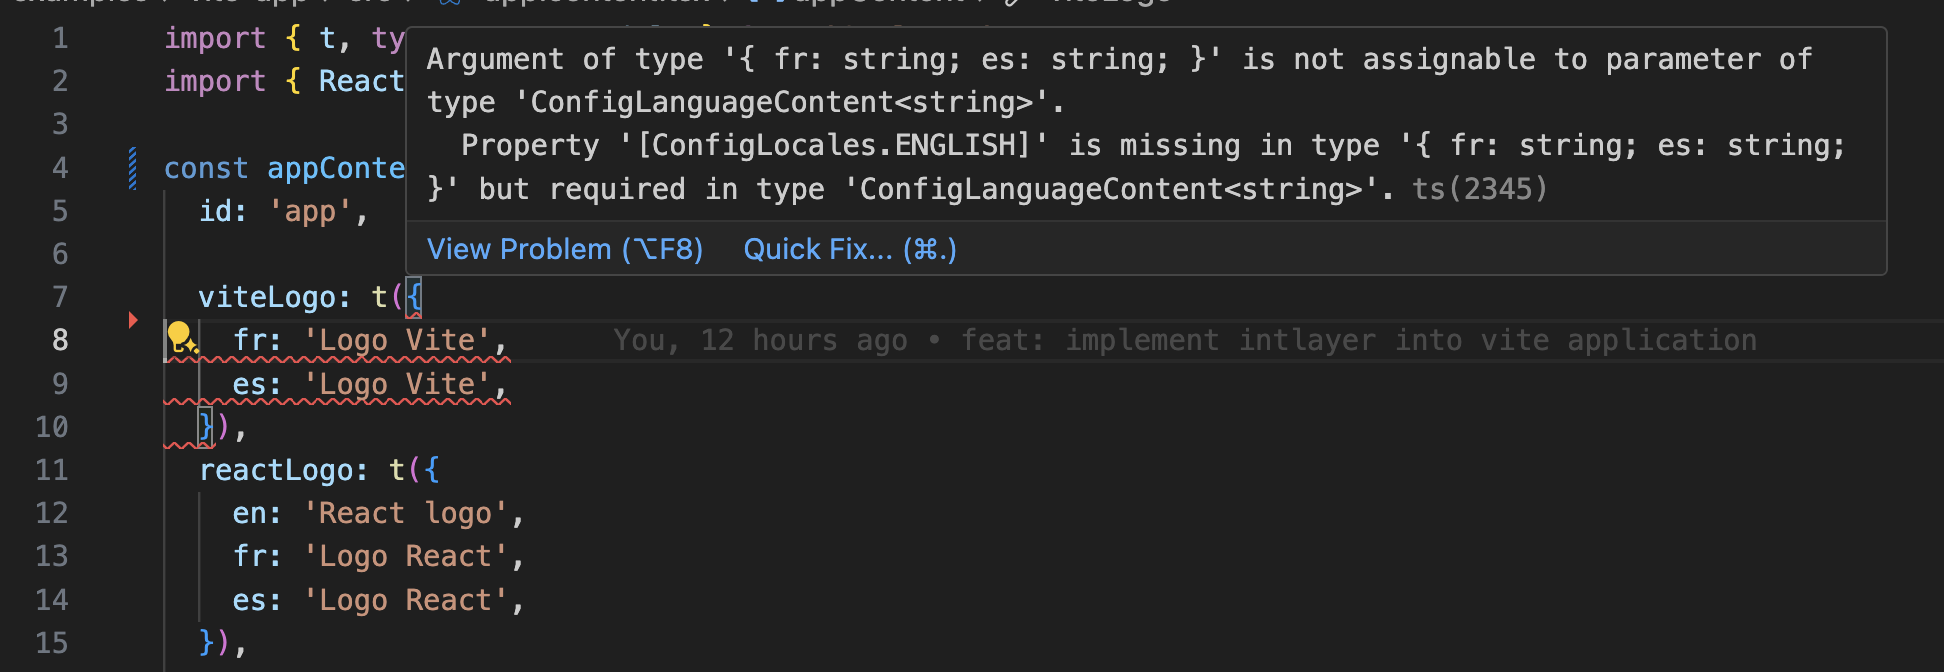
    Intlayer는 모듈 증강(Module Augmentation)을 사용하여 TypeScript의 이점을 얻고 코드베이스를 더 강력하게 만듭니다.

    자동 완성

    번역 오류

    TypeScript 구성에 자동 생성된 유형이 포함되어 있는지 확인하십시오.

    tsconfig.json
    코드 복사

    코드를 클립보드에 복사

    {  // ... 기존 TypeScript 구성  "include": [    // ... 기존 TypeScript 구성    ".intlayer/**/*.ts", // 자동 생성된 유형 포함  ],}

    Git 구성

    Intlayer에서 생성된 파일을 무시하는 것이 좋습니다. 이렇게 하면 Git 리포지토리에 커밋되는 것을 피할 수 있습니다.

    이를 위해 .gitignore 파일에 다음 지침을 추가할 수 있습니다:

    bash
    코드 복사

    코드를 클립보드에 복사

    # Intlayer에 의해 생성된 파일 무시.intlayer

    VS Code 확장

    Intlayer를 통한 개발 경험을 개선하기 위해 공식 Intlayer VS Code Extension을 설치할 수 있습니다.

    VS Code Marketplace에서 설치

    이 확장은 다음을 제공합니다:

    • 번역 키를 위한 자동 완성.
    • 누락된 번역에 대한 실시간 오류 감지.
    • 번역된 콘텐츠의 인라인 미리보기.
    • 번역을 쉽게 만들고 업데이트할 수 있는 빠른 작업.

    확장을 사용하는 방법에 대한 자세한 내용은 Intlayer VS Code 확장 문서를 참조하세요.


    더 나아가기

    더 나아가려면 시각적 편집기를 구현하거나 CMS를 사용하여 콘텐츠를 외부화할 수 있습니다.


    Vite 및 Lit
    Angular 19 (Webpack)
    Alt+→

    이 페이지에서

      토론은 익명이며 일반적인 문제를 해결하기 위해 정기적으로 검토됩니다. 기능 아이디어, 문서에 대한 피드백 또는 Intlayer와 관련된 모든 것을 자유롭게 공유하세요, 이 의견을 로드맵 구성과 제품 개선에 활용합니다.

      npm install intlayer angular-intlayernpm install @angular-builders/custom-esbuild --save-devnpx intlayer init
      {  "projects": {    "your-app-name": {      "architect": {        "build": {          "builder": "@angular-builders/custom-esbuild:application", // replace "@angular/build:application"          "options": {            "define": {              "process.env": "{}",            },            "plugins": ["./esbuild.plugins.ts"],            "browser": "src/main.ts",            // ...          },        },        "serve": {          "builder": "@angular-builders/custom-esbuild:dev-server", // replace "@angular/build:dev-server"          "options": {            "prebundle": {              "exclude": [                "intlayer",                "angular-intlayer",                "@intlayer/config/built",                "@intlayer/core"              ]          },        },      },    },  },}
      import { intlayerEsbuildPlugin } from "angular-intlayer/esbuild";export default [intlayerEsbuildPlugin()];
      import { intlayerEsbuildPlugin } from "angular-intlayer/esbuild";export default [intlayerEsbuildPlugin()];
      import { ApplicationConfig } from "@angular/core";import { provideRouter } from "@angular/router";import { provideIntlayer } from "angular-intlayer";import { routes } from "./app.routes";export const appConfig: ApplicationConfig = {  providers: [    provideRouter(routes),    provideIntlayer(), // 여기에 Intlayer 공급자를 추가합니다  ],};
      import { Component } from "@angular/core";import { RouterOutlet } from "@angular/router";import { useIntlayer } from "angular-intlayer";@Component({  selector: "app-root",  standalone: true,  imports: [RouterOutlet],  templateUrl: "./app.component.html",  styleUrl: "./app.component.css",})export class AppComponent {  content = useIntlayer("app");}
      <div class="content">  <h1>{{ content().title }}</h1>  <p>{{ content().congratulations }}</p></div>
      import { Component } from "@angular/core";import { CommonModule } from "@angular/common";import { useLocale } from "angular-intlayer";@Component({  selector: "app-locale-switcher",  standalone: true,  imports: [CommonModule],  template: `    <div class="locale-switcher">      <select        [value]="locale()"        (change)="setLocale($any($event.target).value)"      >        @for (loc of availableLocales; track loc) {          <option [value]="loc">{{ loc }}</option>        }      </select>    </div>  `,})export class LocaleSwitcherComponent {  localeCtx = useLocale();  locale = this.localeCtx.locale;  availableLocales = this.localeCtx.availableLocales;  setLocale = this.localeCtx.setLocale;}
      import { Component } from "@angular/core";import { RouterOutlet } from "@angular/router";import { useIntlayer } from "angular-intlayer";import { LocaleSwitcherComponent } from "./locale-switcher.component";@Component({  selector: "app-root",  standalone: true,  imports: [RouterOutlet, LocaleSwitcherComponent],  templateUrl: "./app.component.html",  styleUrl: "./app.component.css",})export class AppComponent {  content = useIntlayer("app");}
      {  // ... 기존 TypeScript 구성  "include": [    // ... 기존 TypeScript 구성    ".intlayer/**/*.ts", // 자동 생성된 유형 포함  ],}
      # Intlayer에 의해 생성된 파일 무시.intlayer