ホームサンドボックスショーケースアプリ文書ブログ
    • English英語
      EN
    • русскийロシア語
      RU
    • 日本語日本語
      JA
    • françaisフランス語
      FR
    • 한국어韓国語
      KO
    • 中文中国語
      ZH
    • españolスペイン語
      ES
    • Deutschドイツ語
      DE
    • العربيةアラビア語
      AR
    • italianoイタリア語
      IT
    • British Englishイギリス英語
      EN-GB
    • portuguêsポルトガル語
      PT
    • हिन्दीヒンディー語
      HI
    • Türkçeトルコ語
      TR
    • polskiポーランド語
      PL
    • Indonesiaインドネシア語
      ID
    • Tiếng Việtベトナム語
      VI
    • українськаウクライナ語
      UK
    /
    フレームワークでドキュメントをフィルター
    Alt+←
    なぜIntlayer?
    始める
    コンセプト
    • Intlayerの仕組み
    • 設定
    • TestFillBuildWatchExtractLoginPushPullConfigurationListVersionEditorLiveDebugDoc ReviewDoc TranslateSDK
    • ビジュアルエディター
    • CMS
    • CI/CD統合
    • 翻訳複数形列挙条件性別挿入ファイルネスティングMarkdownHTML関数取得
    • ロケールごとのファイル
    • コンパイラー
    • 自動入力
    • テスト
    • バンドル最適化
    環境
    • Next.js 14とApp Router
      Next.js 15
      Next.js ロケールなし URL
      Next.jsとページルーター
      コンパイラ
    • Tanstack Start Solid
    • AstroおよびReact
      AstroおよびSvelte
      AstroおよびVue
      AstroおよびSolid
      AstroおよびPreact
      AstroおよびLit
      AstroおよびVanilla JS
    • React Router v7
      React Router v7 (fs-routes)
      Compiler
    • NuxtおよびVue
    • ViteおよびSolid
    • SvelteKit
    • ViteおよびPreact
    • ViteおよびVanilla JS
    • ViteおよびLit
    • Angular 19 (Webpack)
      Analog
    • React CRA
    • React NativeとExpo
    • Express.js
      NestJS
      Fastify
      Hono
      Adonis
    • LynxおよびReact
    Plugins
    • JSON
    • gettext (.po)
    VS Code拡張機能
    エージェント
    • MCPサーバー
    • エージェントのスキル
    リリース
    • v8
    • v7
    • v6
    ベンチマーク
    • Next.js
    • TanStack
    • Vue
    • Solid
    • Svelte
    ブログ
    質問をする
    1. Documentation
    2. 環境
    3. Astro
    4. Vanilla
    \n```\n\n> **固定の維持に関する注意:**\n> `installIntlayer` は、サーバーによって定義されたロケールでIntlayerシングルトンを初期化します。`onLocaleChange` を伴う `useLocale` は、移動前にミドルウェアを介して言語クッキーを設定し、将来の訪問時にユーザーの好みが記憶されるようにします。\n\n> **プログレッシブエンハンスメントに関する注意:**\n> 言語切り替えリンクは、JavaScriptがなくても標準の `` タグとして機能します。JSが利用可能な場合、`setLocale` の呼び出しが移動前にクッキーを更新するため、ミドルウェアが正しいリダイレクトを実行できます。\n\n### ステップ7: サイトマップとRobots.txt\n\nIntlayerは、動的にローカライズされたサイトマップとrobots.txtファイルを生成するためのユーティリティを提供します。\n\n#### サイトマップ\n\nIntlayer には、アプリケーションのサイトマップを簡単に作成できるサイトマップ ジェネレーターが組み込まれています。ローカライズされたルートを処理し、検索エンジンに必要なメタデータを追加します。\n\n> Intlayer によって生成されたサイトマップは、`xhtml:link` 名前空間 (Hreflang XML Extensions) をサポートしています。生の URL のみを表示するデフォルトのサイトマップ ジェネレーターとは異なり、Intlayer はページのすべての言語バージョン (例: `/about`、`/about?lang=fr`、`/about?lang=es`) 間に必要な双方向リンクを自動的に作成します。これにより、検索エンジンが正しい言語バージョンを正しい対象者に正しくインデックス付けして提供できるようになります。\n\nすべてのローカライズされたルートを含むサイトマップを生成するために、`src/pages/sitemap.xml.ts` を作成します。\n\n```typescript fileName=\"src/pages/sitemap.xml.ts\"\nimport type { APIRoute } from \"astro\";\nimport { generateSitemap, type SitemapUrlEntry } from \"intlayer\";\n\nconst pathList: SitemapUrlEntry[] = [\n { path: \"/\", changefreq: \"daily\", priority: 1.0 },\n { path: \"/about\", changefreq: \"monthly\", priority: 0.7 },\n];\n\nconst SITE_URL = import.meta.env.SITE ?? \"http://localhost:4321\";\n\nexport const GET: APIRoute = async ({ site }) => {\n const xmlOutput = generateSitemap(pathList, { siteUrl: SITE_URL });\n\n return new Response(xmlOutput, {\n headers: { \"Content-Type\": \"application/xml\" },\n });\n};\n```\n\n#### Robots.txt\n\n検索エンジンのクロールを制御するために `src/pages/robots.txt.ts` を作成します。\n\n```typescript fileName=\"src/pages/robots.txt.ts\"\nimport type { APIRoute } from \"astro\";\nimport { getMultilingualUrls } from \"intlayer\";\n\nconst getAllMultilingualUrls = (urls: string[]) =>\n urls.flatMap((url) => Object.values(getMultilingualUrls(url)) as string[]);\n\nconst disallowedPaths = getAllMultilingualUrls([\"/admin\", \"/private\"]);\n\nexport const GET: APIRoute = ({ site }) => {\n const robotsTxt = [\n \"User-agent: *\",\n \"Allow: /\",\n ...disallowedPaths.map((path) => `Disallow: ${path}`),\n \"\",\n `Sitemap: ${new URL(\"/sitemap.xml\", site).href}`,\n ].join(\"\\n\");\n\n return new Response(robotsTxt, {\n headers: { \"Content-Type\": \"text/plain\" },\n });\n};\n```\n\n### TypeScriptの設定\n\nIntlayerはモジュール拡張を使用してTypeScriptの利点を活かし、コードベースをより堅牢にします。\n\n![オートコンプリート](https://github.com/aymericzip/intlayer/blob/main/docs/assets/autocompletion.png?raw=true)\n\n![翻訳エラー](https://github.com/aymericzip/intlayer/blob/main/docs/assets/translation_error.png?raw=true)\n\nTypeScriptの設定に自動生成された型が含まれていることを確認してください。\n\n```json5 fileName=\"tsconfig.json\"\n{\n // ... 既存のTypeScript設定\n include: [\n // ... 既存のTypeScript設定\n \".intlayer/**/*.ts\", // 自動生成された型を含める\n ],\n}\n```\n\n### Gitの設定\n\nIntlayerによって生成されたファイルを無視することをお勧めします。これにより、それらをGitリポジトリにコミットすることを避けることができます。\n\nそのためには、`.gitignore`ファイルに以下の指示を追加してください:\n\n```bash\n# Intlayerによって生成されたファイルを無視\n.intlayer\n```\n\n### VS Code拡張機能\n\nIntlayerを使用した開発体験を向上させるために、**公式のIntlayer VS Code拡張機能**をインストールできます。\n\n[VS Code Marketplaceからインストール](https://marketplace.visualstudio.com/items?itemName=intlayer.intlayer-vs-code-extension)\n\nこの拡張機能は以下を提供します:\n\n- 翻訳キーの**オートコンプリート**。\n- 欠落している翻訳の**リアルタイムエラー検出**。\n- 翻訳されたコンテンツの**インラインプレビュー**。\n- 翻訳を簡単に作成・更新するための**クイックアクション**。\n\n拡張機能の使用方法の詳細については、[Intlayer VS Code拡張機能のドキュメント](https://intlayer.org/doc/vs-code-extension)を参照してください。\n\n---\n\n### (Optional) Step 15: Extract the content of your components\n\nIf you have an existing codebase, transforming thousands of files can be time-consuming.\n\nTo ease this process, Intlayer propose a [compiler](/ja/doc/compiler) / [extractor](/ja/doc/concept/cli/extract) to transform your components and extract the content.\n\nTo set it up, you can add a `compiler` section in your `intlayer.config.ts` file:\n\n```typescript fileName=\"intlayer.config.ts\" codeFormat={[\"typescript\", \"esm\", \"commonjs\"]}\nimport { type IntlayerConfig } from \"intlayer\";\n\nconst config: IntlayerConfig = {\n // ... Rest of your config\n compiler: {\n /**\n * Indicates if the compiler should be enabled.\n */\n enabled: true,\n\n /**\n * Defines the output files path\n */\n output: ({ fileName, extension }) => `./${fileName}${extension}`,\n\n /**\n * Indicates if the components should be saved after being transformed.\n *\n * - If `true`, the compiler will rewrite the component file in the disk. So the transformation will be permanent, and the compiler will skip the transformation for the next process. That way, the compiler can transform the app, and then it can be removed.\n *\n * - If `false`, the compiler will inject the `useIntlayer()` function call into the code in the build output only, and keep the base codebase intact. The transformation will be done only in memory.\n */\n saveComponents: false,\n\n /**\n * Dictionary key prefix\n */\n dictionaryKeyPrefix: \"\",\n },\n};\n\nexport default config;\n```\n\n\n \n\nRun the extractor to transform your components and extract the content\n\n```bash packageManager=\"npm\"\nnpx intlayer extract\n```\n\n```bash packageManager=\"pnpm\"\npnpm intlayer extract\n```\n\n```bash packageManager=\"yarn\"\nyarn intlayer extract\n```\n\n```bash packageManager=\"bun\"\nbun x intlayer extract\n```\n\n \n \n\nUpdate your `vite.config.ts` to include the `intlayerCompiler` plugin:\n\n```ts fileName=\"vite.config.ts\"\nimport { defineConfig } from \"vite\";\nimport { intlayer, intlayerCompiler } from \"vite-intlayer\";\n\nexport default defineConfig({\n plugins: [\n intlayer(),\n intlayerCompiler(), // Adds the compiler plugin\n ],\n});\n```\n\n```bash packageManager=\"npm\"\nnpm run build # Or npm run dev\n```\n\n```bash packageManager=\"pnpm\"\npnpm run build # Or pnpm run dev\n```\n\n```bash packageManager=\"yarn\"\nyarn build # Or yarn dev\n```\n\n```bash packageManager=\"bun\"\nbun run build # Or bun run dev\n```\n\n \n\n\n---\n\n### さらに詳しく\n\nさらに詳しく知りたい場合は、[ビジュアルエディター](/ja/doc/concept/editor)を実装したり、[CMS](/ja/doc/concept/cms)を使用してコンテンツを外部化したりすることもできます。\n","about":"Intlayerを使用してAstro + Vanilla JSサイトに国際化(i18n)を追加する方法を学びます。このガイドに従って、サイトを多言語化しましょう。","url":"https://intlayer.org/ja/doc/environment/astro/vanilla","datePublished":"24-04-2026","dateModified":"06-05-2026","keywords":"国際化, ドキュメント, Intlayer, Astro, Vanilla JS, JavaScript, TypeScript","license":"https://raw.githubusercontent.com/aymericzip/intlayer/refs/heads/main/LICENSE","audience":{"@type":"Audience","audienceType":"開発者、コンテンツマネージャー"}}
    作成:2026-04-24最終更新:2026-05-06
    GitHubでアプリケーションテンプレートを見る

    このページにはアプリケーションテンプレートが用意されています。

    ショーケースアプリケーションを見る

    このページはテンプレートのライブデモにリンクしています。

    このドキュメントをあなたの好きなAIアシスタントに参照してください
    ChatGPT
    Claude
    DeepSeek
    Google AI mode
    Gemini
    Perplexity
    Mistral
    Grok

    このページとあなたの好きなAIアシスタントを使ってドキュメントを要約します

    バージョン履歴

    1. "Solid の useIntlayer API の使用法を直接プロパティアクセスに更新"
      v8.9.02026/5/4
    2. "Astro + Vanilla JSの初期ドキュメント"
      v8.7.72026/4/24

    このページのコンテンツはAIを使用して翻訳されました。

    英語の元のコンテンツの最新バージョンを見る
    このドキュメントを編集

    このドキュメントを改善するアイデアがある場合は、GitHubでプルリクエストを送信することで自由に貢献してください。

    ドキュメントへのGitHubリンク
    コピー

    ドキュメントのMarkdownをクリップボードにコピー

    Intlayerを使用したAstro + Vanilla JSサイトの翻訳 | 国際化 (i18n)

    ide.intlayer.org
    intlayer-astro-template.vercel.app

    目次

    Intlayerとは?

    Intlayerは、現代的なウェブアプリケーションでの多言語サポートを簡素化するために設計された、革新的でオープンソースの国際化 (i18n) ライブラリです。

    Intlayerを使用すると、以下のことが可能になります:

    • 翻訳の管理が容易:コンポーネントレベルの宣言型辞書を使用します。
    • 動的なローカライズ:メタデータ、ルート、コンテンツを動的にローカライズできます。
    • TypeScriptのサポート:自動生成された型により、オートコンプリートやエラー検出が向上します。
    • 高度な機能:動的なロケール検出や切り替えなどの機能を利用できます。

    Astro + Vanilla JSへのIntlayer設定ステップバイステップガイド

    GitHubでアプリケーションテンプレートを表示。

    ステップ1: 依存関係のインストール

    お好みのパッケージマネージャーを使用して、必要なパッケージをインストールします:

    bash
    コードをコピー

    コードをクリップボードにコピー

    npm install intlayer astro-intlayer vanilla-intlayernpx intlayer init
    • intlayer 設定管理、翻訳、コンテンツ宣言、トランスパイル、およびCLIコマンドのための国際化ツールを提供するコアパッケージ。

    • astro-intlayer IntlayerをViteバンドラーと統合するためのAstro統合プラグイン、およびユーザーの優先ロケールの検出、クッキーの管理、URLリダイレクトの処理を行うミドルウェアが含まれています。

    • vanilla-intlayer IntlayerをVanilla JavaScript / TypeScriptアプリケーションと統合するパッケージ。UIフレームワークを使用せずに、Astroの <script> タグの任意の部分が言語変更に応答できるように、pub/subシングルトン (IntlayerClient) とコールバックベースのヘルパー (useIntlayer、useLocale など) を提供します。

    ステップ2: プロジェクトの設定

    アプリケーションの言語を設定するための設定ファイルを作成します:

    intlayer.config.ts
    コードをコピー

    コードをクリップボードにコピー

    import { Locales, type IntlayerConfig } from "intlayer";const config: IntlayerConfig = {  internationalization: {    locales: [      Locales.ENGLISH,      Locales.FRENCH,      Locales.SPANISH,      // その他のロケール    ],    defaultLocale: Locales.ENGLISH,  },};export default config;
    この設定ファイルを使用して、ローカライズされたURL、ミドルウェアのリダイレクト、クッキー名、コンテンツ宣言の場所と拡張子、コンソールでのIntlayerログの無効化などを設定できます。利用可能なパラメータの全リストについては、設定ドキュメントを参照してください。

    ステップ3: Astro設定へのIntlayerの統合

    Astroの設定にintlayerプラグインを追加します。Vanilla JSの場合、追加のUIフレームワーク統合は必要ありません。

    astro.config.ts
    コードをコピー

    コードをクリップボードにコピー

    // @ts-checkimport { intlayer } from "astro-intlayer";import { defineConfig } from "astro/config";// https://astro.build/configexport default defineConfig({  integrations: [intlayer()],});
    Astro統合プラグイン intlayer() は、IntlayerをAstroと統合するために使用されます。コンテンツ宣言ファイルの構築を確実にし、開発モードで監視します。Astroアプリケーション内でIntlayerの環境変数を定義し、パフォーマンス最適化のためのエイリアスを提供します。

    ステップ4: コンテンツの宣言

    翻訳を保存するためのコンテンツ宣言を作成・管理します:

    src/app.content.ts
    コードをコピー

    コードをクリップボードにコピー

    import { t, type Dictionary } from "intlayer";const appContent = {  key: "app",  content: {    greeting: t({      en: "Hello World",      fr: "Bonjour le monde",      es: "Hola mundo",      ja: "こんにちは世界",    }),    description: t({      en: "Welcome to my multilingual Astro site.",      fr: "Bienvenue sur mon site Astro multilingue.",      es: "Bienvenido a mi sitio Astro multilingüe.",      ja: "多言語対応のAstroサイトへようこそ。",    }),    switchLocale: t({      en: "Switch language:",      fr: "Changer de langue :",      es: "Cambiar idioma:",      ja: "言語を切り替える:",    }),  },} satisfies Dictionary;export default appContent;
    コンテンツ宣言は、contentDir(デフォルトは ./src)に含まれ、コンテンツ宣言ファイルの拡張子(デフォルトは .content.{json,ts,tsx,js,jsx,mjs,cjs})と一致していれば、アプリケーション内のどこにでも定義できます。
    詳細については、コンテンツ宣言のドキュメントを参照してください。

    ステップ5: Astroでのコンテンツの使用

    Vanilla JSの場合、初期のサーバーサイドレンダリングには .astro ファイル内で getIntlayer を使用してすべてのレンダリングが行われます。その後、<script> ブロックがクライアントサイドで vanilla-intlayer を初期化し、言語の切り替えを処理します。

    src/pages/[...locale]/index.astro
    コードをコピー

    コードをクリップボードにコピー

    ---import {  getIntlayer,  getLocaleFromPath,  getLocalizedUrl,  getPrefix,  getLocaleName,  localeMap,  locales,  defaultLocale,  getPathWithoutLocale,  type LocalesValues,} from "intlayer";export const getStaticPaths = () => {  return localeMap(({ locale }) => ({    params: { locale: getPrefix(locale).localePrefix },  }));};const locale = getLocaleFromPath(Astro.url.pathname) as LocalesValues;const pathWithoutLocale = getPathWithoutLocale(Astro.url.pathname);const { greeting, description, switchLocale } = getIntlayer("app", locale);---<!doctype html><html lang={locale} dir={getHTMLTextDir(locale)}>  <head>    <meta charset="utf-8" />    <meta name="viewport" content="width=device-width" />    <link rel="icon" type="image/svg+xml" href="/favicon.svg" />    <title>{greeting}</title>    <!-- 正規リンク -->    <link      rel="canonical"      href={new URL(getLocalizedUrl(Astro.url.pathname, locale), Astro.site)}    />    <!-- Hreflangリンク -->    {      localeMap(({ locale: mapLocale }) => (        <link          rel="alternate"          hreflang={mapLocale}          href={new URL(            getLocalizedUrl(Astro.url.pathname, mapLocale),            Astro.site          )}        />      ))    }    <link      rel="alternate"      hreflang="x-default"      href={new URL(        getLocalizedUrl(Astro.url.pathname, defaultLocale),        Astro.site      )}    />  </head>  <body>    <main>      <h1 id="greeting">{greeting}</h1>      <p id="description">{description}</p>      <div class="locale-switcher">        <span class="switcher-label">{switchLocale}</span>        <div class="locale-buttons">          {            locales.map((localeItem) => (              <a                href={localeItem === locale ? undefined : getLocalizedUrl(pathWithoutLocale, localeItem)}                class={`locale-btn ${localeItem === locale ? "active" : ""}`}                data-locale={localeItem}                aria-disabled={localeItem === locale}              >                {getLocaleName(localeItem)}              </a>            ))          }        </div>      </div>    </main>  </body></html>
    alt、title、href、aria-label などの 文字列 属性でコンテンツを使用したい場合は、次のように関数の値を使用できます。
    html
    コードをコピー

    コードをクリップボードにコピー

    <img src="{content.image.src.value}" alt="{content.image.value}" /><img src="{content.image.src.toString()}" alt="{content.image.toString()}" /><img src="{String(content.image.src)}" alt="{String(content.image)}" />

    ルーティング設定に関する注意: 使用するディレクトリ構造は、intlayer.config.ts の middleware.routing 設定によります:

    • prefix-no-default(デフォルト): ルート(プレフィックスなし)にデフォルト言語を保持し、他の言語にはプレフィックスを付けます。すべてのケースをキャッチするために [...locale] を使用します。
    • prefix-all: すべてのURLに言語プレフィックスが付きます。ルートを個別に処理する必要がない場合は、標準の [locale] を使用できます。
    • search-param または no-prefix: ロケールフォルダは不要です。ロケールは検索パラメータまたはクッキーを通じて処理されます。

    ステップ6: 言語切り替え機能の追加

    AstroでのVanilla JSの場合、言語切り替えは通常のリンクとしてサーバーサイドでレンダリングされ、クライアントサイドで <script> ブロックを通じてハイドレーションされます。ユーザーが言語リンクをクリックすると、vanilla-intlayer がローカライズされたURLに移動する前に setLocale を通じて言語クッキーを設定します。

    src/pages/[...locale]/index.astro
    コードをコピー

    コードをクリップボードにコピー

    <!-- サーバーサイドのマークアップは上記のステップ5を参照 --><script>  import { installIntlayer, useLocale } from "vanilla-intlayer";  import { getLocaleFromPath, getLocalizedUrl, type LocalesValues } from "intlayer";  // 現在のURLからロケールを使用してクライアントサイドのIntlayerを初期化  const locale = getLocaleFromPath(window.location.pathname);  installIntlayer({ locale: locale as LocalesValues });  const { setLocale } = useLocale({    onLocaleChange: (newLocale: LocalesValues) => {      window.location.href = getLocalizedUrl(window.location.pathname, newLocale);    },  });  // 言語切り替えリンクにクリックイベントをアタッチ  const localeLinks = document.querySelectorAll("[data-locale]");  localeLinks.forEach((link) => {    link.addEventListener("click", (e) => {      const localeValue = link.getAttribute("data-locale") as LocalesValues;      if (localeValue && localeValue !== locale) {        e.preventDefault();        setLocale(localeValue);      }    });  });</script>

    固定の維持に関する注意: installIntlayer は、サーバーによって定義されたロケールでIntlayerシングルトンを初期化します。onLocaleChange を伴う useLocale は、移動前にミドルウェアを介して言語クッキーを設定し、将来の訪問時にユーザーの好みが記憶されるようにします。

    プログレッシブエンハンスメントに関する注意: 言語切り替えリンクは、JavaScriptがなくても標準の <a> タグとして機能します。JSが利用可能な場合、setLocale の呼び出しが移動前にクッキーを更新するため、ミドルウェアが正しいリダイレクトを実行できます。

    ステップ7: サイトマップとRobots.txt

    Intlayerは、動的にローカライズされたサイトマップとrobots.txtファイルを生成するためのユーティリティを提供します。

    サイトマップ

    Intlayer には、アプリケーションのサイトマップを簡単に作成できるサイトマップ ジェネレーターが組み込まれています。ローカライズされたルートを処理し、検索エンジンに必要なメタデータを追加します。

    Intlayer によって生成されたサイトマップは、xhtml:link 名前空間 (Hreflang XML Extensions) をサポートしています。生の URL のみを表示するデフォルトのサイトマップ ジェネレーターとは異なり、Intlayer はページのすべての言語バージョン (例: /about、/about?lang=fr、/about?lang=es) 間に必要な双方向リンクを自動的に作成します。これにより、検索エンジンが正しい言語バージョンを正しい対象者に正しくインデックス付けして提供できるようになります。

    すべてのローカライズされたルートを含むサイトマップを生成するために、src/pages/sitemap.xml.ts を作成します。

    src/pages/sitemap.xml.ts
    コードをコピー

    コードをクリップボードにコピー

    import type { APIRoute } from "astro";import { generateSitemap, type SitemapUrlEntry } from "intlayer";const pathList: SitemapUrlEntry[] = [  { path: "/", changefreq: "daily", priority: 1.0 },  { path: "/about", changefreq: "monthly", priority: 0.7 },];const SITE_URL = import.meta.env.SITE ?? "http://localhost:4321";export const GET: APIRoute = async ({ site }) => {  const xmlOutput = generateSitemap(pathList, { siteUrl: SITE_URL });  return new Response(xmlOutput, {    headers: { "Content-Type": "application/xml" },  });};

    Robots.txt

    検索エンジンのクロールを制御するために src/pages/robots.txt.ts を作成します。

    src/pages/robots.txt.ts
    コードをコピー

    コードをクリップボードにコピー

    import type { APIRoute } from "astro";import { getMultilingualUrls } from "intlayer";const getAllMultilingualUrls = (urls: string[]) =>  urls.flatMap((url) => Object.values(getMultilingualUrls(url)) as string[]);const disallowedPaths = getAllMultilingualUrls(["/admin", "/private"]);export const GET: APIRoute = ({ site }) => {  const robotsTxt = [    "User-agent: *",    "Allow: /",    ...disallowedPaths.map((path) => `Disallow: ${path}`),    "",    `Sitemap: ${new URL("/sitemap.xml", site).href}`,  ].join("\n");  return new Response(robotsTxt, {    headers: { "Content-Type": "text/plain" },  });};

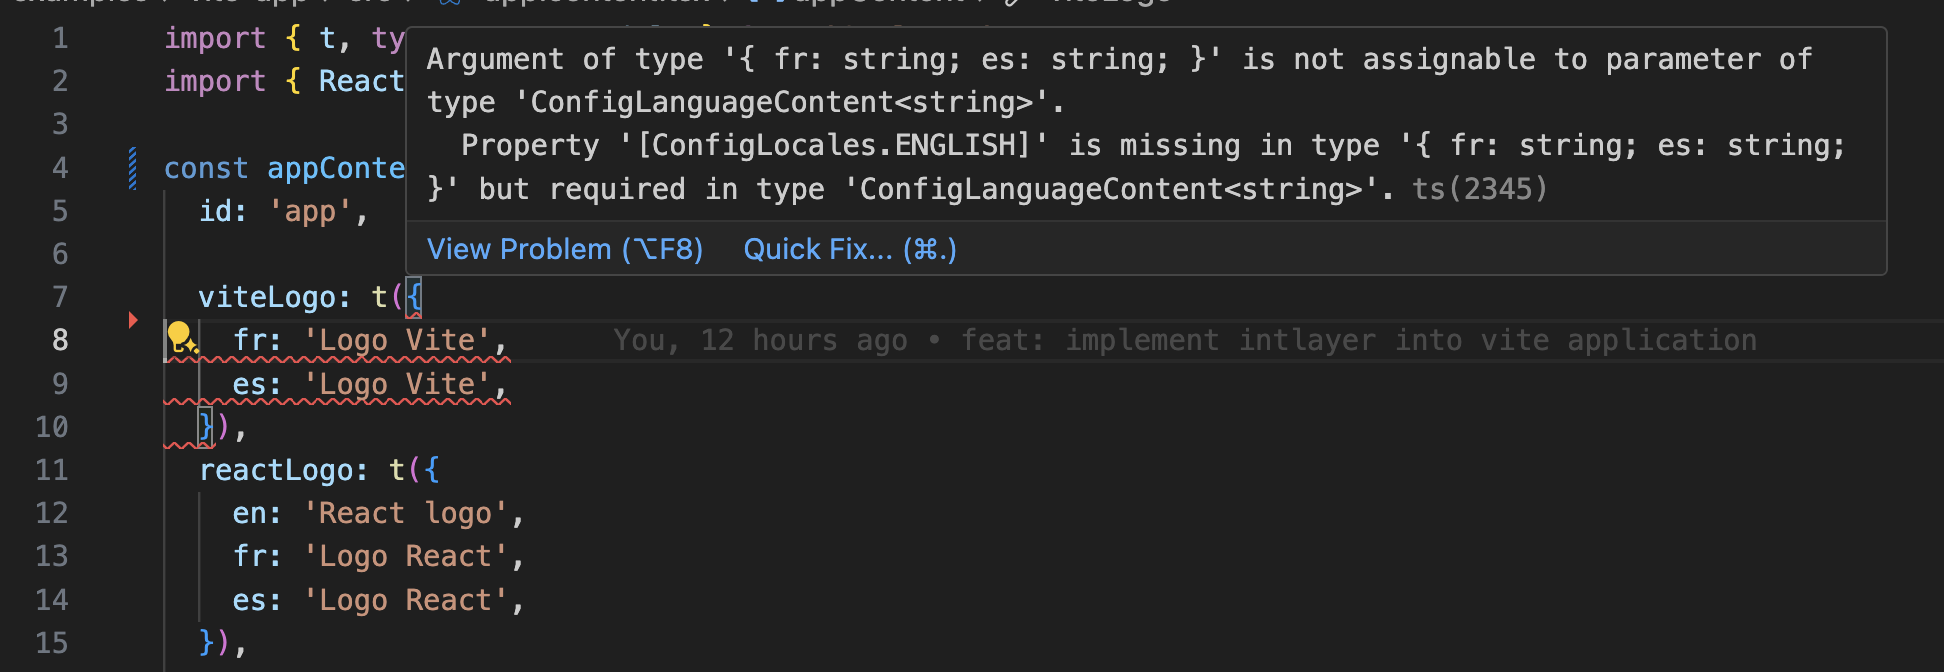
    TypeScriptの設定

    Intlayerはモジュール拡張を使用してTypeScriptの利点を活かし、コードベースをより堅牢にします。

    オートコンプリート

    翻訳エラー

    TypeScriptの設定に自動生成された型が含まれていることを確認してください。

    tsconfig.json
    コードをコピー

    コードをクリップボードにコピー

    {  // ... 既存のTypeScript設定  include: [    // ... 既存のTypeScript設定    ".intlayer/**/*.ts", // 自動生成された型を含める  ],}

    Gitの設定

    Intlayerによって生成されたファイルを無視することをお勧めします。これにより、それらをGitリポジトリにコミットすることを避けることができます。

    そのためには、.gitignoreファイルに以下の指示を追加してください:

    bash
    コードをコピー

    コードをクリップボードにコピー

    # Intlayerによって生成されたファイルを無視.intlayer

    VS Code拡張機能

    Intlayerを使用した開発体験を向上させるために、公式のIntlayer VS Code拡張機能をインストールできます。

    VS Code Marketplaceからインストール

    この拡張機能は以下を提供します:

    • 翻訳キーのオートコンプリート。
    • 欠落している翻訳のリアルタイムエラー検出。
    • 翻訳されたコンテンツのインラインプレビュー。
    • 翻訳を簡単に作成・更新するためのクイックアクション。

    拡張機能の使用方法の詳細については、Intlayer VS Code拡張機能のドキュメントを参照してください。


    (Optional) Step 15: Extract the content of your components

    If you have an existing codebase, transforming thousands of files can be time-consuming.

    To ease this process, Intlayer propose a compiler / extractor to transform your components and extract the content.

    To set it up, you can add a compiler section in your intlayer.config.ts file:

    intlayer.config.ts
    コードをコピー

    コードをクリップボードにコピー

    import { type IntlayerConfig } from "intlayer";
    
    const config: IntlayerConfig = {
      // ... Rest of your config
      compiler: {
        /**
         * Indicates if the compiler should be enabled.
         */
        enabled: true,
    
        /**
         * Defines the output files path
         */
        output: ({ fileName, extension }) => `./${fileName}${extension}`,
    
        /**
         * Indicates if the components should be saved after being transformed.
         *
         * - If `true`, the compiler will rewrite the component file in the disk. So the transformation will be permanent, and the compiler will skip the transformation for the next process. That way, the compiler can transform the app, and then it can be removed.
         *
         * - If `false`, the compiler will inject the `useIntlayer()` function call into the code in the build output only, and keep the base codebase intact. The transformation will be done only in memory.
         */
        saveComponents: false,
    
        /**
         * Dictionary key prefix
         */
        dictionaryKeyPrefix: "",
      },
    };
    
    export default config;

    Run the extractor to transform your components and extract the content

    bash
    コードをコピー

    コードをクリップボードにコピー

    npx intlayer extract

    Update your vite.config.ts to include the intlayerCompiler plugin:

    vite.config.ts
    コードをコピー

    コードをクリップボードにコピー

    import { defineConfig } from "vite";import { intlayer, intlayerCompiler } from "vite-intlayer";export default defineConfig({ plugins: [   intlayer(),   intlayerCompiler(), // Adds the compiler plugin ],});
    bash
    コードをコピー

    コードをクリップボードにコピー

    npm run build # Or npm run dev

    さらに詳しく

    さらに詳しく知りたい場合は、ビジュアルエディターを実装したり、CMSを使用してコンテンツを外部化したりすることもできます。

    AstroおよびLit
    ViteおよびReact
    Alt+→

    このページについて

      ディスカッションは匿名で、よくある問題に対処するために定期的に確認されます。機能のアイデア、ドキュメントへのフィードバック、Intlayerに関することなど、お気軽にお聞かせください, このフィードバックをロードマップの作成と製品の改善に活用しています。

      npm install intlayer astro-intlayer vanilla-intlayernpx intlayer init
      import { Locales, type IntlayerConfig } from "intlayer";const config: IntlayerConfig = {  internationalization: {    locales: [      Locales.ENGLISH,      Locales.FRENCH,      Locales.SPANISH,      // その他のロケール    ],    defaultLocale: Locales.ENGLISH,  },};export default config;
      // @ts-checkimport { intlayer } from "astro-intlayer";import { defineConfig } from "astro/config";// https://astro.build/configexport default defineConfig({  integrations: [intlayer()],});
      import { t, type Dictionary } from "intlayer";const appContent = {  key: "app",  content: {    greeting: t({      en: "Hello World",      fr: "Bonjour le monde",      es: "Hola mundo",      ja: "こんにちは世界",    }),    description: t({      en: "Welcome to my multilingual Astro site.",      fr: "Bienvenue sur mon site Astro multilingue.",      es: "Bienvenido a mi sitio Astro multilingüe.",      ja: "多言語対応のAstroサイトへようこそ。",    }),    switchLocale: t({      en: "Switch language:",      fr: "Changer de langue :",      es: "Cambiar idioma:",      ja: "言語を切り替える:",    }),  },} satisfies Dictionary;export default appContent;
      ---import {  getIntlayer,  getLocaleFromPath,  getLocalizedUrl,  getPrefix,  getLocaleName,  localeMap,  locales,  defaultLocale,  getPathWithoutLocale,  type LocalesValues,} from "intlayer";export const getStaticPaths = () => {  return localeMap(({ locale }) => ({    params: { locale: getPrefix(locale).localePrefix },  }));};const locale = getLocaleFromPath(Astro.url.pathname) as LocalesValues;const pathWithoutLocale = getPathWithoutLocale(Astro.url.pathname);const { greeting, description, switchLocale } = getIntlayer("app", locale);---<!doctype html><html lang={locale} dir={getHTMLTextDir(locale)}>  <head>    <meta charset="utf-8" />    <meta name="viewport" content="width=device-width" />    <link rel="icon" type="image/svg+xml" href="/favicon.svg" />    <title>{greeting}</title>    <!-- 正規リンク -->    <link      rel="canonical"      href={new URL(getLocalizedUrl(Astro.url.pathname, locale), Astro.site)}    />    <!-- Hreflangリンク -->    {      localeMap(({ locale: mapLocale }) => (        <link          rel="alternate"          hreflang={mapLocale}          href={new URL(            getLocalizedUrl(Astro.url.pathname, mapLocale),            Astro.site          )}        />      ))    }    <link      rel="alternate"      hreflang="x-default"      href={new URL(        getLocalizedUrl(Astro.url.pathname, defaultLocale),        Astro.site      )}    />  </head>  <body>    <main>      <h1 id="greeting">{greeting}</h1>      <p id="description">{description}</p>      <div class="locale-switcher">        <span class="switcher-label">{switchLocale}</span>        <div class="locale-buttons">          {            locales.map((localeItem) => (              <a                href={localeItem === locale ? undefined : getLocalizedUrl(pathWithoutLocale, localeItem)}                class={`locale-btn ${localeItem === locale ? "active" : ""}`}                data-locale={localeItem}                aria-disabled={localeItem === locale}              >                {getLocaleName(localeItem)}              </a>            ))          }        </div>      </div>    </main>  </body></html>
      <img src="{content.image.src.value}" alt="{content.image.value}" /><img src="{content.image.src.toString()}" alt="{content.image.toString()}" /><img src="{String(content.image.src)}" alt="{String(content.image)}" />
      <!-- サーバーサイドのマークアップは上記のステップ5を参照 --><script>  import { installIntlayer, useLocale } from "vanilla-intlayer";  import { getLocaleFromPath, getLocalizedUrl, type LocalesValues } from "intlayer";  // 現在のURLからロケールを使用してクライアントサイドのIntlayerを初期化  const locale = getLocaleFromPath(window.location.pathname);  installIntlayer({ locale: locale as LocalesValues });  const { setLocale } = useLocale({    onLocaleChange: (newLocale: LocalesValues) => {      window.location.href = getLocalizedUrl(window.location.pathname, newLocale);    },  });  // 言語切り替えリンクにクリックイベントをアタッチ  const localeLinks = document.querySelectorAll("[data-locale]");  localeLinks.forEach((link) => {    link.addEventListener("click", (e) => {      const localeValue = link.getAttribute("data-locale") as LocalesValues;      if (localeValue && localeValue !== locale) {        e.preventDefault();        setLocale(localeValue);      }    });  });</script>
      import type { APIRoute } from "astro";import { generateSitemap, type SitemapUrlEntry } from "intlayer";const pathList: SitemapUrlEntry[] = [  { path: "/", changefreq: "daily", priority: 1.0 },  { path: "/about", changefreq: "monthly", priority: 0.7 },];const SITE_URL = import.meta.env.SITE ?? "http://localhost:4321";export const GET: APIRoute = async ({ site }) => {  const xmlOutput = generateSitemap(pathList, { siteUrl: SITE_URL });  return new Response(xmlOutput, {    headers: { "Content-Type": "application/xml" },  });};
      import type { APIRoute } from "astro";import { getMultilingualUrls } from "intlayer";const getAllMultilingualUrls = (urls: string[]) =>  urls.flatMap((url) => Object.values(getMultilingualUrls(url)) as string[]);const disallowedPaths = getAllMultilingualUrls(["/admin", "/private"]);export const GET: APIRoute = ({ site }) => {  const robotsTxt = [    "User-agent: *",    "Allow: /",    ...disallowedPaths.map((path) => `Disallow: ${path}`),    "",    `Sitemap: ${new URL("/sitemap.xml", site).href}`,  ].join("\n");  return new Response(robotsTxt, {    headers: { "Content-Type": "text/plain" },  });};
      {  // ... 既存のTypeScript設定  include: [    // ... 既存のTypeScript設定    ".intlayer/**/*.ts", // 自動生成された型を含める  ],}
      # Intlayerによって生成されたファイルを無視.intlayer
      npx intlayer extract
      import { defineConfig } from "vite";import { intlayer, intlayerCompiler } from "vite-intlayer";export default defineConfig({ plugins: [   intlayer(),   intlayerCompiler(), // Adds the compiler plugin ],});
      npm run build # Or npm run dev