首页演练场案例展示应用文档博客
    • English英语
      EN
    • русский俄语
      RU
    • 日本語日语
      JA
    • français法语
      FR
    • 한국어韩语
      KO
    • 中文中文
      ZH
    • español西班牙语
      ES
    • Deutsch德语
      DE
    • العربية阿拉伯语
      AR
    • italiano意大利语
      IT
    • British English英国英语
      EN-GB
    • português葡萄牙语
      PT
    • हिन्दी印地语
      HI
    • Türkçe土耳其语
      TR
    • polski波兰语
      PL
    • Indonesia印度尼西亚语
      ID
    • Tiếng Việt越南语
      VI
    • українська乌克兰语
      UK
    /
    按框架筛选文档
    Alt+←
    为什么Intlayer?
    开始
    概念
    • Intlayer如何工作
    • 配置
    • TestFillBuildWatchExtractLoginPushPullConfigurationListVersionEditorLiveDebugDoc ReviewDoc TranslateSDK
    • 可视化编辑器
    • CMS
    • CI/CD集成
    • 翻译复数枚举条件性别插入文件嵌套MarkdownHTML函数获取
    • 每个语言环境的文件
    • 编译器
    • 自动填充
    • 测试
    • 打包优化
    环境
    • Next.js 14和应用路由器
      Next.js 15
      Next.js 无 locale URL
      Next.js和页面路由器
      编译器
    • Tanstack Start Solid
    • Astro和React
      Astro和Svelte
      Astro和Vue
      Astro和Solid
      Astro和Preact
      Astro和Lit
      Astro和Vanilla JS
    • React Router v7
      React Router v7 (fs-routes)
      Compiler
    • Nuxt和Vue
    • Vite和Solid
    • SvelteKit
    • Vite和Preact
    • Vite和Vanilla JS
    • Vite和Lit
    • Angular 19 (Webpack)
      Analog
    • React CRA
    • React Native和Expo
    • Express.js
      NestJS
      Fastify
      Hono
      Adonis
    • Lynx和React
    Plugins
    • JSON
    • gettext (.po)
    VS Code扩展
    代理
    • MCP服务器
    • 代理技能
    发布
    • v8
    • v7
    • v6
    基准测试
    • Next.js
    • TanStack
    • Vue
    • Solid
    • Svelte
    博客
    问问题
    1. Documentation
    2. 环境
    3. Astro
    4. Vanilla
    \n```\n\n> **关于持久性的说明:**\n> `installIntlayer` 使用服务端定义的语言初始化 Intlayer 单例。带 `onLocaleChange` 的 `useLocale` 确保在导航之前通过中间件设置语言 Cookie,以便记住用户在未来访问时的首选语言。\n\n> **关于渐进式增强的说明:**\n> 即使没有 JavaScript,语言切换链接也会作为标准的 `` 标签工作。如果 JS 可用,调用 `setLocale` 会在导航前更新 Cookie,允许中间件执行正确的重定向。\n\n### 第七步:站点地图和 Robots.txt\n\nIntlayer 提供了实用工具来动态创建您的本地化站点地图和 robots.txt 文件。\n\n#### 站点地图\n\nIntlayer 附带一个内置的站点地图生成器,可帮助您轻松为应用程序创建站点地图。它能够处理本地化路由,并为搜索引擎添加必要的元数据。\n\n> Intlayer 生成的站点地图支持 `xhtml:link` 命名空间(Hreflang XML 扩展)。与仅列出原始 URL 的默认站点地图生成器不同,Intlayer 会自动在页面的所有语言版本(例如 `/about`、`/about?lang=fr` 和 `/about?lang=es`)之间创建所需的双向链接。这确保了搜索引擎能够正确索引并向合适的受众提供正确的语言版本。\n\n创建 `src/pages/sitemap.xml.ts` 以生成包含所有本地化路由的站点地图。\n\n```typescript fileName=\"src/pages/sitemap.xml.ts\"\nimport type { APIRoute } from \"astro\";\nimport { generateSitemap, type SitemapUrlEntry } from \"intlayer\";\n\nconst pathList: SitemapUrlEntry[] = [\n { path: \"/\", changefreq: \"daily\", priority: 1.0 },\n { path: \"/about\", changefreq: \"monthly\", priority: 0.7 },\n];\n\nconst SITE_URL = import.meta.env.SITE ?? \"http://localhost:4321\";\n\nexport const GET: APIRoute = async ({ site }) => {\n const xmlOutput = generateSitemap(pathList, { siteUrl: SITE_URL });\n\n return new Response(xmlOutput, {\n headers: { \"Content-Type\": \"application/xml\" },\n });\n};\n```\n\n#### Robots.txt\n\n创建 `src/pages/robots.txt.ts` 以控制搜索引擎抓取。\n\n```typescript fileName=\"src/pages/robots.txt.ts\"\nimport type { APIRoute } from \"astro\";\nimport { getMultilingualUrls } from \"intlayer\";\n\nconst getAllMultilingualUrls = (urls: string[]) =>\n urls.flatMap((url) => Object.values(getMultilingualUrls(url)) as string[]);\n\nconst disallowedPaths = getAllMultilingualUrls([\"/admin\", \"/private\"]);\n\nexport const GET: APIRoute = ({ site }) => {\n const robotsTxt = [\n \"User-agent: *\",\n \"Allow: /\",\n ...disallowedPaths.map((path) => `Disallow: ${path}`),\n \"\",\n `Sitemap: ${new URL(\"/sitemap.xml\", site).href}`,\n ].join(\"\\n\");\n\n return new Response(robotsTxt, {\n headers: { \"Content-Type\": \"text/plain\" },\n });\n};\n```\n\n### TypeScript 配置\n\nIntlayer 使用模块扩展来利用 TypeScript,使您的代码库更加健壮。\n\n![自动补全](https://github.com/aymericzip/intlayer/blob/main/docs/assets/autocompletion.png?raw=true)\n\n![翻译错误](https://github.com/aymericzip/intlayer/blob/main/docs/assets/translation_error.png?raw=true)\n\n确保您的 TypeScript 配置包含自动生成的类型。\n\n```json5 fileName=\"tsconfig.json\"\n{\n // ... 您现有的 TypeScript 配置\n \"include\": [\n // ... 您现有的 TypeScript 配置\n \".intlayer/**/*.ts\", // 包含自动生成的类型\n ],\n}\n```\n\n### Git 配置\n\n建议忽略 Intlayer 生成的文件。这可以避免将它们提交到您的 Git 仓库。\n\n为此,您可以将以下说明添加到 `.gitignore` 文件中:\n\n```bash\n# 忽略 Intlayer 生成的文件\n.intlayer\n```\n\n> 如果您想在 `字符串` 属性(如 `alt`、`title`、`href`、`aria-label` 等)中使用内容,可以使用函数的值,例如:\n\n> ```html\n> \"{content.image.value}\"\n> \"{content.image.toString()}\"\n> \"{String(content.image)}\"\n> ```\n\n### VS Code 扩展\n\n为了改善使用 Intlayer 的开发体验,您可以安装**官方 Intlayer VS Code 扩展**。\n\n[从 VS Code Marketplace 安装](https://marketplace.visualstudio.com/items?itemName=intlayer.intlayer-vs-code-extension)\n\n此扩展提供:\n\n- 翻译键的**自动补全**。\n- 缺失翻译的**实时错误检测**。\n- 翻译内容的**内联预览**。\n- 轻松创建和更新翻译的**快速操作**。\n\n有关使用该扩展的更多信息,请参阅 [Intlayer VS Code 扩展文档](https://intlayer.org/doc/vs-code-extension)。\n\n---\n\n### 第十五步:提取组件中的内容(可选)\n\n如果您有现有的代码库,转换数千个文件可能会非常耗时。\n\n为了简化此过程,Intlayer 提供了 [编译器](/zh/doc/compiler) / [提取器](/zh/doc/concept/cli/extract) 来转换您的组件并提取内容。\n\n要进行设置,您可以在 `intlayer.config.ts` 文件中添加 `compiler` 部分:\n\n```typescript fileName=\"intlayer.config.ts\" codeFormat=\"typescript\"\nimport { type IntlayerConfig } from \"intlayer\";\n\nconst config: IntlayerConfig = {\n // ... 您的其他配置\n compiler: {\n /**\n * 指示是否应启用编译器。\n */\n enabled: true,\n\n /**\n * 定义输出文件路径\n */\n output: ({ fileName, extension }) => `./${fileName}${extension}`,\n\n /**\n * 指示在转换后是否应保存组件。这样,编译器只需运行一次即可转换应用程序,然后即可将其删除。\n */\n saveComponents: false,\n\n /**\n * 字典键前缀\n */\n dictionaryKeyPrefix: \"\",\n },\n};\n\nexport default config;\n```\n\n\n \n\n运行提取器以转换组件并提取内容\n\n```bash packageManager=\"npm\"\nnpx intlayer extract\n```\n\n```bash packageManager=\"pnpm\"\npnpm intlayer extract\n```\n\n```bash packageManager=\"yarn\"\nyarn intlayer extract\n```\n\n```bash packageManager=\"bun\"\nbun x intlayer extract\n```\n\n \n \n\n更新您的 `vite.config.ts` 以包含 `intlayerCompiler` 插件:\n\n```ts fileName=\"vite.config.ts\"\nimport { defineConfig } from \"vite\";\nimport { intlayer, intlayerCompiler } from \"vite-intlayer\";\n\nexport default defineConfig({\n plugins: [\n intlayer(),\n intlayerCompiler(), // 添加编译器插件\n ],\n});\n```\n\n \n\n\n---\n\n### 深入了解\n\n如果您想了解更多,还可以实现[可视化编辑器](/zh/doc/concept/editor)或使用 [CMS](/zh/doc/concept/cms) 将您的内容外部化。\n","about":"了解如何使用 Intlayer 为您的 Astro + Vanilla JS 网站添加国际化 (i18n)。按照本指南让您的网站支持多语言。","url":"https://intlayer.org/zh/doc/environment/astro/vanilla","datePublished":"24-04-2026","dateModified":"06-05-2026","keywords":"国际化, 文档, Intlayer, Astro, Vanilla JS, JavaScript, TypeScript","license":"https://raw.githubusercontent.com/aymericzip/intlayer/refs/heads/main/LICENSE","audience":{"@type":"Audience","audienceType":"开发者,内容经理"}}
    Creation:2026-04-24Last update:2026-05-06
    在 GitHub 上查看应用程序模板

    此页面有可用的应用程序模板。

    查看展示应用

    此页面链接到模板的在线演示。

    将此文档参考到您的 AI 助手
    ChatGPT
    Claude
    DeepSeek
    Google AI mode
    Gemini
    Perplexity
    Mistral
    Grok

    使用您最喜欢的AI助手总结文档,并引用此页面和AI提供商

    版本历史

    1. "更新 Solid useIntlayer API 用法以直接访问属性"
      v8.9.02026/5/4
    2. "Astro + Vanilla JS 的初始文档"
      v8.7.72026/4/24

    此页面的内容已使用 AI 翻译。

    查看英文原文的最新版本
    编辑此文档

    如果您有改善此文档的想法,请随时通过在GitHub上提交拉取请求来贡献。

    文档的 GitHub 链接
    Copy

    复制文档 Markdown 到剪贴板

    使用 Intlayer 翻译您的 Astro + Vanilla JS 网站 | 国际化 (i18n)

    ide.intlayer.org
    intlayer-astro-template.vercel.app

    目录

    什么是 Intlayer?

    Intlayer 是一个创新且开源的国际化 (i18n) 库,旨在简化现代 Web 应用程序的多语言支持。

    使用 Intlayer,您可以:

    • 轻松管理翻译:使用组件级的声明式词典。
    • 动态本地化元数据、路由和内容。
    • 确保 TypeScript 支持:通过自动生成的类型增强自动补全和错误检测。
    • 受益于高级功能:如动态语言检测和语言切换。

    在 Astro + Vanilla JS 中配置 Intlayer 的分步指南

    在 GitHub 上查看应用程序模板。

    第一步:安装依赖

    使用您喜欢的包管理器安装所需的软件包:

    bash
    复制代码

    复制代码到剪贴板

    npm install intlayer astro-intlayer vanilla-intlayernpx intlayer init
    • intlayer 核心软件包,提供用于配置管理、翻译、内容声明、编译和 CLI 命令的国际化工具。

    • astro-intlayer 包含将 Intlayer 与 Vite 构建器集成的 Astro 集成插件,以及用于检测用户首选语言、管理 Cookie 和处理 URL 重定向的中间件。

    • vanilla-intlayer 将 Intlayer 与 Vanilla JavaScript / TypeScript 应用程序集成的软件包。它提供了一个发布/订阅单例 (IntlayerClient) 和基于回调的辅助函数 (useIntlayer, useLocale 等),允许 Astro 的 <script> 标签内的任何部分在不使用框架的情况下响应语言更改。

    第二步:配置您的项目

    创建一个配置文件来定义您的应用程序语言:

    intlayer.config.ts
    复制代码

    复制代码到剪贴板

    import { Locales, type IntlayerConfig } from "intlayer";const config: IntlayerConfig = {  internationalization: {    locales: [      Locales.ENGLISH,      Locales.FRENCH,      Locales.SPANISH,      // 您的其他语言    ],    defaultLocale: Locales.ENGLISH,  },};export default config;
    通过此配置文件,您可以配置本地化 URL、中间件重定向、Cookie 名称、内容声明的位置和扩展名、在控制台中禁用 Intlayer 日志等。有关可用参数的完整列表,请参阅配置文档。

    第三步:在 Astro 配置中集成 Intlayer

    将 intlayer 插件添加到您的 Astro 配置中。对于 Vanilla JS,不需要额外的 UI 框架集成。

    astro.config.ts
    复制代码

    复制代码到剪贴板

    // @ts-checkimport { intlayer } from "astro-intlayer";import { defineConfig } from "astro/config";// https://astro.build/configexport default defineConfig({  integrations: [intlayer()],});
    intlayer() 集成插件用于将 Intlayer 与 Astro 集成。它确保内容声明文件的构建并在开发模式下进行监视。它在 Astro 应用程序中定义 Intlayer 环境变量,并提供别名以优化性能。

    第四步:声明您的内容

    创建并管理您的内容声明以存储翻译:

    src/app.content.ts
    复制代码

    复制代码到剪贴板

    import { t, type Dictionary } from "intlayer";const appContent = {  key: "app",  content: {    greeting: t({      en: "Hello World",      fr: "Bonjour le monde",      es: "Hola mundo",      zh: "你好,世界",    }),    description: t({      en: "Welcome to my multilingual Astro site.",      fr: "Bienvenue sur mon site Astro multilingue.",      es: "Bienvenido a mi sitio Astro multilingüe.",      zh: "欢迎来到我的多语言 Astro 网站。",    }),    switchLocale: t({      en: "Switch language:",      fr: "Changer de langue :",      es: "Cambiar idioma:",      zh: "切换语言:",    }),  },} satisfies Dictionary;export default appContent;
    只要您的内容声明包含在 contentDir(默认为 ./src)中,且匹配内容声明文件扩展名(默认为 .content.{json,ts,tsx,js,jsx,mjs,cjs}),就可以在应用程序的任何位置定义。
    有关更多信息,请参阅内容声明文档。

    第五步:在 Astro 中使用内容

    对于 Vanilla JS,所有服务端渲染都是通过直接在 .astro 文件中使用 getIntlayer 完成的。随后,<script> 块在客户端初始化 vanilla-intlayer 以处理语言切换。

    src/pages/[...locale]/index.astro
    复制代码

    复制代码到剪贴板

    ---import {  getIntlayer,  getLocaleFromPath,  getLocalizedUrl,  getPrefix,  getLocaleName,  localeMap,  locales,  defaultLocale,  getPathWithoutLocale,  type LocalesValues,} from "intlayer";export const getStaticPaths = () => {  return localeMap(({ locale }) => ({    params: { locale: getPrefix(locale).localePrefix },  }));};const locale = getLocaleFromPath(Astro.url.pathname) as LocalesValues;const pathWithoutLocale = getPathWithoutLocale(Astro.url.pathname);const { greeting, description, switchLocale } = getIntlayer("app", locale);---<!doctype html><html lang={locale} dir={getHTMLTextDir(locale)}>  <head>    <meta charset="utf-8" />    <meta name="viewport" content="width=device-width" />    <link rel="icon" type="image/svg+xml" href="/favicon.svg" />    <title>{greeting}</title>    <!-- 规范链接 -->    <link      rel="canonical"      href={new URL(getLocalizedUrl(Astro.url.pathname, locale), Astro.site)}    />    <!-- Hreflang 链接 -->    {      localeMap(({ locale: mapLocale }) => (        <link          rel="alternate"          hreflang={mapLocale}          href={new URL(            getLocalizedUrl(Astro.url.pathname, mapLocale),            Astro.site          )}        />      ))    }    <link      rel="alternate"      hreflang="x-default"      href={new URL(        getLocalizedUrl(Astro.url.pathname, defaultLocale),        Astro.site      )}    />  </head>  <body>    <main>      <h1 id="greeting">{greeting}</h1>      <p id="description">{description}</p>      <div class="locale-switcher">        <span class="switcher-label">{switchLocale}</span>        <div class="locale-buttons">          {            locales.map((localeItem) => (              <a                href={localeItem === locale ? undefined : getLocalizedUrl(pathWithoutLocale, localeItem)}                class={`locale-btn ${localeItem === locale ? "active" : ""}`}                data-locale={localeItem}                aria-disabled={localeItem === locale}              >                {getLocaleName(localeItem)}              </a>            ))          }        </div>      </div>    </main>  </body></html>

    关于路由设置的说明: 您使用的目录结构取决于 intlayer.config.ts 中的 middleware.routing 设置:

    • prefix-no-default(默认):在根目录下保留默认语言(无前缀),并为其他语言添加前缀。使用 [...locale] 来捕获所有情况。
    • prefix-all:所有 URL 都有语言前缀。如果您不需要单独处理根目录,可以使用标准的 [locale]。
    • search-param 或 no-prefix:不需要语言文件夹。语言通过查询参数或 Cookie 处理。

    第六步:添加语言切换功能

    在带有 Vanilla JS 的 Astro 中,语言切换器在服务端渲染为普通链接,并通过 <script> 块在客户端进行激活。当用户点击语言链接时,vanilla-intlayer 会在导航到本地化 URL 之前通过 setLocale 设置语言 Cookie。

    src/pages/[...locale]/index.astro
    复制代码

    复制代码到剪贴板

    <!-- 服务端标记请参见上面的第五步 --><script>  import { installIntlayer, useLocale } from "vanilla-intlayer";  import { getLocaleFromPath, getLocalizedUrl, type LocalesValues } from "intlayer";  // 使用当前 URL 的语言初始化客户端 Intlayer  const locale = getLocaleFromPath(window.location.pathname);  installIntlayer({ locale: locale as LocalesValues });  const { setLocale } = useLocale({    onLocaleChange: (newLocale: LocalesValues) => {      window.location.href = getLocalizedUrl(window.location.pathname, newLocale);    },  });  // 为语言切换链接绑定点击事件  const localeLinks = document.querySelectorAll("[data-locale]");  localeLinks.forEach((link) => {    link.addEventListener("click", (e) => {      const localeValue = link.getAttribute("data-locale") as LocalesValues;      if (localeValue && localeValue !== locale) {        e.preventDefault();        setLocale(localeValue);      }    });  });</script>

    关于持久性的说明: installIntlayer 使用服务端定义的语言初始化 Intlayer 单例。带 onLocaleChange 的 useLocale 确保在导航之前通过中间件设置语言 Cookie,以便记住用户在未来访问时的首选语言。

    关于渐进式增强的说明: 即使没有 JavaScript,语言切换链接也会作为标准的 <a> 标签工作。如果 JS 可用,调用 setLocale 会在导航前更新 Cookie,允许中间件执行正确的重定向。

    第七步:站点地图和 Robots.txt

    Intlayer 提供了实用工具来动态创建您的本地化站点地图和 robots.txt 文件。

    站点地图

    Intlayer 附带一个内置的站点地图生成器,可帮助您轻松为应用程序创建站点地图。它能够处理本地化路由,并为搜索引擎添加必要的元数据。

    Intlayer 生成的站点地图支持 xhtml:link 命名空间(Hreflang XML 扩展)。与仅列出原始 URL 的默认站点地图生成器不同,Intlayer 会自动在页面的所有语言版本(例如 /about、/about?lang=fr 和 /about?lang=es)之间创建所需的双向链接。这确保了搜索引擎能够正确索引并向合适的受众提供正确的语言版本。

    创建 src/pages/sitemap.xml.ts 以生成包含所有本地化路由的站点地图。

    src/pages/sitemap.xml.ts
    复制代码

    复制代码到剪贴板

    import type { APIRoute } from "astro";import { generateSitemap, type SitemapUrlEntry } from "intlayer";const pathList: SitemapUrlEntry[] = [  { path: "/", changefreq: "daily", priority: 1.0 },  { path: "/about", changefreq: "monthly", priority: 0.7 },];const SITE_URL = import.meta.env.SITE ?? "http://localhost:4321";export const GET: APIRoute = async ({ site }) => {  const xmlOutput = generateSitemap(pathList, { siteUrl: SITE_URL });  return new Response(xmlOutput, {    headers: { "Content-Type": "application/xml" },  });};

    Robots.txt

    创建 src/pages/robots.txt.ts 以控制搜索引擎抓取。

    src/pages/robots.txt.ts
    复制代码

    复制代码到剪贴板

    import type { APIRoute } from "astro";import { getMultilingualUrls } from "intlayer";const getAllMultilingualUrls = (urls: string[]) =>  urls.flatMap((url) => Object.values(getMultilingualUrls(url)) as string[]);const disallowedPaths = getAllMultilingualUrls(["/admin", "/private"]);export const GET: APIRoute = ({ site }) => {  const robotsTxt = [    "User-agent: *",    "Allow: /",    ...disallowedPaths.map((path) => `Disallow: ${path}`),    "",    `Sitemap: ${new URL("/sitemap.xml", site).href}`,  ].join("\n");  return new Response(robotsTxt, {    headers: { "Content-Type": "text/plain" },  });};

    TypeScript 配置

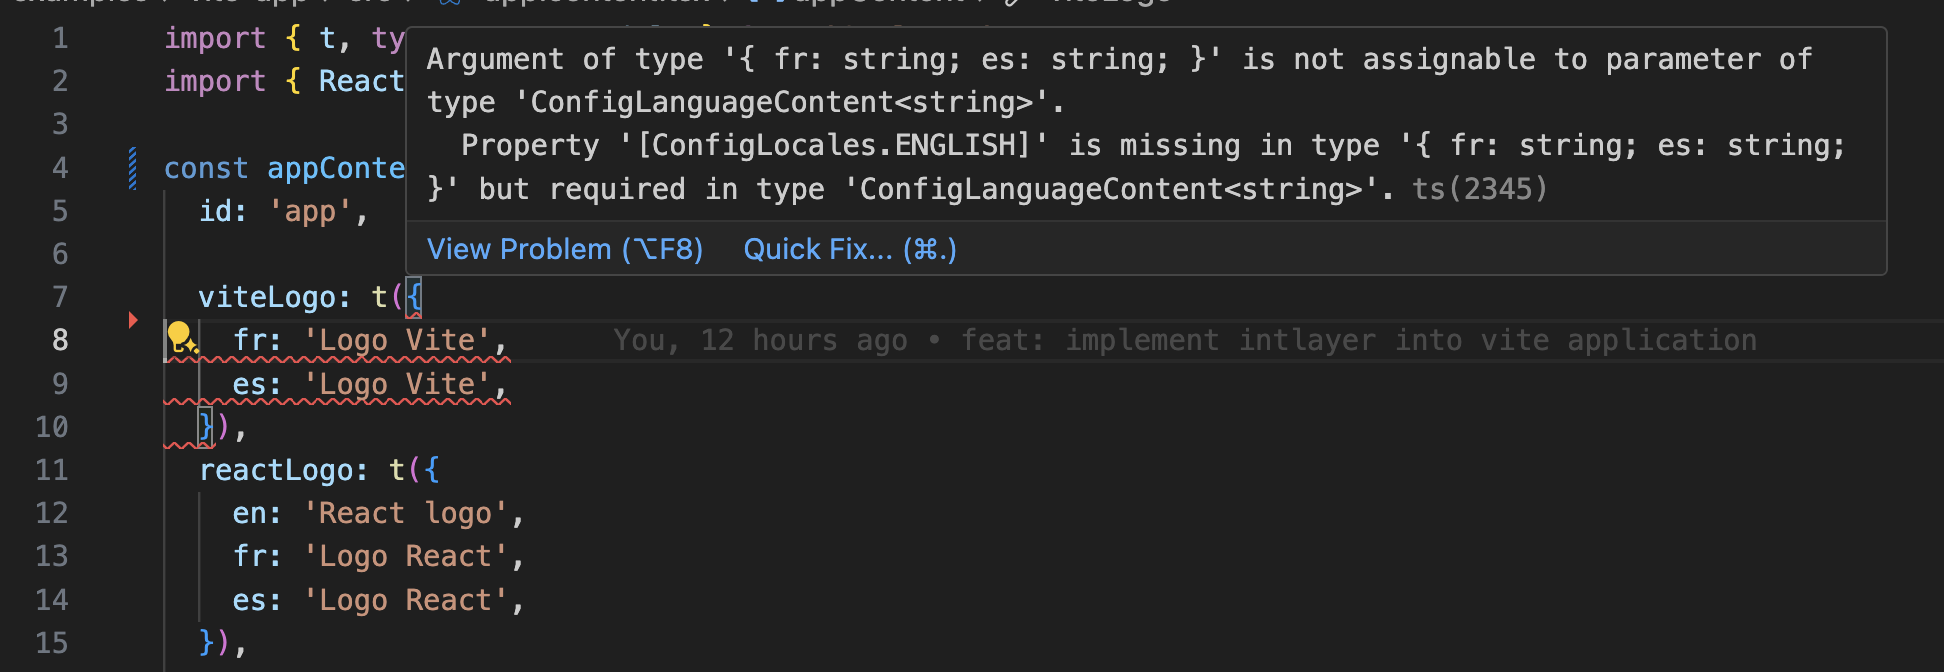
    Intlayer 使用模块扩展来利用 TypeScript,使您的代码库更加健壮。

    自动补全

    翻译错误

    确保您的 TypeScript 配置包含自动生成的类型。

    tsconfig.json
    复制代码

    复制代码到剪贴板

    {  // ... 您现有的 TypeScript 配置  "include": [    // ... 您现有的 TypeScript 配置    ".intlayer/**/*.ts", // 包含自动生成的类型  ],}

    Git 配置

    建议忽略 Intlayer 生成的文件。这可以避免将它们提交到您的 Git 仓库。

    为此,您可以将以下说明添加到 .gitignore 文件中:

    bash
    复制代码

    复制代码到剪贴板

    # 忽略 Intlayer 生成的文件.intlayer
    如果您想在 字符串 属性(如 alt、title、href、aria-label 等)中使用内容,可以使用函数的值,例如:
    html
    复制代码

    复制代码到剪贴板

    <img src="{content.image.src.value}" alt="{content.image.value}" /><img src="{content.image.src.toString()}" alt="{content.image.toString()}" /><img src="{String(content.image.src)}" alt="{String(content.image)}" />

    VS Code 扩展

    为了改善使用 Intlayer 的开发体验,您可以安装官方 Intlayer VS Code 扩展。

    从 VS Code Marketplace 安装

    此扩展提供:

    • 翻译键的自动补全。
    • 缺失翻译的实时错误检测。
    • 翻译内容的内联预览。
    • 轻松创建和更新翻译的快速操作。

    有关使用该扩展的更多信息,请参阅 Intlayer VS Code 扩展文档。


    第十五步:提取组件中的内容(可选)

    如果您有现有的代码库,转换数千个文件可能会非常耗时。

    为了简化此过程,Intlayer 提供了 编译器 / 提取器 来转换您的组件并提取内容。

    要进行设置,您可以在 intlayer.config.ts 文件中添加 compiler 部分:

    intlayer.config.ts
    复制代码

    复制代码到剪贴板

    import { type IntlayerConfig } from "intlayer";const config: IntlayerConfig = {  // ... 您的其他配置  compiler: {    /**     * 指示是否应启用编译器。     */    enabled: true,    /**     * 定义输出文件路径     */    output: ({ fileName, extension }) => `./${fileName}${extension}`,    /**     * 指示在转换后是否应保存组件。这样,编译器只需运行一次即可转换应用程序,然后即可将其删除。     */    saveComponents: false,    /**     * 字典键前缀     */    dictionaryKeyPrefix: "",  },};export default config;

    运行提取器以转换组件并提取内容

    bash
    复制代码

    复制代码到剪贴板

    npx intlayer extract

    更新您的 vite.config.ts 以包含 intlayerCompiler 插件:

    vite.config.ts
    复制代码

    复制代码到剪贴板

    import { defineConfig } from "vite";import { intlayer, intlayerCompiler } from "vite-intlayer";export default defineConfig({ plugins: [   intlayer(),   intlayerCompiler(), // 添加编译器插件 ],});

    深入了解

    如果您想了解更多,还可以实现可视化编辑器或使用 CMS 将您的内容外部化。

    Astro和Lit
    Vite和React
    Alt+→

    在此页面

      讨论是匿名的,并会定期审查以解决常见问题。欢迎分享功能想法、对文档的反馈或任何与 Intlayer 相关的内容, 我们会利用这些意见来制定路线图并改进产品。

      npm install intlayer astro-intlayer vanilla-intlayernpx intlayer init
      import { Locales, type IntlayerConfig } from "intlayer";const config: IntlayerConfig = {  internationalization: {    locales: [      Locales.ENGLISH,      Locales.FRENCH,      Locales.SPANISH,      // 您的其他语言    ],    defaultLocale: Locales.ENGLISH,  },};export default config;
      // @ts-checkimport { intlayer } from "astro-intlayer";import { defineConfig } from "astro/config";// https://astro.build/configexport default defineConfig({  integrations: [intlayer()],});
      import { t, type Dictionary } from "intlayer";const appContent = {  key: "app",  content: {    greeting: t({      en: "Hello World",      fr: "Bonjour le monde",      es: "Hola mundo",      zh: "你好,世界",    }),    description: t({      en: "Welcome to my multilingual Astro site.",      fr: "Bienvenue sur mon site Astro multilingue.",      es: "Bienvenido a mi sitio Astro multilingüe.",      zh: "欢迎来到我的多语言 Astro 网站。",    }),    switchLocale: t({      en: "Switch language:",      fr: "Changer de langue :",      es: "Cambiar idioma:",      zh: "切换语言:",    }),  },} satisfies Dictionary;export default appContent;
      ---import {  getIntlayer,  getLocaleFromPath,  getLocalizedUrl,  getPrefix,  getLocaleName,  localeMap,  locales,  defaultLocale,  getPathWithoutLocale,  type LocalesValues,} from "intlayer";export const getStaticPaths = () => {  return localeMap(({ locale }) => ({    params: { locale: getPrefix(locale).localePrefix },  }));};const locale = getLocaleFromPath(Astro.url.pathname) as LocalesValues;const pathWithoutLocale = getPathWithoutLocale(Astro.url.pathname);const { greeting, description, switchLocale } = getIntlayer("app", locale);---<!doctype html><html lang={locale} dir={getHTMLTextDir(locale)}>  <head>    <meta charset="utf-8" />    <meta name="viewport" content="width=device-width" />    <link rel="icon" type="image/svg+xml" href="/favicon.svg" />    <title>{greeting}</title>    <!-- 规范链接 -->    <link      rel="canonical"      href={new URL(getLocalizedUrl(Astro.url.pathname, locale), Astro.site)}    />    <!-- Hreflang 链接 -->    {      localeMap(({ locale: mapLocale }) => (        <link          rel="alternate"          hreflang={mapLocale}          href={new URL(            getLocalizedUrl(Astro.url.pathname, mapLocale),            Astro.site          )}        />      ))    }    <link      rel="alternate"      hreflang="x-default"      href={new URL(        getLocalizedUrl(Astro.url.pathname, defaultLocale),        Astro.site      )}    />  </head>  <body>    <main>      <h1 id="greeting">{greeting}</h1>      <p id="description">{description}</p>      <div class="locale-switcher">        <span class="switcher-label">{switchLocale}</span>        <div class="locale-buttons">          {            locales.map((localeItem) => (              <a                href={localeItem === locale ? undefined : getLocalizedUrl(pathWithoutLocale, localeItem)}                class={`locale-btn ${localeItem === locale ? "active" : ""}`}                data-locale={localeItem}                aria-disabled={localeItem === locale}              >                {getLocaleName(localeItem)}              </a>            ))          }        </div>      </div>    </main>  </body></html>
      <!-- 服务端标记请参见上面的第五步 --><script>  import { installIntlayer, useLocale } from "vanilla-intlayer";  import { getLocaleFromPath, getLocalizedUrl, type LocalesValues } from "intlayer";  // 使用当前 URL 的语言初始化客户端 Intlayer  const locale = getLocaleFromPath(window.location.pathname);  installIntlayer({ locale: locale as LocalesValues });  const { setLocale } = useLocale({    onLocaleChange: (newLocale: LocalesValues) => {      window.location.href = getLocalizedUrl(window.location.pathname, newLocale);    },  });  // 为语言切换链接绑定点击事件  const localeLinks = document.querySelectorAll("[data-locale]");  localeLinks.forEach((link) => {    link.addEventListener("click", (e) => {      const localeValue = link.getAttribute("data-locale") as LocalesValues;      if (localeValue && localeValue !== locale) {        e.preventDefault();        setLocale(localeValue);      }    });  });</script>
      import type { APIRoute } from "astro";import { generateSitemap, type SitemapUrlEntry } from "intlayer";const pathList: SitemapUrlEntry[] = [  { path: "/", changefreq: "daily", priority: 1.0 },  { path: "/about", changefreq: "monthly", priority: 0.7 },];const SITE_URL = import.meta.env.SITE ?? "http://localhost:4321";export const GET: APIRoute = async ({ site }) => {  const xmlOutput = generateSitemap(pathList, { siteUrl: SITE_URL });  return new Response(xmlOutput, {    headers: { "Content-Type": "application/xml" },  });};
      import type { APIRoute } from "astro";import { getMultilingualUrls } from "intlayer";const getAllMultilingualUrls = (urls: string[]) =>  urls.flatMap((url) => Object.values(getMultilingualUrls(url)) as string[]);const disallowedPaths = getAllMultilingualUrls(["/admin", "/private"]);export const GET: APIRoute = ({ site }) => {  const robotsTxt = [    "User-agent: *",    "Allow: /",    ...disallowedPaths.map((path) => `Disallow: ${path}`),    "",    `Sitemap: ${new URL("/sitemap.xml", site).href}`,  ].join("\n");  return new Response(robotsTxt, {    headers: { "Content-Type": "text/plain" },  });};
      {  // ... 您现有的 TypeScript 配置  "include": [    // ... 您现有的 TypeScript 配置    ".intlayer/**/*.ts", // 包含自动生成的类型  ],}
      # 忽略 Intlayer 生成的文件.intlayer
      <img src="{content.image.src.value}" alt="{content.image.value}" /><img src="{content.image.src.toString()}" alt="{content.image.toString()}" /><img src="{String(content.image.src)}" alt="{String(content.image)}" />
      import { type IntlayerConfig } from "intlayer";const config: IntlayerConfig = {  // ... 您的其他配置  compiler: {    /**     * 指示是否应启用编译器。     */    enabled: true,    /**     * 定义输出文件路径     */    output: ({ fileName, extension }) => `./${fileName}${extension}`,    /**     * 指示在转换后是否应保存组件。这样,编译器只需运行一次即可转换应用程序,然后即可将其删除。     */    saveComponents: false,    /**     * 字典键前缀     */    dictionaryKeyPrefix: "",  },};export default config;
      npx intlayer extract
      import { defineConfig } from "vite";import { intlayer, intlayerCompiler } from "vite-intlayer";export default defineConfig({ plugins: [   intlayer(),   intlayerCompiler(), // 添加编译器插件 ],});