首页演练场案例展示应用文档博客
    • English英语
      EN
    • русский俄语
      RU
    • 日本語日语
      JA
    • français法语
      FR
    • 한국어韩语
      KO
    • 中文中文
      ZH
    • español西班牙语
      ES
    • Deutsch德语
      DE
    • العربية阿拉伯语
      AR
    • italiano意大利语
      IT
    • British English英国英语
      EN-GB
    • português葡萄牙语
      PT
    • हिन्दी印地语
      HI
    • Türkçe土耳其语
      TR
    • polski波兰语
      PL
    • Indonesia印度尼西亚语
      ID
    • Tiếng Việt越南语
      VI
    • українська乌克兰语
      UK
    /
    按框架筛选文档
    Alt+←
    为什么Intlayer?
    开始
    概念
    • Intlayer如何工作
    • 配置
    • TestFillBuildWatchExtractLoginPushPullConfigurationListVersionEditorLiveDebugDoc ReviewDoc TranslateSDK
    • 可视化编辑器
    • CMS
    • CI/CD集成
    • 翻译复数枚举条件性别插入文件嵌套MarkdownHTML函数获取
    • 每个语言环境的文件
    • 编译器
    • 自动填充
    • 测试
    • 打包优化
    环境
    • Next.js 14和应用路由器
      Next.js 15
      Next.js 无 locale URL
      Next.js和页面路由器
      编译器
    • Tanstack Start Solid
    • Astro和React
      Astro和Svelte
      Astro和Vue
      Astro和Solid
      Astro和Preact
      Astro和Lit
      Astro和Vanilla JS
    • React Router v7
      React Router v7 (fs-routes)
      Compiler
    • Nuxt和Vue
    • Vite和Solid
    • SvelteKit
    • Vite和Preact
    • Vite和Vanilla JS
    • Vite和Lit
    • Angular 19 (Webpack)
      Analog
    • React CRA
    • React Native和Expo
    • Express.js
      NestJS
      Fastify
      Hono
      Adonis
    • Lynx和React
    Plugins
    • JSON
    • gettext (.po)
    VS Code扩展
    代理
    • MCP服务器
    • 代理技能
    发布
    • v8
    • v7
    • v6
    基准测试
    • Next.js
    • TanStack
    • Vue
    • Solid
    • Svelte
    博客
    问问题
    1. Documentation
    2. 环境
    3. Analog
    Creation:2025-04-18Last update:2026-05-06
    在 GitHub 上查看应用程序模板

    此页面有可用的应用程序模板。

    查看展示应用

    此页面链接到模板的在线演示。

    将此文档参考到您的 AI 助手
    ChatGPT
    Claude
    DeepSeek
    Google AI mode
    Gemini
    Perplexity
    Mistral
    Grok

    使用您最喜欢的AI助手总结文档,并引用此页面和AI提供商

    版本历史

    1. "更新 Solid useIntlayer API 用法以直接访问属性"
      v8.9.02026/5/4
    2. "初始化历史记录"
      v8.0.42026/1/26

    此页面的内容已使用 AI 翻译。

    查看英文原文的最新版本
    编辑此文档

    如果您有改善此文档的想法,请随时通过在GitHub上提交拉取请求来贡献。

    文档的 GitHub 链接
    Copy

    复制文档 Markdown 到剪贴板

    使用 Intlayer 翻译您的 Analog (Angular) 应用 | 国际化 (i18n)

    ide.intlayer.org
    intlayer-analog-template.vercel.app

    目录

    什么是 Intlayer?

    Intlayer 是一个创新的、开源的国际化 (i18n) 库,旨在简化现代 Web 应用中的多语言支持。

    使用 Intlayer,您可以:

    • 轻松管理翻译:在组件级使用声明式字典。
    • 动态本地化元数据、路由和内容。
    • 确保 TypeScript 支持:通过自动生成的类型提高自动补全和错误检测能力。
    • 受益于高级功能:如动态语言检测和切换。

    在 Analog 应用中设置 Intlayer 的分步指南

    查看 GitHub 上的 应用模板。

    第 1 步:安装依赖项

    使用 npm 安装必要的软件包:

    bash
    复制代码

    复制代码到剪贴板

    npm install intlayer angular-intlayer vite-intlayernpx intlayer init
    • intlayer

      核心软件包,提供用于配置管理、翻译、内容声明、编译和 CLI 命令的国际化工具。

    • angular-intlayer 将 Intlayer 与 Angular 应用集成的软件包。它为 Angular 国际化提供上下文提供者和 Hook。

    • vite-intlayer 将 Intlayer 与 Vite 集成的软件包。它提供一个插件来处理内容声明文件,并为优化性能设置别名。

    第 2 步:项目配置

    创建一个配置文件来配置应用的语言:

    intlayer.config.ts
    复制代码

    复制代码到剪贴板

    import { Locales, type IntlayerConfig } from "intlayer";
    
    const config: IntlayerConfig = {
      internationalization: {
        locales: [
          Locales.ENGLISH,
          Locales.FRENCH,
          Locales.SPANISH,
          // 您的其他语言
        ],
        defaultLocale: Locales.ENGLISH,
      },
    };
    
    export default config;
    通过此配置文件,您可以设置本地化 URL、中间件重定向、Cookie 名称、内容声明的位置和扩展名、禁用控制台中的 Intlayer 日志等。有关可用参数的完整列表,请参考配置文档。

    第 3 步:在 Vite 配置中集成 Intlayer

    要将 Intlayer 与 Analog 集成,您需要使用 vite-intlayer 插件。

    修改您的 vite.config.ts 文件:

    vite.config.ts
    复制代码

    复制代码到剪贴板

    import { defineConfig } from "vite";import { intlayer } from "vite-intlayer";import analog from "@analogjs/platform";// https://vitejs.dev/config/export default defineConfig(() => ({  plugins: [    analog(),    intlayer(), // 添加 Intlayer 插件  ],}));
    intlayer() 插件为 Vite 配置了 Intlayer。它处理内容声明文件并为优化性能设置别名。

    第 4 步:声明您的内容

    创建并管理您的内容声明以存储翻译:

    您的内容声明可以定义在应用中的任何位置,只要它们包含在 contentDir 目录(默认为 ./src)中,并且符合内容声明文件扩展名(默认为 .content.{json,ts,tsx,js,jsx,mjs,cjs})。
    有关更多详细信息,请参考内容声明文档。

    第 5 步:在代码中使用 Intlayer

    要在整个 Analog 应用中使用 Intlayer 的国际化功能,您需要在应用配置中提供 Intlayer。

    src/app/app.config.ts
    复制代码

    复制代码到剪贴板

    import { ApplicationConfig } from "@angular/core";import { provideIntlayer } from "angular-intlayer";export const appConfig: ApplicationConfig = {  providers: [    provideIntlayer(), // 在此处添加 Intlayer 提供者  ],};

    然后,您可以在任何组件中使用 useIntlayer 函数。

    src/app/pages/index.page.ts
    复制代码

    复制代码到剪贴板

    import { Component } from "@angular/core";import { useIntlayer } from "angular-intlayer";@Component({  selector: "app-home",  standalone: true,  template: `    <div class="content">      <h1>{{ content().title }}</h1>      <p>{{ content().congratulations }}</p>    </div>  `,})export default class HomeComponent {  content = useIntlayer("app");}

    Intlayer 内容以 Signal 形式返回,因此您通过调用 Signal 来访问值:content().title。

    (可选)第 6 步:更改内容语言

    要更改内容的语言,您可以使用 useLocale 函数提供的 setLocale 函数。这允许您设置应用的语言环境并相应地更新内容。

    创建一个用于切换语言的组件:

    src/app/locale-switcher.component.ts
    复制代码

    复制代码到剪贴板

    import { Component } from "@angular/core";import { CommonModule } from "@angular/common";import { useLocale } from "angular-intlayer";@Component({  selector: "app-locale-switcher",  standalone: true,  imports: [CommonModule],  template: `    <div class="locale-switcher">      <select        [value]="locale()"        (change)="setLocale($any($event.target).value)"      >        @for (loc of availableLocales; track loc) {          <option [value]="loc">{{ loc }}</option>        }      </select>    </div>  `,})export class LocaleSwitcherComponent {  localeCtx = useLocale();  locale = this.localeCtx.locale;  availableLocales = this.localeCtx.availableLocales;  setLocale = this.localeCtx.setLocale;}

    然后,在您的页面中使用此组件:

    src/app/pages/index.page.ts
    复制代码

    复制代码到剪贴板

    import { Component } from "@angular/core";import { useIntlayer } from "angular-intlayer";import { LocaleSwitcherComponent } from "../locale-switcher.component";@Component({  selector: "app-home",  standalone: true,  imports: [LocaleSwitcherComponent],  template: `    <app-locale-switcher></app-locale-switcher>    <div class="content">      <h1>{{ content().title }}</h1>      <p>{{ content().congratulations }}</p>    </div>  `,})export default class HomeComponent {  content = useIntlayer("app");}

    配置 TypeScript

    Intlayer 使用模块扩充 (module augmentation) 来利用 TypeScript 的优势并使您的代码库更强大。

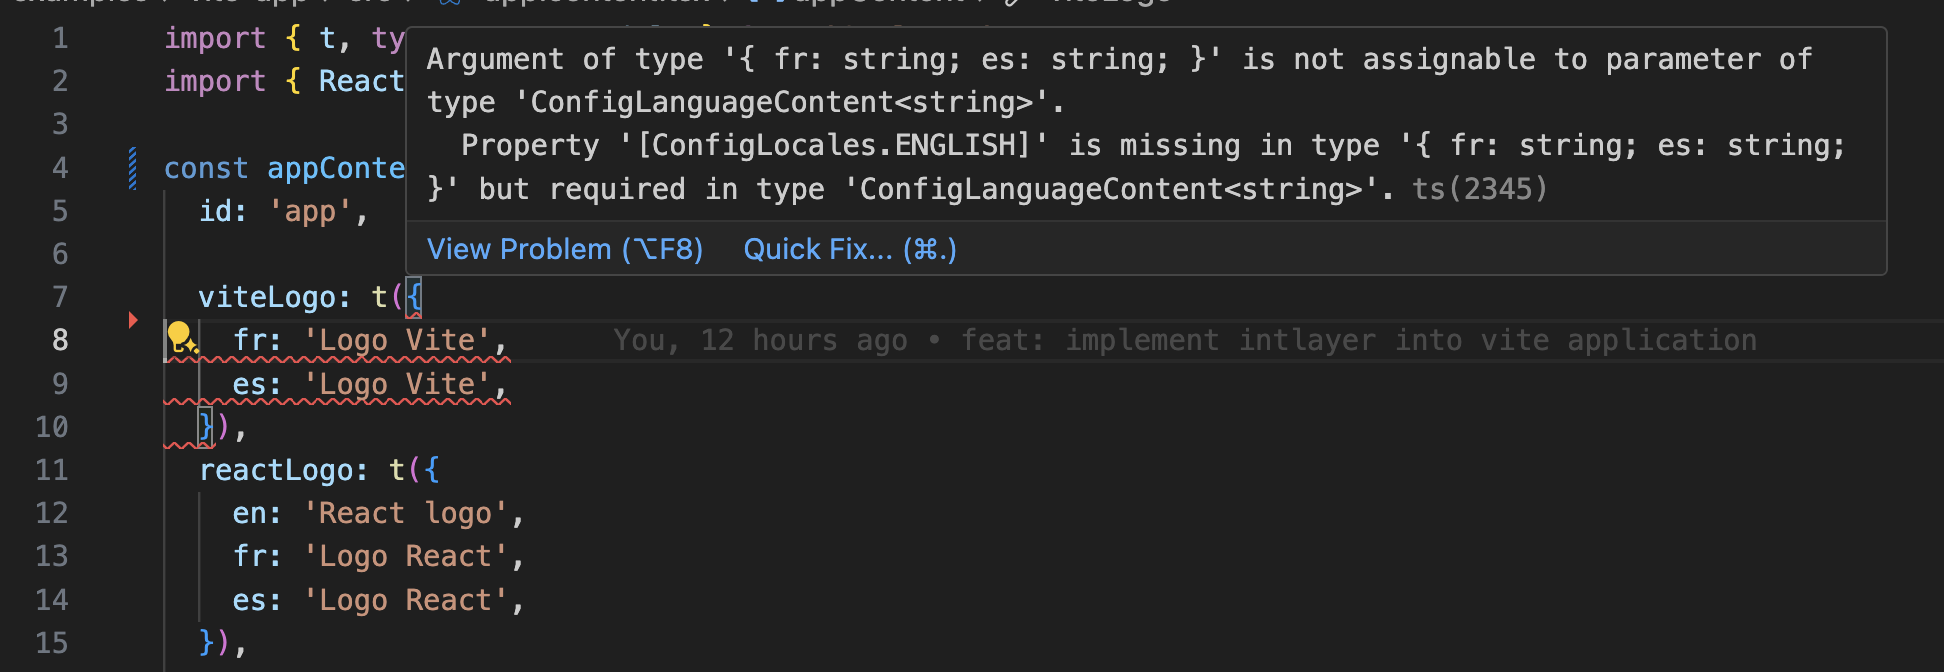
    自动补全

    翻译错误

    确保您的 TypeScript 配置包含自动生成的类型。

    tsconfig.json
    复制代码

    复制代码到剪贴板

    {  // ... 您现有的 TypeScript 配置  "include": [    // ... 您现有的 TypeScript 配置    ".intlayer/**/*.ts", // 包含自动生成的类型  ],}

    Git 配置

    建议忽略 Intlayer 生成的文件。这可以避免将它们提交到您的 Git 仓库。

    为此,您可以将以下指令添加到 .gitignore 文件中:

    bash
    复制代码

    复制代码到剪贴板

    #  忽略 Intlayer 生成的文件.intlayer

    VS Code 扩展

    为了提升您的 Intlayer 开发体验,您可以安装官方的 Intlayer VS Code 扩展。

    从 VS Code 市场安装

    此扩展提供:

    • 翻译键的自动补全。
    • 缺失翻译的实时错误检测。
    • 翻译内容的内联预览。
    • 轻松创建和更新翻译的快速操作。

    有关如何使用该扩展的更多详细信息,请参考 Intlayer VS Code 扩展文档。

    Angular 19 (Webpack)
    React CRA
    Alt+→

    在此页面

      讨论是匿名的,并会定期审查以解决常见问题。欢迎分享功能想法、对文档的反馈或任何与 Intlayer 相关的内容, 我们会利用这些意见来制定路线图并改进产品。

      npm install intlayer angular-intlayer vite-intlayernpx intlayer init
      import { defineConfig } from "vite";import { intlayer } from "vite-intlayer";import analog from "@analogjs/platform";// https://vitejs.dev/config/export default defineConfig(() => ({  plugins: [    analog(),    intlayer(), // 添加 Intlayer 插件  ],}));
      import { ApplicationConfig } from "@angular/core";import { provideIntlayer } from "angular-intlayer";export const appConfig: ApplicationConfig = {  providers: [    provideIntlayer(), // 在此处添加 Intlayer 提供者  ],};
      import { Component } from "@angular/core";import { useIntlayer } from "angular-intlayer";@Component({  selector: "app-home",  standalone: true,  template: `    <div class="content">      <h1>{{ content().title }}</h1>      <p>{{ content().congratulations }}</p>    </div>  `,})export default class HomeComponent {  content = useIntlayer("app");}
      import { Component } from "@angular/core";import { CommonModule } from "@angular/common";import { useLocale } from "angular-intlayer";@Component({  selector: "app-locale-switcher",  standalone: true,  imports: [CommonModule],  template: `    <div class="locale-switcher">      <select        [value]="locale()"        (change)="setLocale($any($event.target).value)"      >        @for (loc of availableLocales; track loc) {          <option [value]="loc">{{ loc }}</option>        }      </select>    </div>  `,})export class LocaleSwitcherComponent {  localeCtx = useLocale();  locale = this.localeCtx.locale;  availableLocales = this.localeCtx.availableLocales;  setLocale = this.localeCtx.setLocale;}
      import { Component } from "@angular/core";import { useIntlayer } from "angular-intlayer";import { LocaleSwitcherComponent } from "../locale-switcher.component";@Component({  selector: "app-home",  standalone: true,  imports: [LocaleSwitcherComponent],  template: `    <app-locale-switcher></app-locale-switcher>    <div class="content">      <h1>{{ content().title }}</h1>      <p>{{ content().congratulations }}</p>    </div>  `,})export default class HomeComponent {  content = useIntlayer("app");}
      {  // ... 您现有的 TypeScript 配置  "include": [    // ... 您现有的 TypeScript 配置    ".intlayer/**/*.ts", // 包含自动生成的类型  ],}
      #  忽略 Intlayer 生成的文件.intlayer