HomeSandboxShowcaseAppDocBlog
    • EnglishEnglish
      EN
    • русскийRussian
      RU
    • 日本語Japanese
      JA
    • françaisFrench
      FR
    • 한국어Korean
      KO
    • 中文Chinese
      ZH
    • españolSpanish
      ES
    • DeutschGerman
      DE
    • العربيةArabic
      AR
    • italianoItalian
      IT
    • British EnglishBritish English
      EN-GB
    • portuguêsPortuguese
      PT
    • हिन्दीHindi
      HI
    • TürkçeTurkish
      TR
    • polskiPolish
      PL
    • IndonesiaIndonesian
      ID
    • Tiếng ViệtVietnamese
      VI
    • українськаUkrainian
      UK
    /
    Filter docs by framework
    Alt+←
    Why Intlayer ?
    Get Started
    Concept
    • How Intlayer Works
    • Configuration
    • TestFillBuildWatchExtractLoginPushPullConfigurationListVersionEditorLiveDebugDoc ReviewDoc TranslateSDK
    • Visual Editor
    • CMS
    • CI/CD Integration
    • TranslationPluralEnumerationConditionGenderInsertionFileNestingMarkdownHTMLFunction Fetching
    • Per Locale File
    • Compiler
    • Auto Fill
    • Testing
    • Bundle Optimization
    Environment
    • Next.js 14 and App Router
      Next.js 15
      Next.js no locale path
      Next.js and Page Router
      Compiler
    • Tanstack Start Solid
    • Astro and React
      Astro and Svelte
      Astro and Vue
      Astro and Solid
      Astro and Preact
      Astro and Lit
      Astro and Vanilla JS
    • React Router v7
      React Router v7 (fs-routes)
      Compiler
    • Nuxt and Vue
    • Vite and Solid
    • SvelteKit
    • Vite and Preact
    • Vite and Vanilla JS
    • Vite and Lit
    • Angular 19 (Webpack)
      Analog
    • React CRA
    • React Native and Expo
    • Express.js
      NestJS
      Fastify
      Hono
      Adonis
    • Lynx and React
    Plugins
    • JSON
    • gettext (.po)
    VS Code Extension
    Agent
    • MCP Server
    • Agent skills
    Releases
    • v8
    • v7
    • v6
    Benchmark
    • Next.js
    • TanStack
    • Vue
    • Solid
    • Svelte
    Blog
    Ask a question
    1. Documentation
    2. Environment
    3. Vite and Vue
    \n\n\n```\n\n> If your app already exists, you can use the [Intlayer Compiler](/doc/compiler), as well as the [extract command](/doc/concept/cli/extract), to transform thousands of components in a second.\n\n#### Accessing Content in Intlayer\n\nIntlayer offers different APIs to access your content:\n\n- **Component-based syntax** (recommended):\n Use the ``, or `` syntax to render content as an Intlayer Node. You can also customize the rendering by using the `.use()` method: ` h('strong', props) })\" />`. This integrates seamlessly with the [Visual Editor](/doc/concept/editor) and [CMS](/doc/concept/cms).\n\n- **String-based syntax**:\n Use `{{ myContent }}` to render the content as plain text, without Visual Editor support.\n\n- **Raw HTML syntax**:\n Use `
    ` to render the content as raw HTML, without Visual Editor support.\n\n- **Destructuration syntax**:\n The `useIntlayer` composable returns an Proxy with the content. This proxy can be destructured to access the content while keeping the reactivity.\n - Use `const content = useIntlayer(\"myContent\");` And `{{ content.myContent }}` / ``.\n - Or use `const { myContent } = useIntlayer(\"myContent\");` And `{{ myContent}}` / `` to destructure the content.\n\n### (Optional) Step 6: Change the language of your content\n\nTo change the language of your content, you can use the `setLocale` function provided by the `useLocale` composable. This function allows you to set the locale of the application and update the content accordingly.\n\nCreate a component to switch between languages:\n\n```vue fileName=\"src/components/LocaleSwitcher.vue\"\n\n\n\n```\n\nThen, use this component in your App.vue:\n\n```vue fileName=\"src/App.vue\"\n\n\n\n```\n\n### (Optional) Step 7: Add localized Routing to your application\n\nAdding localized routing in a Vue application typically involves using Vue Router with locale prefixes. This makes unique routes for each language, which is useful for SEO and SEO-friendly URLs.\n\nExample:\n\n```plaintext\n- https://example.com/about\n- https://example.com/es/about\n- https://example.com/fr/about\n```\n\nFirst, install Vue Router:\n\n```bash packageManager=\"npm\"\nnpm install vue-router\nnpx intlayer init\n```\n\n```bash packageManager=\"pnpm\"\npnpm add vue-router\npnpm intlayer init\n```\n\n```bash packageManager=\"yarn\"\nyarn add vue-router\n```\n\nThen, create a router configuration that handles locale-based routing:\n\n```js fileName=\"src/router/index.ts\"\nimport {\n localeFlatMap,\n type Locale,\n} from 'intlayer';\nimport { createIntlayerClient } from \"vue-intlayer\";\nimport { createRouter, createWebHistory } from 'vue-router';\nimport HomeView from './views/home/HomeView.vue';\nimport RootView from './views/root/Root.vue';\n\n/**\n * Declare the routes with locale-specific paths and metadata.\n */\nconst routes = localeFlatMap(({ urlPrefix, locale }) => [\n {\n path: `${urlPrefix}/`,\n name: `Root-${locale}`,\n component: RootView,\n meta: {\n locale,\n },\n },\n {\n path: `${urlPrefix}/home`,\n name: `Home-${locale}`,\n component: HomeView,\n meta: {\n locale,\n },\n },\n]);\n\n// Create the router instance\nexport const router = createRouter({\n history: createWebHistory(),\n routes,\n});\n\n// Add navigation guard for locale handling\nrouter.beforeEach((to, _from, next) => {\n const client = createIntlayerClient();\n\n const metaLocale = to.meta.locale as Locale;\n\n // Reuse the locale defined in the route meta\n client.setLocale(metaLocale);\n next();\n});\n```\n\n> The name is used to identify the route in the router. It should be unique across all routes to avoid conflicts and ensure proper navigation and linking.\n\nThen, register the router in your main.js file:\n\n```js fileName=\"src/main.ts\"\nimport { createApp } from \"vue\";\nimport App from \"./App.vue\";\nimport { router } from \"./router\";\nimport \"./style.css\";\n\nconst app = createApp(App);\n\n// Add the router to the app\napp.use(router);\n\n// Mount the app\napp.mount(\"#app\");\n```\n\nThen update your `App.vue` file to render the RouterView component. This component will display the matched component for the current route.\n\n```vue fileName=\"src/App.vue\"\n\n\n\n```\n\nIn parallel, you can also use the `intlayerProxy` to add server-side routing to your application. This plugin will automatically detect the current locale based on the URL and set the appropriate locale cookie. If no locale is specified, the plugin will determine the most appropriate locale based on the user's browser language preferences. If no locale is detected, it will redirect to the default locale.\n\n> Note that to use the `intlayerProxy` in production, you need to switch the `vite-intlayer` package from `devDependencies` to `dependencies`.\n\n```typescript {3,7} fileName=\"vite.config.ts\" codeFormat={[\"typescript\", \"esm\", \"commonjs\"]}\nimport { defineConfig } from \"vite\";\nimport vue from \"@vitejs/plugin-vue\";\nimport { intlayer, intlayerProxy } from \"vite-intlayer\";\n\n// https://vitejs.dev/config/\nexport default defineConfig({\n plugins: [\n intlayerProxy(), // should be placed first\n vue(),\n intlayer(),\n ],\n});\n```\n\n### (Optional) Step 8: Change the URL when the locale changes\n\nTo automatically update the URL when the user changes the language, you can modify the `LocaleSwitcher` component to use Vue Router:\n\n```vue fileName=\"src/components/LocaleSwitcher.vue\"\n\n\n\n```\n\nTip: For better SEO and accessibility, use tags as `` to link to localized pages, as shown in Step 10. This allows search engines to discover and index language-specific URLs properly. To preserve SPA behavior, you can prevent the default navigation with @click.prevent, change the locale using useLocale, and programmatically navigate using Vue Router.\n\n```html\n
      \n
    1. \n \n
      \n English\n English\n EN\n
      \n
      \n
    2. \n
    3. \n \n
      \n Español\n Spanish\n ES\n
      \n \n
    4. \n
    \n```\n\n### (Optional) Step 9: Switch the HTML Language and Direction Attributes\n\nWhen your application supports multiple languages, it's crucial to update the `` tag's `lang` and `dir` attributes to match the current locale. Doing so ensures:\n\n- **Accessibility**: Screen readers and assistive technologies rely on the correct `lang` attribute to pronounce and interpret content accurately.\n- **Text Rendering**: The `dir` (direction) attribute ensures that text is rendered in the proper order (e.g., left-to-right for English, right-to-left for Arabic or Hebrew), which is essential for readability.\n- **SEO**: Search engines use the `lang` attribute to determine the language of your page, helping to serve the right localized content in search results.\n\nBy updating these attributes dynamically when the locale changes, you guarantee a consistent and accessible experience for users across all supported languages.\n\n```js fileName=\"src/composables/useI18nHTMLAttributes.ts\"\nimport { watch } from \"vue\";\nimport { useLocale } from \"vue-intlayer\";\nimport { getHTMLTextDir } from \"intlayer\";\n\n/**\n * Composable that updates the HTML element's `lang` and `dir` attributes\n * based on the current locale.\n *\n * @example\n * // In your App.vue or a global component\n * import { useI18nHTMLAttributes } from './composables/useI18nHTMLAttributes'\n *\n * useI18nHTMLAttributes()\n */\nexport const useI18nHTMLAttributes = () => {\n const { locale } = useLocale();\n\n // Update the HTML attributes whenever the locale changes\n watch(\n () => locale.value,\n (newLocale) => {\n if (!newLocale) return;\n\n // Update the language attribute\n document.documentElement.lang = newLocale;\n\n // Set the text direction (ltr for most languages, rtl for Arabic, Hebrew, etc.)\n document.documentElement.dir = getHTMLTextDir(newLocale);\n },\n { immediate: true }\n );\n};\n```\n\nUse this composable in your `App.vue` or a global component:\n\n```vue fileName=\"src/App.vue\"\n\n\n\n```\n\n### (Optional) Step 10: Creating a Localized Link Component\n\nTo ensure that your application’s navigation respects the current locale, you can create a custom `Link` component. This component automatically prefixes internal URLs with the current language, so that. For example, when a French-speaking user clicks on a link to the \"About\" page, they are redirected to `/fr/about` instead of `/about`.\n\nThis behavior is useful for several reasons:\n\n- **SEO and User Experience**: Localized URLs help search engines index language-specific pages correctly and provide users with content in their preferred language.\n- **Consistency**: By using a localized link throughout your application, you guarantee that navigation stays within the current locale, preventing unexpected language switches.\n- **Maintainability**: Centralizing the localization logic in a single component simplifies the management of URLs, making your codebase easier to maintain and extend as your application grows.\n\n```vue fileName=\"src/components/Link.vue\"\n\n\n\n```\n\nFor use with Vue Router, create a router-specific version:\n\n```vue fileName=\"src/components/RouterLink.vue\"\n\n\n\n```\n\nUse these components in your application:\n\n```vue fileName=\"src/App.vue\"\n\n\n\n```\n\n### (Optional) Step 11: Extract the content of your components\n\nIf you have an existing codebase, transforming thousands of files can be time-consuming.\n\nTo ease this process, Intlayer propose a [compiler](/doc/compiler) / [extractor](/doc/concept/cli/extract) to transform your components and extract the content.\n\nTo set it up, you can add a `compiler` section in your `intlayer.config.ts` file:\n\n```typescript fileName=\"intlayer.config.ts\" codeFormat={[\"typescript\", \"esm\", \"commonjs\"]}\nimport { type IntlayerConfig } from \"intlayer\";\n\nconst config: IntlayerConfig = {\n // ... Rest of your config\n compiler: {\n /**\n * Indicates if the compiler should be enabled.\n */\n enabled: true,\n\n /**\n * Defines the output files path\n */\n output: ({ fileName, extension }) => `./${fileName}${extension}`,\n\n /**\n * Indicates if the components should be saved after being transformed.\n *\n * - If `true`, the compiler will rewrite the component file in the disk. So the transformation will be permanent, and the compiler will skip the transformation for the next process. That way, the compiler can transform the app, and then it can be removed.\n *\n * - If `false`, the compiler will inject the `useIntlayer()` function call into the code in the build output only, and keep the base codebase intact. The transformation will be done only in memory.\n */\n saveComponents: false,\n\n /**\n * Dictionary key prefix\n */\n dictionaryKeyPrefix: \"\",\n },\n};\n\nexport default config;\n```\n\n\n \n\nRun the extractor to transform your components and extract the content\n\n```bash packageManager=\"npm\"\nnpx intlayer extract\n```\n\n```bash packageManager=\"pnpm\"\npnpm intlayer extract\n```\n\n```bash packageManager=\"yarn\"\nyarn intlayer extract\n```\n\n```bash packageManager=\"bun\"\nbun x intlayer extract\n```\n\n \n \n\nUpdate your `vite.config.ts` to include the `intlayerCompiler` plugin:\n\n```ts fileName=\"vite.config.ts\"\nimport { defineConfig } from \"vite\";\nimport { intlayer, intlayerCompiler } from \"vite-intlayer\";\n\nexport default defineConfig({\n plugins: [\n intlayer(),\n intlayerCompiler(), // Adds the compiler plugin\n ],\n});\n```\n\n```bash packageManager=\"npm\"\nnpm run build # Or npm run dev\n```\n\n```bash packageManager=\"pnpm\"\npnpm run build # Or pnpm run dev\n```\n\n```bash packageManager=\"yarn\"\nyarn build # Or yarn dev\n```\n\n```bash packageManager=\"bun\"\nbun run build # Or bun run dev\n```\n\n \n\n\n### (Optional) Sitemap and robots.txt (build-time)\n\nIntlayer includes formatters such as `generateSitemap` and `getMultilingualUrls` that produce crawler-ready multilingual `sitemap.xml` and `robots.txt` output you can write into your project’s `public/` folder. In practice you run a small Node script **before** Vite (for example `predev` / `prebuild` npm hooks) so those files exist when you build or serve the app.\n\n#### Sitemap\n\nIntlayer’s sitemap generator respects your locale setup and includes the usual metadata for crawlers.\n\n> The generated sitemap supports the `xhtml:link` namespace (hreflang XML extensions). Unlike basic generators that only emit flat URLs, Intlayer wires bidirectional links between every localized variant of each page (for example `/about`, `/fr/about`, or `/about?lang=fr`, depending on your routing mode), which helps search engines relate localized URLs.\n\n#### Robots.txt\n\nUse `getMultilingualUrls` so `Disallow` entries cover every localized spelling of sensitive paths.\n\n#### 1. Add `generate-seo.mjs` at the project root\n\n```javascript fileName=\"generate-seo.mjs\"\nimport fs from \"fs\";\nimport path from \"path\";\nimport { fileURLToPath } from \"url\";\nimport { generateSitemap, getMultilingualUrls } from \"intlayer\";\n\nconst __dirname = path.dirname(fileURLToPath(import.meta.url));\n\nconst SITE_URL = (process.env.SITE_URL || \"http://localhost:5173\").replace(\n /\\/$/,\n \"\"\n);\n\nconst pathList = [\n { path: \"/\", changefreq: \"daily\", priority: 1.0 },\n { path: \"/about\", changefreq: \"monthly\", priority: 0.7 },\n];\n\nconst sitemapXml = generateSitemap(pathList, { siteUrl: SITE_URL });\nfs.writeFileSync(path.join(__dirname, \"public\", \"sitemap.xml\"), sitemapXml);\n\nconst getAllMultilingualUrls = (urls) =>\n urls.flatMap((url) => Object.values(getMultilingualUrls(url)));\n\nconst disallowedPaths = getAllMultilingualUrls([\"/admin\", \"/private\"]);\n\nconst robotsTxt = [\n \"User-agent: *\",\n \"Allow: /\",\n ...disallowedPaths.map((path) => `Disallow: ${path}`),\n \"\",\n `Sitemap: ${SITE_URL}/sitemap.xml`,\n].join(\"\\n\");\n\nfs.writeFileSync(path.join(__dirname, \"public\", \"robots.txt\"), robotsTxt);\n\nconsole.log(\"SEO files generated successfully.\");\n```\n\n`intlayer` must be installed so the script can import it. Set `SITE_URL` in the environment for production (for example in CI).\n\n> Prefer `generate-seo.mjs` for Node ESM. If you use `generate-seo.js` instead, ensure `\"type\": \"module\"` is set in `package.json`, or run Node with ESM enabled.\n\n#### 2. Run the script before Vite\n\n```json fileName=\"package.json\"\n{\n \"scripts\": {\n \"dev\": \"vite\",\n \"prebuild\": \"node generate-seo.mjs\",\n \"build\": \"vite build\",\n \"preview\": \"vite preview\"\n }\n}\n```\n\nAdjust if you use pnpm or yarn. You can also invoke the same script from CI or another step if that fits your workflow.\n\n### Configure TypeScript\n\nIntlayer uses module augmentation to get benefits of TypeScript and make your codebase stronger.\n\n![Autocompletion](https://github.com/aymericzip/intlayer/blob/main/docs/assets/autocompletion.png?raw=true)\n\n![Translation error](https://github.com/aymericzip/intlayer/blob/main/docs/assets/translation_error.png?raw=true)\n\nEnsure your TypeScript configuration includes the autogenerated types.\n\n```json5 fileName=\"tsconfig.json\"\n{\n // ... Your existing TypeScript configurations\n \"include\": [\n // ... Your existing TypeScript configurations\n \".intlayer/**/*.ts\", // Include the auto-generated types\n ],\n}\n```\n\n### Git Configuration\n\nIt is recommended to ignore the files generated by Intlayer. This allows you to avoid committing them to your Git repository.\n\nTo do this, you can add the following instructions to your `.gitignore` file:\n\n```bash\n# Ignore the files generated by Intlayer\n.intlayer\n```\n\n### VS Code Extension\n\nTo improve your development experience with Intlayer, you can install the official **Intlayer VS Code Extension**.\n\n[Install from the VS Code Marketplace](https://marketplace.visualstudio.com/items?itemName=intlayer.intlayer-vs-code-extension)\n\nThis extension provides:\n\n- **Autocompletion** for translation keys.\n- **Real-time error detection** for missing translations.\n- **Inline previews** of translated content.\n- **Quick actions** to easily create and update translations.\n\nFor more details on how to use the extension, refer to the [Intlayer VS Code Extension documentation](https://intlayer.org/doc/vs-code-extension).\n\n---\n\n### Go Further\n\nTo go further, you can implement the [visual editor](/doc/concept/editor) or externalize your content using the [CMS](/doc/concept/cms).\n\n---\n","about":"Discover how to make your Vite and Vue website multilingual. Follow the documentation to internationalize (i18n) and translate it.","url":"https://intlayer.org/doc/environment/vite-and-vue","datePublished":"18-04-2025","dateModified":"06-05-2026","keywords":"Internationalization, Documentation, Intlayer, Vite, Vue, JavaScript","license":"https://raw.githubusercontent.com/aymericzip/intlayer/refs/heads/main/LICENSE","audience":{"@type":"Audience","audienceType":"Developers, Content Managers"}}
    Creation:2025-04-18Last update:2026-05-06
    See the application template on GitHub

    This page has an application template available.

    See the showcase application

    This page links to a live demo of the template.

    Watch the video tutorial

    This page has a video tutorial available.

    Reference this doc to your favorite AI assistant
    ChatGPT
    Claude
    DeepSeek
    Google AI mode
    Gemini
    Perplexity
    Mistral
    Grok

    Ask your question and get a summary of the document by referencing this page and the AI provider of your choice

    Version History

    1. "Update Solid useIntlayer API usage to direct property access"
      v8.9.05/4/2026
    2. Change installIntlayer by use(intlayer)
      v8.5.03/24/2026
    3. "Add init command"
      v7.5.912/30/2025
    4. "Initial history"
      v5.5.106/29/2025
    Edit this doc

    If you have an idea for improving this documentation, please feel free to contribute by submitting a pull request on GitHub.

    GitHub link to the documentation
    Copy

    Copy doc Markdown to clipboard

    Translate your Vite and Vue website using Intlayer | Internationalization (i18n)

    Table of Contents

    What is Intlayer?

    Intlayer is an innovative, open-source internationalization (i18n) library designed to simplify multilingual support in modern web applications.

    With Intlayer, you can:

    • Easily manage translations using declarative dictionaries at the component level.
    • Dynamically localize metadata, routes, and content.
    • Ensure TypeScript support with autogenerated types, improving autocompletion and error detection.
    • Benefit from advanced features, like dynamic locale detection and switching.

    Step-by-Step Guide to Set Up Intlayer in a Vite and Vue Application

    www.youtube.com
    ide.intlayer.org
    intlayer-vite-vue-template.vercel.app

    See Application Template on GitHub.

    Step 1: Install Dependencies

    Install the necessary packages using npm:

    bash
    Copy code

    Copy the code to the clipboard

    npm install intlayer vue-intlayernpm install vite-intlayer --save-devnpx intlayer init
    • intlayer

      The core package that provides internationalization tools for configuration management, translation, content declaration, transpilation, and CLI commands.

    • vue-intlayer The package that integrates Intlayer with Vue application. It provides context providers and composables for Vue internationalization.

    • vite-intlayer Includes the Vite plugin for integrating Intlayer with the Vite bundler, as well as middleware for detecting the user's preferred locale, managing cookies, and handling URL redirection.

    Step 2: Configuration of your project

    Create a config file to configure the languages of your application:

    intlayer.config.ts
    Copy code

    Copy the code to the clipboard

    import { Locales, type IntlayerConfig } from "intlayer";
    
    const config: IntlayerConfig = {
      internationalization: {
        locales: [
          Locales.ENGLISH,
          Locales.FRENCH,
          Locales.SPANISH,
          // Your other locales
        ],
        defaultLocale: Locales.ENGLISH,
      },
    };
    
    export default config;
    Through this configuration file, you can set up localized URLs, middleware redirection, cookie names, the location and extension of your content declarations, disable Intlayer logs in the console, and more. For a complete list of available parameters, refer to the configuration documentation.

    Step 3: Integrate Intlayer in Your Vite Configuration

    Add the intlayer plugin into your configuration.

    vite.config.ts
    Copy code

    Copy the code to the clipboard

    import { defineConfig } from "vite";
    import vue from "@vitejs/plugin-vue";
    import { intlayer } from "vite-intlayer";
    
    // https://vitejs.dev/config/
    export default defineConfig({
      plugins: [vue(), intlayer()],
    });
    The intlayer() Vite plugin is used to integrate Intlayer with Vite. It ensures the building of content declaration files and monitors them in development mode. It defines Intlayer environment variables within the Vite application. Additionally, it provides aliases to optimize performance.

    Step 4: Declare Your Content

    Create and manage your content declarations to store translations:

    src/helloWorld.content.ts
    Copy code

    Copy the code to the clipboard

    import { t, type Dictionary } from "intlayer";
    
    const helloWorldContent = {
      key: "helloworld",
      content: {
        count: t({ en: "count is ", fr: "le compte est ", es: "el recuento es " }),
        edit: t({
          en: "Edit <code>components/HelloWorld.vue</code> and save to test HMR",
          fr: "Éditez <code>components/HelloWorld.vue</code> et enregistrez pour tester HMR",
          es: "Edita <code>components/HelloWorld.vue</code> y guarda para probar HMR",
        }),
        checkOut: t({ en: "Check out ", fr: "Vérifiez ", es: "Compruebe " }),
        officialStarter: t({
          en: ", the official Vue + Vite starter",
          fr: ", le starter officiel Vue + Vite",
          es: ", el starter oficial Vue + Vite",
        }),
        learnMore: t({
          en: "Learn more about IDE Support for Vue in the ",
          fr: "En savoir plus sur le support IDE pour Vue dans le ",
          es: "Aprenda más sobre el soporte IDE para Vue en el ",
        }),
        vueDocs: t({
          en: "Vue Docs Scaling up Guide",
          fr: "Vue Docs Scaling up Guide",
          es: "Vue Docs Scaling up Guide",
        }),
        readTheDocs: t({
          en: "Click on the Vite and Vue logos to learn more",
          fr: "Cliquez sur les logos Vite et Vue pour en savoir plus",
          es: "Haga clic en los logotipos de Vite y Vue para obtener más información",
        }),
      },
    } satisfies Dictionary;
    
    export default helloWorldContent;
    Your content declarations can be defined anywhere in your application as soon they are included into the contentDir directory (by default, ./src). And match the content declaration file extension (by default, .content.{json,ts,tsx,js,jsx,mjs,cjs}).
    For more details, refer to the content declaration documentation.

    Step 5: Utilize Intlayer in Your Code

    To utilize Intlayer's internationalization features throughout your Vue application, you first need to register the Intlayer singleton instance in your main file. This step is crucial as it provides the internationalization context to all components in your application, making translations accessible anywhere in your component tree.

    Copy code

    Copy the code to the clipboard

    import { createApp } from "vue";import { intlayer } from "vue-intlayer";import App from "./App.vue";import "./style.css";const app = createApp(App);// Inject the provider at the top levelapp.use(intlayer);// Mount the appapp.mount("#app");

    You can also call installIntlayer(app) directly as a function if you prefer:

    javascript
    Copy code

    Copy the code to the clipboard

    import { intlayer } from "vue-intlayer";app.use(intlayer);

    Access your content dictionaries throughout your application by creating a main Vue component and using the useIntlayer composables:

    src/HelloWord.vue
    Copy code

    Copy the code to the clipboard

    <script setup lang="ts">import { ref } from "vue";import { useIntlayer } from "vue-intlayer";defineProps({  msg: String,});const {  count,  edit,  checkOut,  officialStarter,  learnMore,  vueDocs,  readTheDocs,} = useIntlayer("helloworld");const countRef = ref(0);</script><template>  <h1>{{ msg }}</h1>  <div class="card">    <button type="button" @click="countRef++">      <count />      {{ countRef }}    </button>    <p v-html="edit"></p>  </div>  <p>    <checkOut />    <a href="https://vuejs.org/guide/quick-start.html#local" target="_blank"      >create-vue</a    >, <officialStarter />  </p>  <p>    <learnMore />    <a      href="https://vuejs.org/guide/scaling-up/tooling.html#ide-support"      target="_blank"      ><vueDocs /></a    >.  </p>  <p class="read-the-docs"><readTheDocs /></p>  <p class="read-the-docs">{{ readTheDocs }}</p></template>
    If your app already exists, you can use the Intlayer Compiler, as well as the extract command, to transform thousands of components in a second.

    Accessing Content in Intlayer

    Intlayer offers different APIs to access your content:

    • Component-based syntax (recommended): Use the <myContent />, or <Component :is="myContent" /> syntax to render content as an Intlayer Node. You can also customize the rendering by using the .use() method: <Component :is="myContent.use({ b: (props) => h('strong', props) })" />. This integrates seamlessly with the Visual Editor and CMS.

    • String-based syntax: Use {{ myContent }} to render the content as plain text, without Visual Editor support.

    • Raw HTML syntax: Use <div v-html="myContent" /> to render the content as raw HTML, without Visual Editor support.

    • Destructuration syntax: The useIntlayer composable returns an Proxy with the content. This proxy can be destructured to access the content while keeping the reactivity.

      • Use const content = useIntlayer("myContent"); And {{ content.myContent }} / <content.myContent />.
      • Or use const { myContent } = useIntlayer("myContent"); And {{ myContent}} / <myContent/> to destructure the content.

    (Optional) Step 6: Change the language of your content

    To change the language of your content, you can use the setLocale function provided by the useLocale composable. This function allows you to set the locale of the application and update the content accordingly.

    Create a component to switch between languages:

    src/components/LocaleSwitcher.vue
    Copy code

    Copy the code to the clipboard

    <script setup lang="ts">import { getLocaleName } from "intlayer";import { ref, watch } from "vue";import { useLocale } from "vue-intlayer";// Get locale information and setLocale functionconst { locale, availableLocales, setLocale } = useLocale();// Track the selected locale with a refconst selectedLocale = ref(locale.value);// Update the locale when the selection changesconst changeLocale = () => setLocale(selectedLocale.value);// Keep the selectedLocale in sync with the global localewatch(  () => locale.value,  (newLocale) => {    selectedLocale.value = newLocale;  });</script><template>  <div class="locale-switcher">    <select v-model="selectedLocale" @change="changeLocale">      <option v-for="loc in availableLocales" :key="loc" :value="loc">        {{ getLocaleName(loc) }}      </option>    </select>  </div></template>

    Then, use this component in your App.vue:

    src/App.vue
    Copy code

    Copy the code to the clipboard

    <script setup lang="ts">import { useIntlayer } from "vue-intlayer";import HelloWorld from "@components/HelloWorld.vue";import LocaleSwitcher from "@components/LocaleSwitcher.vue";import { ref, watch } from "vue";const content = useIntlayer("app"); // Create related intlayer declaration file</script><template>  <div>    <LocaleSwitcher />    <a href="https://vite.dev" target="_blank">      <img src="/vite.svg" class="logo" :alt="content.viteLogo" />    </a>    <a href="https://vuejs.org/" target="_blank">      <img src="./assets/vue.svg" class="logo vue" :alt="content.vueLogo" />    </a>  </div>  <HelloWorld :msg="content.title" /></template>

    (Optional) Step 7: Add localized Routing to your application

    Adding localized routing in a Vue application typically involves using Vue Router with locale prefixes. This makes unique routes for each language, which is useful for SEO and SEO-friendly URLs.

    Example:

    plaintext
    Copy code

    Copy the code to the clipboard

    - https://example.com/about- https://example.com/es/about- https://example.com/fr/about

    First, install Vue Router:

    bash
    Copy code

    Copy the code to the clipboard

    npm install vue-routernpx intlayer init

    Then, create a router configuration that handles locale-based routing:

    src/router/index.ts
    Copy code

    Copy the code to the clipboard

    import {  localeFlatMap,  type Locale,} from 'intlayer';import { createIntlayerClient } from "vue-intlayer";import { createRouter, createWebHistory } from 'vue-router';import HomeView from './views/home/HomeView.vue';import RootView from './views/root/Root.vue';/** * Declare the routes with locale-specific paths and metadata. */const routes = localeFlatMap(({ urlPrefix, locale }) => [  {    path: `${urlPrefix}/`,    name: `Root-${locale}`,    component: RootView,    meta: {      locale,    },  },  {    path: `${urlPrefix}/home`,    name: `Home-${locale}`,    component: HomeView,    meta: {      locale,    },  },]);// Create the router instanceexport const router = createRouter({  history: createWebHistory(),  routes,});// Add navigation guard for locale handlingrouter.beforeEach((to, _from, next) => {  const client = createIntlayerClient();  const metaLocale = to.meta.locale as Locale;  // Reuse the locale defined in the route meta  client.setLocale(metaLocale);  next();});
    The name is used to identify the route in the router. It should be unique across all routes to avoid conflicts and ensure proper navigation and linking.

    Then, register the router in your main.js file:

    src/main.ts
    Copy code

    Copy the code to the clipboard

    import { createApp } from "vue";import App from "./App.vue";import { router } from "./router";import "./style.css";const app = createApp(App);// Add the router to the appapp.use(router);// Mount the appapp.mount("#app");

    Then update your App.vue file to render the RouterView component. This component will display the matched component for the current route.

    src/App.vue
    Copy code

    Copy the code to the clipboard

    <script setup lang="ts">import LocaleSwitcher from "@components/LocaleSwitcher.vue";</script><template>  <nav>    <LocaleSwitcher />  </nav>  <RouterView /></template>

    In parallel, you can also use the intlayerProxy to add server-side routing to your application. This plugin will automatically detect the current locale based on the URL and set the appropriate locale cookie. If no locale is specified, the plugin will determine the most appropriate locale based on the user's browser language preferences. If no locale is detected, it will redirect to the default locale.

    Note that to use the intlayerProxy in production, you need to switch the vite-intlayer package from devDependencies to dependencies.
    vite.config.ts
    Copy code

    Copy the code to the clipboard

    import { defineConfig } from "vite";
    import vue from "@vitejs/plugin-vue";
    import { intlayer, intlayerProxy } from "vite-intlayer";
    
    // https://vitejs.dev/config/
    export default defineConfig({
      plugins: [
        intlayerProxy(), // should be placed first
        vue(),
        intlayer(),
      ],
    });

    (Optional) Step 8: Change the URL when the locale changes

    To automatically update the URL when the user changes the language, you can modify the LocaleSwitcher component to use Vue Router:

    src/components/LocaleSwitcher.vue
    Copy code

    Copy the code to the clipboard

    <script setup lang="ts">import { Locales, getLocaleName, getLocalizedUrl } from "intlayer";import { ref, watch } from "vue";import { useLocale } from "vue-intlayer";import { useRouter } from "vue-router";// Get Vue Routerconst router = useRouter();// Get locale information and setLocale functionconst { locale, availableLocales, setLocale } = useLocale({  onLocaleChange: (newLocale) => {    // Get current route and create a localized URL    const currentPath = router.currentRoute.value.fullPath;    const localizedPath = getLocalizedUrl(currentPath, newLocale);    // Navigate to the localized route without reloading the page    router.push(localizedPath);  },});// Track the selected locale with a refconst selectedLocale = ref(locale.value);// Update the locale when the selection changesconst changeLocale = () => {  setLocale(selectedLocale.value);};// Keep the selectedLocale in sync with the global localewatch(  () => locale.value,  (newLocale) => {    selectedLocale.value = newLocale;  });</script><template>  <div class="locale-switcher">    <select v-model="selectedLocale" @change="changeLocale">      <option v-for="loc in availableLocales" :key="loc" :value="loc">        {{ getLocaleName(loc) }}      </option>    </select>  </div></template>

    Tip: For better SEO and accessibility, use tags as <a href="/fr/home" hreflang="fr"> to link to localized pages, as shown in Step 10. This allows search engines to discover and index language-specific URLs properly. To preserve SPA behavior, you can prevent the default navigation with @click.prevent, change the locale using useLocale, and programmatically navigate using Vue Router.

    html
    Copy code

    Copy the code to the clipboard

    <ol>  <li>    <a      hreflang="x-default"      aria-label="Switch to English"      target="_self"      aria-current="page"      href="/doc/get-started"    >      <div>        <span dir="ltr" lang="en">English</span>        <span>English</span>        <span>EN</span>      </div>    </a>  </li>  <li>    <a      hreflang="es"      aria-label="Switch to Spanish"      target="_self"      href="/es/doc/get-started"    >      <div>        <span dir="ltr" lang="es">Español</span>        <span>Spanish</span>        <span>ES</span>      </div>    </a>  </li></ol>

    (Optional) Step 9: Switch the HTML Language and Direction Attributes

    When your application supports multiple languages, it's crucial to update the <html> tag's lang and dir attributes to match the current locale. Doing so ensures:

    • Accessibility: Screen readers and assistive technologies rely on the correct lang attribute to pronounce and interpret content accurately.
    • Text Rendering: The dir (direction) attribute ensures that text is rendered in the proper order (e.g., left-to-right for English, right-to-left for Arabic or Hebrew), which is essential for readability.
    • SEO: Search engines use the lang attribute to determine the language of your page, helping to serve the right localized content in search results.

    By updating these attributes dynamically when the locale changes, you guarantee a consistent and accessible experience for users across all supported languages.

    src/composables/useI18nHTMLAttributes.ts
    Copy code

    Copy the code to the clipboard

    import { watch } from "vue";import { useLocale } from "vue-intlayer";import { getHTMLTextDir } from "intlayer";/** * Composable that updates the HTML <html> element's `lang` and `dir` attributes * based on the current locale. * * @example * // In your App.vue or a global component * import { useI18nHTMLAttributes } from './composables/useI18nHTMLAttributes' * * useI18nHTMLAttributes() */export const useI18nHTMLAttributes = () => {  const { locale } = useLocale();  // Update the HTML attributes whenever the locale changes  watch(    () => locale.value,    (newLocale) => {      if (!newLocale) return;      // Update the language attribute      document.documentElement.lang = newLocale;      // Set the text direction (ltr for most languages, rtl for Arabic, Hebrew, etc.)      document.documentElement.dir = getHTMLTextDir(newLocale);    },    { immediate: true }  );};

    Use this composable in your App.vue or a global component:

    src/App.vue
    Copy code

    Copy the code to the clipboard

    <script setup lang="ts">import { useI18nHTMLAttributes } from "@composables/useI18nHTMLAttributes";// Apply the HTML attributes based on the current localeuseI18nHTMLAttributes();</script><template>  <!-- Your app template --></template>

    (Optional) Step 10: Creating a Localized Link Component

    To ensure that your application’s navigation respects the current locale, you can create a custom Link component. This component automatically prefixes internal URLs with the current language, so that. For example, when a French-speaking user clicks on a link to the "About" page, they are redirected to /fr/about instead of /about.

    This behavior is useful for several reasons:

    • SEO and User Experience: Localized URLs help search engines index language-specific pages correctly and provide users with content in their preferred language.
    • Consistency: By using a localized link throughout your application, you guarantee that navigation stays within the current locale, preventing unexpected language switches.
    • Maintainability: Centralizing the localization logic in a single component simplifies the management of URLs, making your codebase easier to maintain and extend as your application grows.
    src/components/Link.vue
    Copy code

    Copy the code to the clipboard

    <script setup lang="ts">import { getLocalizedUrl } from "intlayer";import { computed } from "vue";import { useLocale } from "vue-intlayer";const props = defineProps({  href: {    type: String,    required: true,  },});const { locale } = useLocale();// Check if the link is externalconst isExternalLink = computed(() => /^https?:\/\//.test(props.href || ""));// Create a localized href for internal linksconst localizedHref = computed(() =>  isExternalLink.value ? props.href : getLocalizedUrl(props.href, locale.value));</script><template>  <a :href="localizedHref" v-bind="$attrs">    <slot />  </a></template>

    For use with Vue Router, create a router-specific version:

    src/components/RouterLink.vue
    Copy code

    Copy the code to the clipboard

    <script setup lang="ts">import { getLocalizedUrl } from "intlayer";import { computed } from "vue";import { useLocale } from "vue-intlayer";const props = defineProps({  to: {    type: [String, Object],    required: true,  },});const { locale } = useLocale();// Create localized to-prop for router-linkconst localizedTo = computed(() => {  if (typeof props.to === "string") {    return getLocalizedUrl(props.to, locale.value);  } else {    // If 'to' is an object, localize the path property    return {      ...props.to,      path: getLocalizedUrl(props.to.path ?? "/", locale.value),    };  }});</script><template>  <router-link :to="localizedTo" v-bind="$attrs">    <slot />  </router-link></template>

    Use these components in your application:

    src/App.vue
    Copy code

    Copy the code to the clipboard

    <script setup lang="ts">import Link from "@components/Link.vue";import RouterLink from "@components/RouterLink.vue";</script><template>  <div>    <!-- Vue router  -->    <RouterLink to="/">Root</RouterLink>    <RouterLink to="/home">Home</RouterLink>    <!-- Other -->    <Link href="/">Root</Link>    <Link href="/home">Home</Link>  </div></template>

    (Optional) Step 11: Extract the content of your components

    If you have an existing codebase, transforming thousands of files can be time-consuming.

    To ease this process, Intlayer propose a compiler / extractor to transform your components and extract the content.

    To set it up, you can add a compiler section in your intlayer.config.ts file:

    intlayer.config.ts
    Copy code

    Copy the code to the clipboard

    import { type IntlayerConfig } from "intlayer";
    
    const config: IntlayerConfig = {
      // ... Rest of your config
      compiler: {
        /**
         * Indicates if the compiler should be enabled.
         */
        enabled: true,
    
        /**
         * Defines the output files path
         */
        output: ({ fileName, extension }) => `./${fileName}${extension}`,
    
        /**
         * Indicates if the components should be saved after being transformed.
         *
         * - If `true`, the compiler will rewrite the component file in the disk. So the transformation will be permanent, and the compiler will skip the transformation for the next process. That way, the compiler can transform the app, and then it can be removed.
         *
         * - If `false`, the compiler will inject the `useIntlayer()` function call into the code in the build output only, and keep the base codebase intact. The transformation will be done only in memory.
         */
        saveComponents: false,
    
        /**
         * Dictionary key prefix
         */
        dictionaryKeyPrefix: "",
      },
    };
    
    export default config;

    Run the extractor to transform your components and extract the content

    bash
    Copy code

    Copy the code to the clipboard

    npx intlayer extract

    Update your vite.config.ts to include the intlayerCompiler plugin:

    vite.config.ts
    Copy code

    Copy the code to the clipboard

    import { defineConfig } from "vite";import { intlayer, intlayerCompiler } from "vite-intlayer";export default defineConfig({ plugins: [   intlayer(),   intlayerCompiler(), // Adds the compiler plugin ],});
    bash
    Copy code

    Copy the code to the clipboard

    npm run build # Or npm run dev

    (Optional) Sitemap and robots.txt (build-time)

    Intlayer includes formatters such as generateSitemap and getMultilingualUrls that produce crawler-ready multilingual sitemap.xml and robots.txt output you can write into your project’s public/ folder. In practice you run a small Node script before Vite (for example predev / prebuild npm hooks) so those files exist when you build or serve the app.

    Sitemap

    Intlayer’s sitemap generator respects your locale setup and includes the usual metadata for crawlers.

    The generated sitemap supports the xhtml:link namespace (hreflang XML extensions). Unlike basic generators that only emit flat URLs, Intlayer wires bidirectional links between every localized variant of each page (for example /about, /fr/about, or /about?lang=fr, depending on your routing mode), which helps search engines relate localized URLs.

    Robots.txt

    Use getMultilingualUrls so Disallow entries cover every localized spelling of sensitive paths.

    1. Add generate-seo.mjs at the project root

    generate-seo.mjs
    Copy code

    Copy the code to the clipboard

    import fs from "fs";import path from "path";import { fileURLToPath } from "url";import { generateSitemap, getMultilingualUrls } from "intlayer";const __dirname = path.dirname(fileURLToPath(import.meta.url));const SITE_URL = (process.env.SITE_URL || "http://localhost:5173").replace(  /\/$/,  "");const pathList = [  { path: "/", changefreq: "daily", priority: 1.0 },  { path: "/about", changefreq: "monthly", priority: 0.7 },];const sitemapXml = generateSitemap(pathList, { siteUrl: SITE_URL });fs.writeFileSync(path.join(__dirname, "public", "sitemap.xml"), sitemapXml);const getAllMultilingualUrls = (urls) =>  urls.flatMap((url) => Object.values(getMultilingualUrls(url)));const disallowedPaths = getAllMultilingualUrls(["/admin", "/private"]);const robotsTxt = [  "User-agent: *",  "Allow: /",  ...disallowedPaths.map((path) => `Disallow: ${path}`),  "",  `Sitemap: ${SITE_URL}/sitemap.xml`,].join("\n");fs.writeFileSync(path.join(__dirname, "public", "robots.txt"), robotsTxt);console.log("SEO files generated successfully.");

    intlayer must be installed so the script can import it. Set SITE_URL in the environment for production (for example in CI).

    Prefer generate-seo.mjs for Node ESM. If you use generate-seo.js instead, ensure "type": "module" is set in package.json, or run Node with ESM enabled.

    2. Run the script before Vite

    package.json
    Copy code

    Copy the code to the clipboard

    {  "scripts": {    "dev": "vite",    "prebuild": "node generate-seo.mjs",    "build": "vite build",    "preview": "vite preview"  }}

    Adjust if you use pnpm or yarn. You can also invoke the same script from CI or another step if that fits your workflow.

    Configure TypeScript

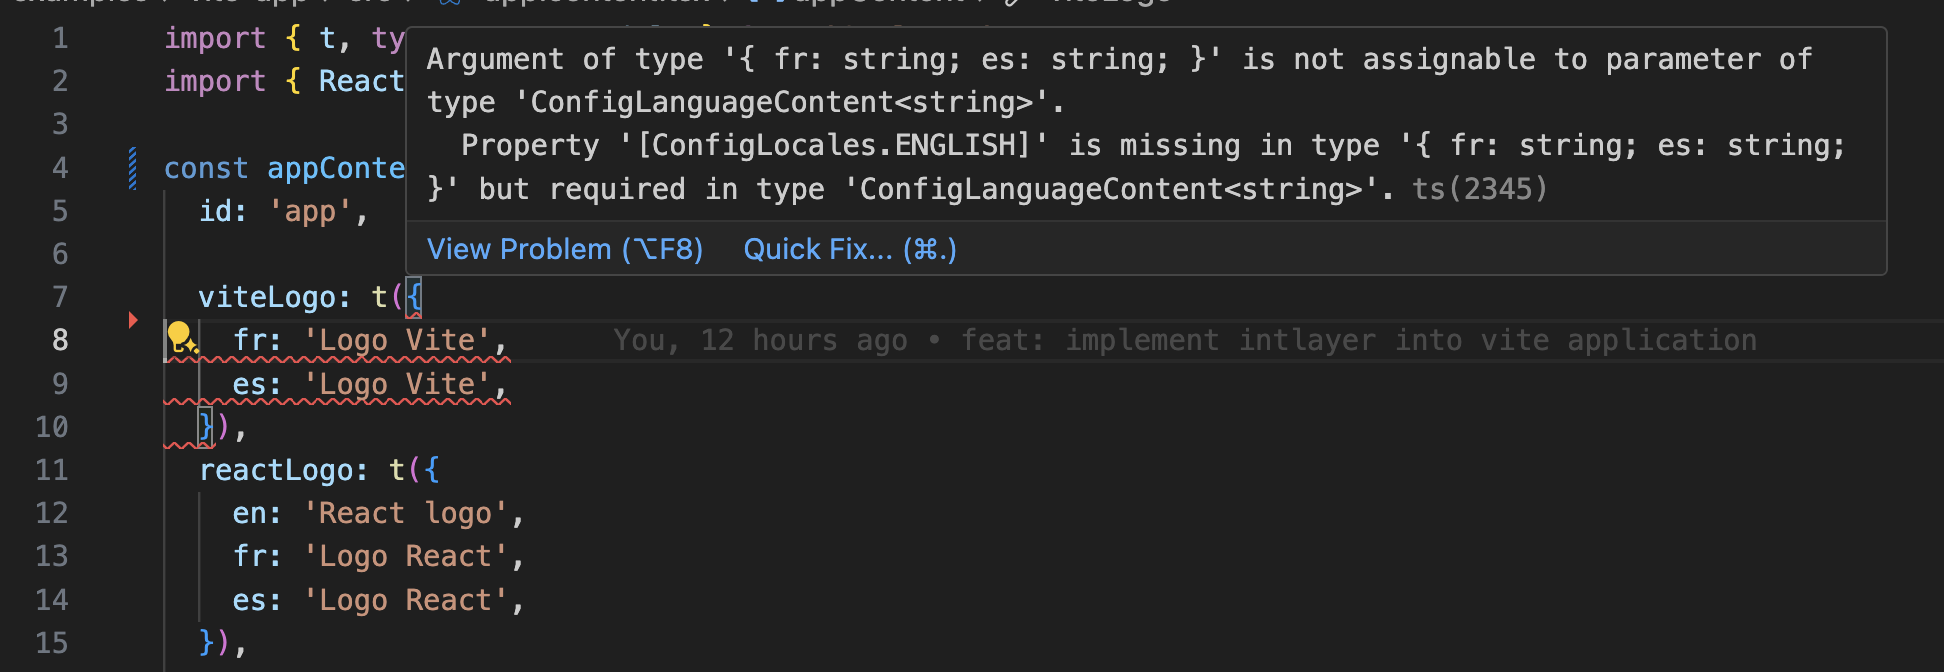
    Intlayer uses module augmentation to get benefits of TypeScript and make your codebase stronger.

    Autocompletion

    Translation error

    Ensure your TypeScript configuration includes the autogenerated types.

    tsconfig.json
    Copy code

    Copy the code to the clipboard

    {  // ... Your existing TypeScript configurations  "include": [    // ... Your existing TypeScript configurations    ".intlayer/**/*.ts", // Include the auto-generated types  ],}

    Git Configuration

    It is recommended to ignore the files generated by Intlayer. This allows you to avoid committing them to your Git repository.

    To do this, you can add the following instructions to your .gitignore file:

    bash
    Copy code

    Copy the code to the clipboard

    # Ignore the files generated by Intlayer.intlayer

    VS Code Extension

    To improve your development experience with Intlayer, you can install the official Intlayer VS Code Extension.

    Install from the VS Code Marketplace

    This extension provides:

    • Autocompletion for translation keys.
    • Real-time error detection for missing translations.
    • Inline previews of translated content.
    • Quick actions to easily create and update translations.

    For more details on how to use the extension, refer to the Intlayer VS Code Extension documentation.


    Go Further

    To go further, you can implement the visual editor or externalize your content using the CMS.


    Compiler
    Nuxt and Vue
    Alt+→

    In this page

      Discussions are anonymous and regularly reviewed to address common issues. Feel free to share feature ideas, feedback on the documentation, or anything related to Intlayer, we use this input to shape our roadmap and improve the product.

      npm install intlayer vue-intlayernpm install vite-intlayer --save-devnpx intlayer init
      import { createApp } from "vue";import { intlayer } from "vue-intlayer";import App from "./App.vue";import "./style.css";const app = createApp(App);// Inject the provider at the top levelapp.use(intlayer);// Mount the appapp.mount("#app");
      import { intlayer } from "vue-intlayer";app.use(intlayer);
      <script setup lang="ts">import { ref } from "vue";import { useIntlayer } from "vue-intlayer";defineProps({  msg: String,});const {  count,  edit,  checkOut,  officialStarter,  learnMore,  vueDocs,  readTheDocs,} = useIntlayer("helloworld");const countRef = ref(0);</script><template>  <h1>{{ msg }}</h1>  <div class="card">    <button type="button" @click="countRef++">      <count />      {{ countRef }}    </button>    <p v-html="edit"></p>  </div>  <p>    <checkOut />    <a href="https://vuejs.org/guide/quick-start.html#local" target="_blank"      >create-vue</a    >, <officialStarter />  </p>  <p>    <learnMore />    <a      href="https://vuejs.org/guide/scaling-up/tooling.html#ide-support"      target="_blank"      ><vueDocs /></a    >.  </p>  <p class="read-the-docs"><readTheDocs /></p>  <p class="read-the-docs">{{ readTheDocs }}</p></template>
      <script setup lang="ts">import { getLocaleName } from "intlayer";import { ref, watch } from "vue";import { useLocale } from "vue-intlayer";// Get locale information and setLocale functionconst { locale, availableLocales, setLocale } = useLocale();// Track the selected locale with a refconst selectedLocale = ref(locale.value);// Update the locale when the selection changesconst changeLocale = () => setLocale(selectedLocale.value);// Keep the selectedLocale in sync with the global localewatch(  () => locale.value,  (newLocale) => {    selectedLocale.value = newLocale;  });</script><template>  <div class="locale-switcher">    <select v-model="selectedLocale" @change="changeLocale">      <option v-for="loc in availableLocales" :key="loc" :value="loc">        {{ getLocaleName(loc) }}      </option>    </select>  </div></template>
      <script setup lang="ts">import { useIntlayer } from "vue-intlayer";import HelloWorld from "@components/HelloWorld.vue";import LocaleSwitcher from "@components/LocaleSwitcher.vue";import { ref, watch } from "vue";const content = useIntlayer("app"); // Create related intlayer declaration file</script><template>  <div>    <LocaleSwitcher />    <a href="https://vite.dev" target="_blank">      <img src="/vite.svg" class="logo" :alt="content.viteLogo" />    </a>    <a href="https://vuejs.org/" target="_blank">      <img src="./assets/vue.svg" class="logo vue" :alt="content.vueLogo" />    </a>  </div>  <HelloWorld :msg="content.title" /></template>
      - https://example.com/about- https://example.com/es/about- https://example.com/fr/about
      npm install vue-routernpx intlayer init
      import {  localeFlatMap,  type Locale,} from 'intlayer';import { createIntlayerClient } from "vue-intlayer";import { createRouter, createWebHistory } from 'vue-router';import HomeView from './views/home/HomeView.vue';import RootView from './views/root/Root.vue';/** * Declare the routes with locale-specific paths and metadata. */const routes = localeFlatMap(({ urlPrefix, locale }) => [  {    path: `${urlPrefix}/`,    name: `Root-${locale}`,    component: RootView,    meta: {      locale,    },  },  {    path: `${urlPrefix}/home`,    name: `Home-${locale}`,    component: HomeView,    meta: {      locale,    },  },]);// Create the router instanceexport const router = createRouter({  history: createWebHistory(),  routes,});// Add navigation guard for locale handlingrouter.beforeEach((to, _from, next) => {  const client = createIntlayerClient();  const metaLocale = to.meta.locale as Locale;  // Reuse the locale defined in the route meta  client.setLocale(metaLocale);  next();});
      import { createApp } from "vue";import App from "./App.vue";import { router } from "./router";import "./style.css";const app = createApp(App);// Add the router to the appapp.use(router);// Mount the appapp.mount("#app");
      <script setup lang="ts">import LocaleSwitcher from "@components/LocaleSwitcher.vue";</script><template>  <nav>    <LocaleSwitcher />  </nav>  <RouterView /></template>
      <script setup lang="ts">import { Locales, getLocaleName, getLocalizedUrl } from "intlayer";import { ref, watch } from "vue";import { useLocale } from "vue-intlayer";import { useRouter } from "vue-router";// Get Vue Routerconst router = useRouter();// Get locale information and setLocale functionconst { locale, availableLocales, setLocale } = useLocale({  onLocaleChange: (newLocale) => {    // Get current route and create a localized URL    const currentPath = router.currentRoute.value.fullPath;    const localizedPath = getLocalizedUrl(currentPath, newLocale);    // Navigate to the localized route without reloading the page    router.push(localizedPath);  },});// Track the selected locale with a refconst selectedLocale = ref(locale.value);// Update the locale when the selection changesconst changeLocale = () => {  setLocale(selectedLocale.value);};// Keep the selectedLocale in sync with the global localewatch(  () => locale.value,  (newLocale) => {    selectedLocale.value = newLocale;  });</script><template>  <div class="locale-switcher">    <select v-model="selectedLocale" @change="changeLocale">      <option v-for="loc in availableLocales" :key="loc" :value="loc">        {{ getLocaleName(loc) }}      </option>    </select>  </div></template>
      <ol>  <li>    <a      hreflang="x-default"      aria-label="Switch to English"      target="_self"      aria-current="page"      href="/doc/get-started"    >      <div>        <span dir="ltr" lang="en">English</span>        <span>English</span>        <span>EN</span>      </div>    </a>  </li>  <li>    <a      hreflang="es"      aria-label="Switch to Spanish"      target="_self"      href="/es/doc/get-started"    >      <div>        <span dir="ltr" lang="es">Español</span>        <span>Spanish</span>        <span>ES</span>      </div>    </a>  </li></ol>
      import { watch } from "vue";import { useLocale } from "vue-intlayer";import { getHTMLTextDir } from "intlayer";/** * Composable that updates the HTML <html> element's `lang` and `dir` attributes * based on the current locale. * * @example * // In your App.vue or a global component * import { useI18nHTMLAttributes } from './composables/useI18nHTMLAttributes' * * useI18nHTMLAttributes() */export const useI18nHTMLAttributes = () => {  const { locale } = useLocale();  // Update the HTML attributes whenever the locale changes  watch(    () => locale.value,    (newLocale) => {      if (!newLocale) return;      // Update the language attribute      document.documentElement.lang = newLocale;      // Set the text direction (ltr for most languages, rtl for Arabic, Hebrew, etc.)      document.documentElement.dir = getHTMLTextDir(newLocale);    },    { immediate: true }  );};
      <script setup lang="ts">import { useI18nHTMLAttributes } from "@composables/useI18nHTMLAttributes";// Apply the HTML attributes based on the current localeuseI18nHTMLAttributes();</script><template>  <!-- Your app template --></template>
      <script setup lang="ts">import { getLocalizedUrl } from "intlayer";import { computed } from "vue";import { useLocale } from "vue-intlayer";const props = defineProps({  href: {    type: String,    required: true,  },});const { locale } = useLocale();// Check if the link is externalconst isExternalLink = computed(() => /^https?:\/\//.test(props.href || ""));// Create a localized href for internal linksconst localizedHref = computed(() =>  isExternalLink.value ? props.href : getLocalizedUrl(props.href, locale.value));</script><template>  <a :href="localizedHref" v-bind="$attrs">    <slot />  </a></template>
      <script setup lang="ts">import { getLocalizedUrl } from "intlayer";import { computed } from "vue";import { useLocale } from "vue-intlayer";const props = defineProps({  to: {    type: [String, Object],    required: true,  },});const { locale } = useLocale();// Create localized to-prop for router-linkconst localizedTo = computed(() => {  if (typeof props.to === "string") {    return getLocalizedUrl(props.to, locale.value);  } else {    // If 'to' is an object, localize the path property    return {      ...props.to,      path: getLocalizedUrl(props.to.path ?? "/", locale.value),    };  }});</script><template>  <router-link :to="localizedTo" v-bind="$attrs">    <slot />  </router-link></template>
      <script setup lang="ts">import Link from "@components/Link.vue";import RouterLink from "@components/RouterLink.vue";</script><template>  <div>    <!-- Vue router  -->    <RouterLink to="/">Root</RouterLink>    <RouterLink to="/home">Home</RouterLink>    <!-- Other -->    <Link href="/">Root</Link>    <Link href="/home">Home</Link>  </div></template>
      npx intlayer extract
      import { defineConfig } from "vite";import { intlayer, intlayerCompiler } from "vite-intlayer";export default defineConfig({ plugins: [   intlayer(),   intlayerCompiler(), // Adds the compiler plugin ],});
      npm run build # Or npm run dev
      import fs from "fs";import path from "path";import { fileURLToPath } from "url";import { generateSitemap, getMultilingualUrls } from "intlayer";const __dirname = path.dirname(fileURLToPath(import.meta.url));const SITE_URL = (process.env.SITE_URL || "http://localhost:5173").replace(  /\/$/,  "");const pathList = [  { path: "/", changefreq: "daily", priority: 1.0 },  { path: "/about", changefreq: "monthly", priority: 0.7 },];const sitemapXml = generateSitemap(pathList, { siteUrl: SITE_URL });fs.writeFileSync(path.join(__dirname, "public", "sitemap.xml"), sitemapXml);const getAllMultilingualUrls = (urls) =>  urls.flatMap((url) => Object.values(getMultilingualUrls(url)));const disallowedPaths = getAllMultilingualUrls(["/admin", "/private"]);const robotsTxt = [  "User-agent: *",  "Allow: /",  ...disallowedPaths.map((path) => `Disallow: ${path}`),  "",  `Sitemap: ${SITE_URL}/sitemap.xml`,].join("\n");fs.writeFileSync(path.join(__dirname, "public", "robots.txt"), robotsTxt);console.log("SEO files generated successfully.");
      {  "scripts": {    "dev": "vite",    "prebuild": "node generate-seo.mjs",    "build": "vite build",    "preview": "vite preview"  }}
      {  // ... Your existing TypeScript configurations  "include": [    // ... Your existing TypeScript configurations    ".intlayer/**/*.ts", // Include the auto-generated types  ],}
      # Ignore the files generated by Intlayer.intlayer