الرئيسيةبيئة اختبارمعرض الأعمالتطبيقوثيقةمدونة
    • Englishالإنجليزية
      EN
    • русскийالروسية
      RU
    • 日本語اليابانية
      JA
    • françaisالفرنسية
      FR
    • 한국어الكورية
      KO
    • 中文الصينية
      ZH
    • españolالإسبانية
      ES
    • Deutschالألمانية
      DE
    • العربيةالعربية
      AR
    • italianoالإيطالية
      IT
    • British Englishالإنجليزية (المملكة المتحدة)
      EN-GB
    • portuguêsالبرتغالية
      PT
    • हिन्दीالهندية
      HI
    • Türkçeالتركية
      TR
    • polskiالبولندية
      PL
    • Indonesiaالإندونيسية
      ID
    • Tiếng Việtالفيتنامية
      VI
    • українськаالأوكرانية
      UK
    /
    تصفية المستندات حسب الإطار
    Alt+←
    لماذا Intlayer؟
    ابدأ
    مفهوم
    • كيف يعمل Intlayer
    • التكوين
    • TestFillBuildWatchExtractLoginPushPullConfigurationListVersionEditorLiveDebugDoc ReviewDoc TranslateSDK
    • المحرر المرئي
    • CMS
    • تكامل CI/CD
    • ترجمةجمعتعدادشرطجنسإدراجملفتداخلMarkdownHTMLجلب الوظيفة
    • ملف لكل لغة
    • محرر
    • الملء التلقائي
    • اختبار
    • تحسين الحزمة
    بيئة
    • Next.js 14 وموجه التطبيق
      Next.js 15
      Next.js بدون locale URL
      Next.js وموجه الصفحة
      المترجم
    • Tanstack Start Solid
    • Astro و React
      Astro و Svelte
      Astro و Vue
      Astro و Solid
      Astro و Preact
      Astro و Lit
      Astro و Vanilla JS
    • React Router v7
      React Router v7 (fs-routes)
      Compiler
    • Nuxt و Vue
    • Vite و Solid
    • SvelteKit
    • Vite و Preact
    • Vite و Vanilla JS
    • Vite و Lit
    • Angular 19 (Webpack)
      Analog
    • React CRA
    • React Native و Expo
    • Express.js
      NestJS
      Fastify
      Hono
      Adonis
    • Lynx و React
    Plugins
    • JSON
    • gettext (.po)
    امتداد VS Code
    وكيل
    • خادم MCP
    • مهارات الوكيل
    إصدارات
    • v8
    • v7
    • v6
    مؤشر أداء
    • Next.js
    • TanStack
    • Vue
    • Solid
    • Svelte
    مدونة
    طرح سؤال
    1. Documentation
    2. بيئة
    3. Astro
    4. Vue
    \n\n\n```\n\n> يتم تمرير خاصية `locale` من صفحة Astro (اكتشاف الخادم) وتستخدم لتهيئة `installIntlayer` ، مما يحدد اللغة الأولية لجميع الـ composables داخل الشجرة.\n\n### الخطوة 7: إضافة مبدل اللغة\n\nتتوفر وظيفة تبديل اللغة مباشرة داخل قالب جزيرة Vue (انظر الخطوة 6 أعلاه). وهي تستخدم الـ `useLocale` composable من `vue-intlayer` وتنتقل إلى الرابط المترجم عندما يختار المستخدم لغة جديدة:\n\n```vue fileName=\"src/components/vue/VueIsland.vue\"\n\n\n\n```\n\n> **ملاحظة حول الاستمرارية:**\n> يضمن استخدام `onLocaleChange` لإعادة التوجيه عبر `window.location.href` زيارة الرابط الجديد للغة، مما يسمح لوسيط Intlayer بتعيين كوكيز اللغة وتذكر تفضيلات المستخدم في الزيارات المستقبلية.\n\n### الخطوة 8: خريطة الموقع وRobots.txt\n\nتوفر Intlayer أدوات لإنشاء خريطة موقع مترجمة وملفات robots.txt ديناميكيًا.\n\n#### خريطة الموقع (Sitemap)\n\nIntlayer comes with a built-in sitemap generator to help you create a sitemap for your application easily. It handles localized routes and adds the necessary metadata for search engines.\n\n> The Intlayer generated sitemap supports the `xhtml:link` namespace (Hreflang XML Extensions). Unlike the default sitemap generators that only list raw URLs, Intlayer automatically creates the required bidirectional links between all language versions of a page (e.g., `/about`, `/about?lang=fr`, and `/about?lang=es`). This ensures search engines correctly index and serve the right language version to the right audience.\n\nأنشئ `src/pages/sitemap.xml.ts` لإنشاء خريطة موقع تتضمن جميع مساراتك المترجمة.\n\n```typescript fileName=\"src/pages/sitemap.xml.ts\"\nimport type { APIRoute } from \"astro\";\nimport { generateSitemap, type SitemapUrlEntry } from \"intlayer\";\n\nconst pathList: SitemapUrlEntry[] = [\n { path: \"/\", changefreq: \"daily\", priority: 1.0 },\n { path: \"/about\", changefreq: \"monthly\", priority: 0.7 },\n];\n\nconst SITE_URL = import.meta.env.SITE ?? \"http://localhost:4321\";\n\nexport const GET: APIRoute = async ({ site }) => {\n const xmlOutput = generateSitemap(pathList, { siteUrl: SITE_URL });\n\n return new Response(xmlOutput, {\n headers: { \"Content-Type\": \"application/xml\" },\n });\n};\n```\n\n#### Robots.txt\n\nأنشئ `src/pages/robots.txt.ts` للتحكم في زحف محركات البحث.\n\n```typescript fileName=\"src/pages/robots.txt.ts\"\nimport type { APIRoute } from \"astro\";\nimport { getMultilingualUrls } from \"intlayer\";\n\nconst getAllMultilingualUrls = (urls: string[]) =>\n urls.flatMap((url) => Object.values(getMultilingualUrls(url)) as string[]);\n\nconst disallowedPaths = getAllMultilingualUrls([\"/admin\", \"/private\"]);\n\nexport const GET: APIRoute = ({ site }) => {\n const robotsTxt = [\n \"User-agent: *\",\n \"Allow: /\",\n ...disallowedPaths.map((path) => `Disallow: ${path}`),\n \"\",\n `Sitemap: ${new URL(\"/sitemap.xml\", site).href}`,\n ].join(\"\\n\");\n\n return new Response(robotsTxt, {\n headers: { \"Content-Type\": \"text/plain\" },\n });\n};\n```\n\n### تكوين TypeScript\n\nتستخدم Intlayer تقنية توسيع الوحدات (module augmentation) للاستفادة من TypeScript، مما يجعل برمجتك أكثر قوة.\n\n![الإكمال التلقائي](https://github.com/aymericzip/intlayer/blob/main/docs/assets/autocompletion.png?raw=true)\n\n![خطأ في الترجمة](https://github.com/aymericzip/intlayer/blob/main/docs/assets/translation_error.png?raw=true)\n\nتأكد من أن تكوين TypeScript الخاص بك يتضمن الأنواع المولدة تلقائيًا.\n\n```json5 fileName=\"tsconfig.json\"\n{\n // ... تكوين TypeScript الحالي الخاص بك\n \"include\": [\n // ... تكوين TypeScript الحالي الخاص بك\n \".intlayer/**/*.ts\", // تضمين الأنواع المولدة تلقائيًا\n ],\n}\n```\n\n### تكوين Git\n\nيوصى بتجاهل الملفات التي تنشئها Intlayer. هذا يتجنب إضافتها إلى مستودع Git الخاص بك.\n\nللقيام بذلك، أضف التعليمات التالية إلى ملف `.gitignore` الخاص بك:\n\n```bash\n# تجاهل الملفات المولدة بواسطة Intlayer\n.intlayer\n```\n\n### إضافة VS Code\n\nلتحسين تجربة التطوير الخاصة بك مع Intlayer، يمكنك تثبيت **إضافة Intlayer الرسمية لـ VS Code**.\n\n[التثبيت من VS Code Marketplace](https://marketplace.visualstudio.com/items?itemName=intlayer.intlayer-vs-code-extension)\n\nتوفر هذه الإضافة:\n\n- **إكمال تلقائي** لمفاتيح الترجمة.\n- **اكتشاف الأخطاء في الوقت الفعلي** للترجمات المفقودة.\n- **معاينة مضمنة** للمحتوى المترجم.\n- **إجراءات سريعة** لإنشاء وتحديث الترجمات بسهولة.\n\nلمزيد من المعلومات حول استخدام الإضافة، راجع [توثيق إضافة VS Code](https://intlayer.org/doc/vs-code-extension).\n\n---\n\n### (Optional) Step 15: Extract the content of your components\n\nIf you have an existing codebase, transforming thousands of files can be time-consuming.\n\nTo ease this process, Intlayer propose a [compiler](/ar/doc/compiler) / [extractor](/ar/doc/concept/cli/extract) to transform your components and extract the content.\n\nTo set it up, you can add a `compiler` section in your `intlayer.config.ts` file:\n\n```typescript fileName=\"intlayer.config.ts\" codeFormat={[\"typescript\", \"esm\", \"commonjs\"]}\nimport { type IntlayerConfig } from \"intlayer\";\n\nconst config: IntlayerConfig = {\n // ... Rest of your config\n compiler: {\n /**\n * Indicates if the compiler should be enabled.\n */\n enabled: true,\n\n /**\n * Defines the output files path\n */\n output: ({ fileName, extension }) => `./${fileName}${extension}`,\n\n /**\n * Indicates if the components should be saved after being transformed.\n *\n * - If `true`, the compiler will rewrite the component file in the disk. So the transformation will be permanent, and the compiler will skip the transformation for the next process. That way, the compiler can transform the app, and then it can be removed.\n *\n * - If `false`, the compiler will inject the `useIntlayer()` function call into the code in the build output only, and keep the base codebase intact. The transformation will be done only in memory.\n */\n saveComponents: false,\n\n /**\n * Dictionary key prefix\n */\n dictionaryKeyPrefix: \"\",\n },\n};\n\nexport default config;\n```\n\n\n \n\nRun the extractor to transform your components and extract the content\n\n```bash packageManager=\"npm\"\nnpx intlayer extract\n```\n\n```bash packageManager=\"pnpm\"\npnpm intlayer extract\n```\n\n```bash packageManager=\"yarn\"\nyarn intlayer extract\n```\n\n```bash packageManager=\"bun\"\nbun x intlayer extract\n```\n\n \n \n\nUpdate your `vite.config.ts` to include the `intlayerCompiler` plugin:\n\n```ts fileName=\"vite.config.ts\"\nimport { defineConfig } from \"vite\";\nimport { intlayer, intlayerCompiler } from \"vite-intlayer\";\n\nexport default defineConfig({\n plugins: [\n intlayer(),\n intlayerCompiler(), // Adds the compiler plugin\n ],\n});\n```\n\n```bash packageManager=\"npm\"\nnpm run build # Or npm run dev\n```\n\n```bash packageManager=\"pnpm\"\npnpm run build # Or pnpm run dev\n```\n\n```bash packageManager=\"yarn\"\nyarn build # Or yarn dev\n```\n\n```bash packageManager=\"bun\"\nbun run build # Or bun run dev\n```\n\n \n\n\n---\n\n### تعمق أكثر\n\nإذا كنت تريد معرفة المزيد، يمكنك أيضًا تنفيذ [المحرر المرئي](/ar/doc/concept/editor) أو استخدام [نظام إدارة المحتوى (CMS)](/ar/doc/concept/cms) لإخراج محتواك خارجيًا.\n","about":"تعرف على كيفية إضافة التدويل (i18n) إلى موقع Astro + Vue الخاص بك باستخدام Intlayer. اتبع هذا الدليل لجعل موقعك متعدد اللغات.","url":"https://intlayer.org/ar/doc/environment/astro/vue","datePublished":"24-04-2026","dateModified":"06-05-2026","keywords":"التدويل, توثيق, Intlayer, Astro, Vue, i18n, JavaScript","license":"https://raw.githubusercontent.com/aymericzip/intlayer/refs/heads/main/LICENSE","audience":{"@type":"Audience","audienceType":"المطورون ومديرو المحتوى"}}
    إنشاء:2026-04-24آخر تحديث:2026-05-06
    عرض قالب التطبيق على GitHub

    هذه الصفحة لديها قالب تطبيق متاح.

    عرض تطبيق العرض

    هذه الصفحة ترتبط بعرض مباشر للقالب.

    استخدم هذه الصفحة والموفر AI الذي تريده
    ChatGPT
    Claude
    DeepSeek
    Google AI mode
    Gemini
    Perplexity
    Mistral
    Grok

    استخدم مساعدك المفضل للملخص واستخدم هذه الصفحة والموفر AI الذي تريده

    تاريخ الإصدارات

    1. "تحديث استخدام واجهة برمجة تطبيقات useIntlayer في Solid للوصول المباشر إلى الخصائص"
      v8.9.04‏/5‏/2026
    2. "التوثيق الأولي لـ Astro + Vue"
      v8.7.724‏/4‏/2026

    تمت ترجمة محتوى هذه الصفحة باستخدام الذكاء الاصطناعي.

    اعرض آخر نسخة المحتوى الأصلي باللغة الإنكليزية
    تعديل هذه الوثيقة

    إذا كان لديك فكرة لتحسين هذه الوثيقة، فلا تتردد في المساهمة من خلال تقديم طلب سحب على GitHub.

    رابط GitHub للتوثيق
    نسخ

    نسخ الـ Markdown من المستند إلى الحافظة

    ترجمة موقع Astro + Vue الخاص بك باستخدام Intlayer | التدويل (i18n)

    ide.intlayer.org
    intlayer-astro-template.vercel.app

    جدول المحتويات

    ما هو Intlayer؟

    Intlayer هي مكتبة تدويل (i18n) مبتكرة ومفتوحة المصدر مصممة لتبسيط دعم اللغات المتعددة في تطبيقات الويب الحديثة.

    باستخدام Intlayer، يمكنك:

    • إدارة الترجمات بسهولة: باستخدام قواميس تعريفية على مستوى المكون.
    • توطين الميتا داتا والمسارات والمحتوى ديناميكيًا.
    • ضمان دعم TypeScript: من خلال أنواع مولدة تلقائيًا لتعزيز الإكمال التلقائي واكتشاف الأخطاء.
    • الاستفادة من الميزات المتقدمة: مثل الكشف الديناميكي عن اللغة وتبديل اللغة.

    دليل خطوة بخطوة لتهيئة Intlayer في Astro + Vue

    تحقق من نموذج التطبيق على GitHub.

    الخطوة 1: تثبيت التبعيات

    قم بتثبيت الحزم اللازمة باستخدام مدير الحزم المفضل لديك:

    bash
    نسخ الكود

    نسخ الكود إلى الحافظة

    npm install intlayer astro-intlayer vue vue-intlayer @astrojs/vuenpx intlayer init
    • intlayer الحزمة الأساسية التي توفر أدوات i18n لإدارة التكوين، الترجمات، تعريف المحتوى، التحويل، وأوامر CLI.

    • astro-intlayer تتضمن إضافة تكامل Astro لربط Intlayer بـ Vite bundler، بالإضافة إلى وسيط (middleware) لاكتشاف لغة المستخدم المفضلة، وإدارة ملفات تعريف الارتباط (cookies)، والتعامل مع إعادة توجيه الروابط.

    • vue حزمة Vue الأساسية.

    • vue-intlayer حزمة لدمج Intlayer في تطبيقات Vue. توفر installIntlayer بالإضافة إلى الـ composables useIntlayer و useLocale للتدويل في Vue.

    • @astrojs/vue إضافة Astro الرسمية التي تتيح استخدام جزر (islands) مكونات Vue.

    الخطوة 2: تهيئة مشروعك

    أنشئ ملف تكوين لتحديد لغات تطبيقك:

    intlayer.config.ts
    نسخ الكود

    نسخ الكود إلى الحافظة

    import { Locales, type IntlayerConfig } from "intlayer";const config: IntlayerConfig = {  internationalization: {    locales: [      Locales.ENGLISH,      Locales.FRENCH,      Locales.SPANISH,      Locales.ARABIC,      // لغاتك الأخرى    ],    defaultLocale: Locales.ENGLISH,  },};export default config;
    من خلال ملف التكوين هذا، يمكنك تهيئة الروابط المترجمة، وإعادة توجيه الوسيط، وأسماء الكوكيز، وموقع وامتدادات تعريفات المحتوى، وتعطيل سجلات Intlayer في وحدة التحكم، والمزيد. للحصول على قائمة كاملة بالمعلمات المتاحة، راجع توثيق التهيئة.

    الخطوة 3: دمج Intlayer في تكوين Astro الخاص بك

    أضف إضافة intlayer وتكامل Vue إلى تكوين Astro الخاص بك.

    astro.config.ts
    نسخ الكود

    نسخ الكود إلى الحافظة

    // @ts-checkimport { intlayer } from "astro-intlayer";import vue from "@astrojs/vue";import { defineConfig } from "astro/config";// https://astro.build/configexport default defineConfig({  integrations: [intlayer(), vue()],});
    تُستخدم إضافة intlayer() لدمج Intlayer مع Astro. وهي تضمن إنشاء ملفات تعريف المحتوى ومراقبتها في وضع التطوير. وتعرّف متغيرات بيئة Intlayer داخل تطبيق Astro وتوفر أسماء مستعارة لتحسين الأداء.
    يتيح تكامل vue() استخدام جزر مكونات Vue عبر client:only="vue".

    الخطوة 4: تعريف المحتوى الخاص بك

    أنشئ وأدِر تعريفات المحتوى لتخزين الترجمات:

    src/app.content.ts
    نسخ الكود

    نسخ الكود إلى الحافظة

    import { t, type Dictionary } from "intlayer";const appContent = {  key: "app",  content: {    title: t({      en: "Hello World",      fr: "Bonjour le monde",      es: "Hola mundo",      ar: "مرحبا بالعالم",    }),  },} satisfies Dictionary;export default appContent;
    يمكن تعريف تعريفات المحتوى في أي مكان في تطبيقك، طالما أنها مدرجة في contentDir (افتراضيًا ./src) وتطابق امتداد ملف تعريف المحتوى (افتراضيًا .content.{json,ts,tsx,js,jsx,mjs,cjs}).
    لمزيد من المعلومات، راجع توثيق تعريف المحتوى.

    الخطوة 5: استخدام المحتوى في Astro

    يمكنك استهلاك القواميس مباشرة في ملفات .astro الخاصة بك باستخدام المساعدين الأساسيين المصدرين من intlayer. يجب عليك أيضًا إضافة ميتا داتا SEO (مثل hreflang وروابط canonical) لكل صفحة وتقديم جزيرة Vue للمحتوى التفاعلي في جانب العميل.

    src/pages/[...locale]/index.astro
    نسخ الكود

    نسخ الكود إلى الحافظة

    ---import {  getIntlayer,  getLocaleFromPath,  getLocalizedUrl,  getHTMLTextDir,  getPrefix,  localeMap,  defaultLocale,  type LocalesValues,} from "intlayer";import VueIsland from "../../components/vue/VueIsland.vue";export const getStaticPaths = () => {  return localeMap(({ locale }) => ({    params: { locale: getPrefix(locale).localePrefix },  }));};const locale = getLocaleFromPath(Astro.url.pathname) as LocalesValues;const { title } = getIntlayer("app", locale);---<!doctype html><html lang={locale} dir={locale === 'ar' ? 'rtl' : 'ltr'}>  <head>    <meta charset="utf-8" />    <meta name="viewport" content="width=device-width" />    <link rel="icon" type="image/svg+xml" href="/favicon.svg" />    <title>{title}</title>    <!-- رابط Canonical: يخبر محركات البحث عن النسخة الرئيسية لهذه الصفحة -->    <link      rel="canonical"      href={new URL(getLocalizedUrl(Astro.url.pathname, locale), Astro.site)}    />    <!-- Hreflang: يخبر جوجل عن جميع النسخ المترجمة -->    {      localeMap(({ locale: mapLocale }) => (        <link          rel="alternate"          hreflang={mapLocale}          href={new URL(            getLocalizedUrl(Astro.url.pathname, mapLocale),            Astro.site          )}        />      ))    }    <!-- x-default: خيار احتياطي عندما لا تتطابق اللغة مع لغة المستخدم -->    <link      rel="alternate"      hreflang="x-default"      href={new URL(        getLocalizedUrl(Astro.url.pathname, defaultLocale),        Astro.site      )}    />  </head>  <body>    <!-- جزيرة Vue تقوم برندر جميع المحتويات التفاعلية بما في ذلك مبدل اللغة -->    <VueIsland locale={locale} client:only="vue" />  </body></html>

    ملاحظة حول إعداد التوجيه: تعتمد بنية الدليل التي تستخدمها على إعداد middleware.routing في intlayer.config.ts:

    • prefix-no-default (افتراضي): يحافظ على اللغة الافتراضية في الجذر (بدون بادئة) ويضيف بادئات للغات الأخرى. استخدم [...locale] لتغطية جميع الحالات.
    • prefix-all: تحصل جميع الروابط على بادئة لغة. يمكنك استخدام [locale] القياسي إذا كنت لا تحتاج إلى معالجة الجذر بشكل منفصل.
    • search-param أو no-prefix: لا يلزم وجود أدلة لغة. يتم التعامل مع اللغة عبر معلمات الاستعلام أو ملفات تعريف الارتباط.

    الخطوة 6: إنشاء مكون جزيرة Vue

    أنشئ مكون جزيرة يلف تطبيق Vue الخاص بك ويستلم اللغة المكتشفة من الخادم. يجب عليك تسجيل إضافة Intlayer في نسخة Vue عن طريق استدعاء installIntlayer قبل استخدام أي composables.

    src/components/vue/VueIsland.vue
    نسخ الكود

    نسخ الكود إلى الحافظة

    <script setup lang="ts">import { ref, getCurrentInstance } from "vue";import { useIntlayer, useLocale, installIntlayer } from "vue-intlayer";import { getLocalizedUrl, getLocaleName, type LocalesValues } from "intlayer";const props = defineProps<{ locale: LocalesValues }>();const app = getCurrentInstance()?.appContext.app;if (app) {  installIntlayer(app, { locale: props.locale });}const {  locale: currentLocale,  availableLocales,  setLocale,} = useLocale({  onLocaleChange: (newLocale: LocalesValues) => {    window.location.href = getLocalizedUrl(window.location.pathname, newLocale);  },});const count = ref(0);const { title } = useIntlayer("app");</script><template>  <div>    <h1>{{ title }}</h1>    <!-- يتم رندر مبدل اللغة مباشرة داخل قالب الجزيرة -->    <div class="locale-switcher">      <span class="switcher-label">تغيير اللغة:</span>      <div class="locale-buttons">        <button          v-for="localeItem in availableLocales"          :key="localeItem"          :class="['locale-btn', { active: localeItem === currentLocale }]"          :disabled="localeItem === currentLocale"          @click="setLocale(localeItem)"        >          <span class="ls-own-name">{{ getLocaleName(localeItem) }}</span>          <span class="ls-current-name">{{            getLocaleName(localeItem, currentLocale)          }}</span>          <span class="ls-code">{{ localeItem.toUpperCase() }}</span>        </button>      </div>    </div>  </div></template>
    يتم تمرير خاصية locale من صفحة Astro (اكتشاف الخادم) وتستخدم لتهيئة installIntlayer ، مما يحدد اللغة الأولية لجميع الـ composables داخل الشجرة.

    الخطوة 7: إضافة مبدل اللغة

    تتوفر وظيفة تبديل اللغة مباشرة داخل قالب جزيرة Vue (انظر الخطوة 6 أعلاه). وهي تستخدم الـ useLocale composable من vue-intlayer وتنتقل إلى الرابط المترجم عندما يختار المستخدم لغة جديدة:

    src/components/vue/VueIsland.vue
    نسخ الكود

    نسخ الكود إلى الحافظة

    <script setup lang="ts">import { useLocale } from "vue-intlayer";import { getLocalizedUrl, getLocaleName, type LocalesValues } from "intlayer";// إعادة استخدام نفس واجهة الخاصية (props) / إعداد التطبيق (setup app) كما هو موضح في الخطوة 6...const {  locale: currentLocale,  availableLocales,  setLocale,} = useLocale({  onLocaleChange: (newLocale: LocalesValues) => {    // الانتقال إلى الرابط المترجم عند تغيير اللغة    window.location.href = getLocalizedUrl(window.location.pathname, newLocale);  },});</script><template>  <div class="locale-switcher">    <span class="switcher-label">تغيير اللغة:</span>    <div class="locale-buttons">      <button        v-for="localeItem in availableLocales"        :key="localeItem"        :class="['locale-btn', { active: localeItem === currentLocale }]"        :disabled="localeItem === currentLocale"        @click="setLocale(localeItem)"      >        <span class="ls-own-name">{{ getLocaleName(localeItem) }}</span>        <span class="ls-current-name">{{          getLocaleName(localeItem, currentLocale)        }}</span>        <span class="ls-code">{{ localeItem.toUpperCase() }}</span>      </button>    </div>  </div></template>

    ملاحظة حول الاستمرارية: يضمن استخدام onLocaleChange لإعادة التوجيه عبر window.location.href زيارة الرابط الجديد للغة، مما يسمح لوسيط Intlayer بتعيين كوكيز اللغة وتذكر تفضيلات المستخدم في الزيارات المستقبلية.

    الخطوة 8: خريطة الموقع وRobots.txt

    توفر Intlayer أدوات لإنشاء خريطة موقع مترجمة وملفات robots.txt ديناميكيًا.

    خريطة الموقع (Sitemap)

    Intlayer comes with a built-in sitemap generator to help you create a sitemap for your application easily. It handles localized routes and adds the necessary metadata for search engines.

    The Intlayer generated sitemap supports the xhtml:link namespace (Hreflang XML Extensions). Unlike the default sitemap generators that only list raw URLs, Intlayer automatically creates the required bidirectional links between all language versions of a page (e.g., /about, /about?lang=fr, and /about?lang=es). This ensures search engines correctly index and serve the right language version to the right audience.

    أنشئ src/pages/sitemap.xml.ts لإنشاء خريطة موقع تتضمن جميع مساراتك المترجمة.

    src/pages/sitemap.xml.ts
    نسخ الكود

    نسخ الكود إلى الحافظة

    import type { APIRoute } from "astro";import { generateSitemap, type SitemapUrlEntry } from "intlayer";const pathList: SitemapUrlEntry[] = [  { path: "/", changefreq: "daily", priority: 1.0 },  { path: "/about", changefreq: "monthly", priority: 0.7 },];const SITE_URL = import.meta.env.SITE ?? "http://localhost:4321";export const GET: APIRoute = async ({ site }) => {  const xmlOutput = generateSitemap(pathList, { siteUrl: SITE_URL });  return new Response(xmlOutput, {    headers: { "Content-Type": "application/xml" },  });};

    Robots.txt

    أنشئ src/pages/robots.txt.ts للتحكم في زحف محركات البحث.

    src/pages/robots.txt.ts
    نسخ الكود

    نسخ الكود إلى الحافظة

    import type { APIRoute } from "astro";import { getMultilingualUrls } from "intlayer";const getAllMultilingualUrls = (urls: string[]) =>  urls.flatMap((url) => Object.values(getMultilingualUrls(url)) as string[]);const disallowedPaths = getAllMultilingualUrls(["/admin", "/private"]);export const GET: APIRoute = ({ site }) => {  const robotsTxt = [    "User-agent: *",    "Allow: /",    ...disallowedPaths.map((path) => `Disallow: ${path}`),    "",    `Sitemap: ${new URL("/sitemap.xml", site).href}`,  ].join("\n");  return new Response(robotsTxt, {    headers: { "Content-Type": "text/plain" },  });};

    تكوين TypeScript

    تستخدم Intlayer تقنية توسيع الوحدات (module augmentation) للاستفادة من TypeScript، مما يجعل برمجتك أكثر قوة.

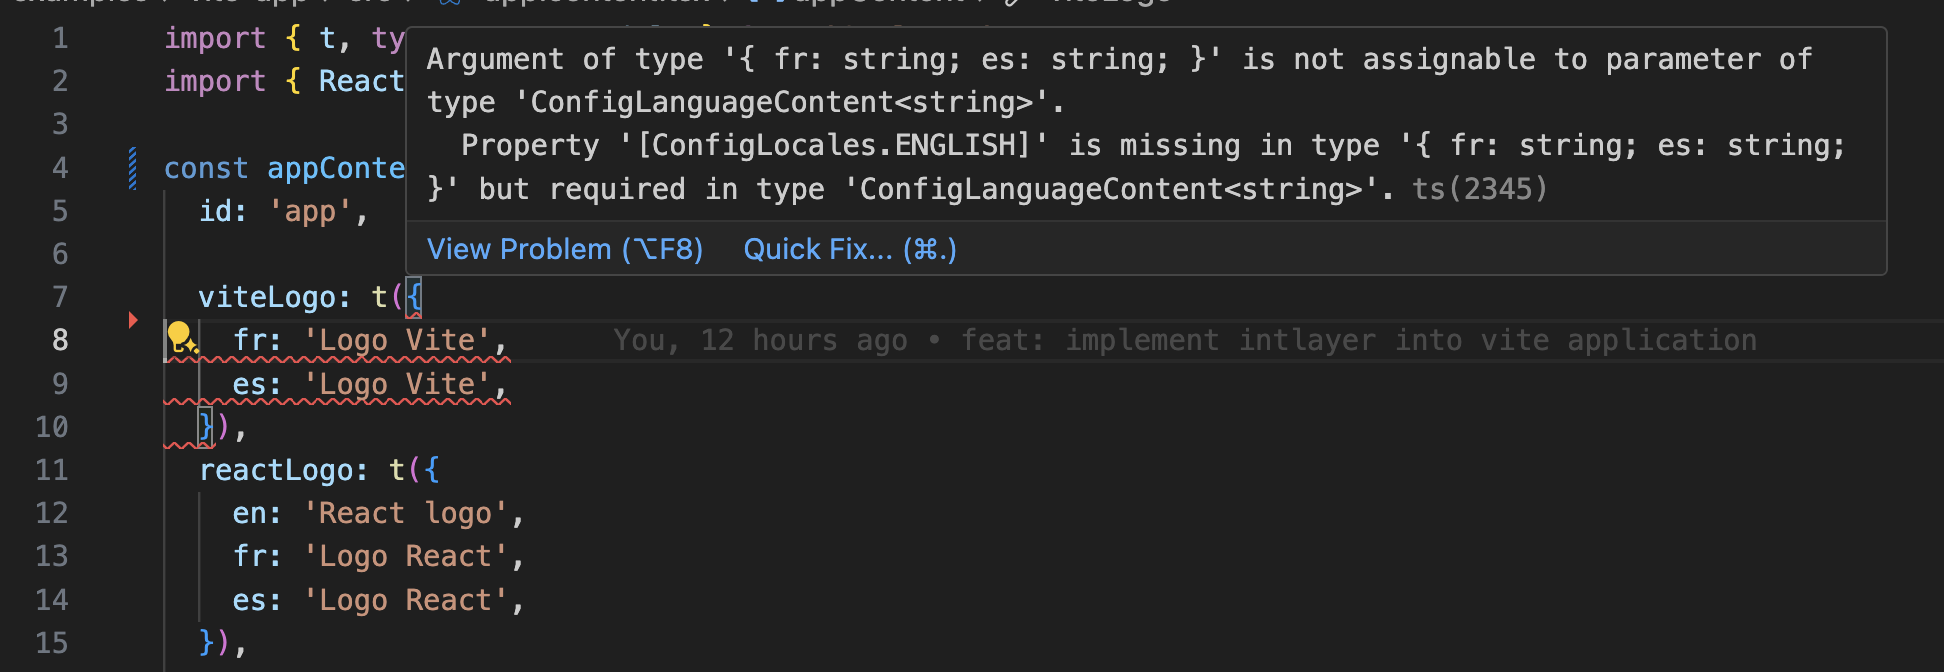
    الإكمال التلقائي

    خطأ في الترجمة

    تأكد من أن تكوين TypeScript الخاص بك يتضمن الأنواع المولدة تلقائيًا.

    tsconfig.json
    نسخ الكود

    نسخ الكود إلى الحافظة

    {  // ... تكوين TypeScript الحالي الخاص بك  "include": [    // ... تكوين TypeScript الحالي الخاص بك    ".intlayer/**/*.ts", // تضمين الأنواع المولدة تلقائيًا  ],}

    تكوين Git

    يوصى بتجاهل الملفات التي تنشئها Intlayer. هذا يتجنب إضافتها إلى مستودع Git الخاص بك.

    للقيام بذلك، أضف التعليمات التالية إلى ملف .gitignore الخاص بك:

    bash
    نسخ الكود

    نسخ الكود إلى الحافظة

    # تجاهل الملفات المولدة بواسطة Intlayer.intlayer

    إضافة VS Code

    لتحسين تجربة التطوير الخاصة بك مع Intlayer، يمكنك تثبيت إضافة Intlayer الرسمية لـ VS Code.

    التثبيت من VS Code Marketplace

    توفر هذه الإضافة:

    • إكمال تلقائي لمفاتيح الترجمة.
    • اكتشاف الأخطاء في الوقت الفعلي للترجمات المفقودة.
    • معاينة مضمنة للمحتوى المترجم.
    • إجراءات سريعة لإنشاء وتحديث الترجمات بسهولة.

    لمزيد من المعلومات حول استخدام الإضافة، راجع توثيق إضافة VS Code.


    (Optional) Step 15: Extract the content of your components

    If you have an existing codebase, transforming thousands of files can be time-consuming.

    To ease this process, Intlayer propose a compiler / extractor to transform your components and extract the content.

    To set it up, you can add a compiler section in your intlayer.config.ts file:

    intlayer.config.ts
    نسخ الكود

    نسخ الكود إلى الحافظة

    import { type IntlayerConfig } from "intlayer";
    
    const config: IntlayerConfig = {
      // ... Rest of your config
      compiler: {
        /**
         * Indicates if the compiler should be enabled.
         */
        enabled: true,
    
        /**
         * Defines the output files path
         */
        output: ({ fileName, extension }) => `./${fileName}${extension}`,
    
        /**
         * Indicates if the components should be saved after being transformed.
         *
         * - If `true`, the compiler will rewrite the component file in the disk. So the transformation will be permanent, and the compiler will skip the transformation for the next process. That way, the compiler can transform the app, and then it can be removed.
         *
         * - If `false`, the compiler will inject the `useIntlayer()` function call into the code in the build output only, and keep the base codebase intact. The transformation will be done only in memory.
         */
        saveComponents: false,
    
        /**
         * Dictionary key prefix
         */
        dictionaryKeyPrefix: "",
      },
    };
    
    export default config;

    Run the extractor to transform your components and extract the content

    bash
    نسخ الكود

    نسخ الكود إلى الحافظة

    npx intlayer extract

    Update your vite.config.ts to include the intlayerCompiler plugin:

    vite.config.ts
    نسخ الكود

    نسخ الكود إلى الحافظة

    import { defineConfig } from "vite";import { intlayer, intlayerCompiler } from "vite-intlayer";export default defineConfig({ plugins: [   intlayer(),   intlayerCompiler(), // Adds the compiler plugin ],});
    bash
    نسخ الكود

    نسخ الكود إلى الحافظة

    npm run build # Or npm run dev

    تعمق أكثر

    إذا كنت تريد معرفة المزيد، يمكنك أيضًا تنفيذ المحرر المرئي أو استخدام نظام إدارة المحتوى (CMS) لإخراج محتواك خارجيًا.

    Astro و Svelte
    Astro و Solid
    Alt+→

    في هذه الصفحة

      المناقشات مجهولة الهوية ويتم مراجعتها بانتظام لمعالجة المشكلات الشائعة. لا تتردد في مشاركة أفكار الميزات أو التعليقات على الوثائق أو أي شيء يتعلق بـ Intlayer, نستخدم هذه المدخلات لتشكيل خارطة الطريق وتحسين المنتج.

      npm install intlayer astro-intlayer vue vue-intlayer @astrojs/vuenpx intlayer init
      import { Locales, type IntlayerConfig } from "intlayer";const config: IntlayerConfig = {  internationalization: {    locales: [      Locales.ENGLISH,      Locales.FRENCH,      Locales.SPANISH,      Locales.ARABIC,      // لغاتك الأخرى    ],    defaultLocale: Locales.ENGLISH,  },};export default config;
      // @ts-checkimport { intlayer } from "astro-intlayer";import vue from "@astrojs/vue";import { defineConfig } from "astro/config";// https://astro.build/configexport default defineConfig({  integrations: [intlayer(), vue()],});
      import { t, type Dictionary } from "intlayer";const appContent = {  key: "app",  content: {    title: t({      en: "Hello World",      fr: "Bonjour le monde",      es: "Hola mundo",      ar: "مرحبا بالعالم",    }),  },} satisfies Dictionary;export default appContent;
      ---import {  getIntlayer,  getLocaleFromPath,  getLocalizedUrl,  getHTMLTextDir,  getPrefix,  localeMap,  defaultLocale,  type LocalesValues,} from "intlayer";import VueIsland from "../../components/vue/VueIsland.vue";export const getStaticPaths = () => {  return localeMap(({ locale }) => ({    params: { locale: getPrefix(locale).localePrefix },  }));};const locale = getLocaleFromPath(Astro.url.pathname) as LocalesValues;const { title } = getIntlayer("app", locale);---<!doctype html><html lang={locale} dir={locale === 'ar' ? 'rtl' : 'ltr'}>  <head>    <meta charset="utf-8" />    <meta name="viewport" content="width=device-width" />    <link rel="icon" type="image/svg+xml" href="/favicon.svg" />    <title>{title}</title>    <!-- رابط Canonical: يخبر محركات البحث عن النسخة الرئيسية لهذه الصفحة -->    <link      rel="canonical"      href={new URL(getLocalizedUrl(Astro.url.pathname, locale), Astro.site)}    />    <!-- Hreflang: يخبر جوجل عن جميع النسخ المترجمة -->    {      localeMap(({ locale: mapLocale }) => (        <link          rel="alternate"          hreflang={mapLocale}          href={new URL(            getLocalizedUrl(Astro.url.pathname, mapLocale),            Astro.site          )}        />      ))    }    <!-- x-default: خيار احتياطي عندما لا تتطابق اللغة مع لغة المستخدم -->    <link      rel="alternate"      hreflang="x-default"      href={new URL(        getLocalizedUrl(Astro.url.pathname, defaultLocale),        Astro.site      )}    />  </head>  <body>    <!-- جزيرة Vue تقوم برندر جميع المحتويات التفاعلية بما في ذلك مبدل اللغة -->    <VueIsland locale={locale} client:only="vue" />  </body></html>
      <script setup lang="ts">import { ref, getCurrentInstance } from "vue";import { useIntlayer, useLocale, installIntlayer } from "vue-intlayer";import { getLocalizedUrl, getLocaleName, type LocalesValues } from "intlayer";const props = defineProps<{ locale: LocalesValues }>();const app = getCurrentInstance()?.appContext.app;if (app) {  installIntlayer(app, { locale: props.locale });}const {  locale: currentLocale,  availableLocales,  setLocale,} = useLocale({  onLocaleChange: (newLocale: LocalesValues) => {    window.location.href = getLocalizedUrl(window.location.pathname, newLocale);  },});const count = ref(0);const { title } = useIntlayer("app");</script><template>  <div>    <h1>{{ title }}</h1>    <!-- يتم رندر مبدل اللغة مباشرة داخل قالب الجزيرة -->    <div class="locale-switcher">      <span class="switcher-label">تغيير اللغة:</span>      <div class="locale-buttons">        <button          v-for="localeItem in availableLocales"          :key="localeItem"          :class="['locale-btn', { active: localeItem === currentLocale }]"          :disabled="localeItem === currentLocale"          @click="setLocale(localeItem)"        >          <span class="ls-own-name">{{ getLocaleName(localeItem) }}</span>          <span class="ls-current-name">{{            getLocaleName(localeItem, currentLocale)          }}</span>          <span class="ls-code">{{ localeItem.toUpperCase() }}</span>        </button>      </div>    </div>  </div></template>
      <script setup lang="ts">import { useLocale } from "vue-intlayer";import { getLocalizedUrl, getLocaleName, type LocalesValues } from "intlayer";// إعادة استخدام نفس واجهة الخاصية (props) / إعداد التطبيق (setup app) كما هو موضح في الخطوة 6...const {  locale: currentLocale,  availableLocales,  setLocale,} = useLocale({  onLocaleChange: (newLocale: LocalesValues) => {    // الانتقال إلى الرابط المترجم عند تغيير اللغة    window.location.href = getLocalizedUrl(window.location.pathname, newLocale);  },});</script><template>  <div class="locale-switcher">    <span class="switcher-label">تغيير اللغة:</span>    <div class="locale-buttons">      <button        v-for="localeItem in availableLocales"        :key="localeItem"        :class="['locale-btn', { active: localeItem === currentLocale }]"        :disabled="localeItem === currentLocale"        @click="setLocale(localeItem)"      >        <span class="ls-own-name">{{ getLocaleName(localeItem) }}</span>        <span class="ls-current-name">{{          getLocaleName(localeItem, currentLocale)        }}</span>        <span class="ls-code">{{ localeItem.toUpperCase() }}</span>      </button>    </div>  </div></template>
      import type { APIRoute } from "astro";import { generateSitemap, type SitemapUrlEntry } from "intlayer";const pathList: SitemapUrlEntry[] = [  { path: "/", changefreq: "daily", priority: 1.0 },  { path: "/about", changefreq: "monthly", priority: 0.7 },];const SITE_URL = import.meta.env.SITE ?? "http://localhost:4321";export const GET: APIRoute = async ({ site }) => {  const xmlOutput = generateSitemap(pathList, { siteUrl: SITE_URL });  return new Response(xmlOutput, {    headers: { "Content-Type": "application/xml" },  });};
      import type { APIRoute } from "astro";import { getMultilingualUrls } from "intlayer";const getAllMultilingualUrls = (urls: string[]) =>  urls.flatMap((url) => Object.values(getMultilingualUrls(url)) as string[]);const disallowedPaths = getAllMultilingualUrls(["/admin", "/private"]);export const GET: APIRoute = ({ site }) => {  const robotsTxt = [    "User-agent: *",    "Allow: /",    ...disallowedPaths.map((path) => `Disallow: ${path}`),    "",    `Sitemap: ${new URL("/sitemap.xml", site).href}`,  ].join("\n");  return new Response(robotsTxt, {    headers: { "Content-Type": "text/plain" },  });};
      {  // ... تكوين TypeScript الحالي الخاص بك  "include": [    // ... تكوين TypeScript الحالي الخاص بك    ".intlayer/**/*.ts", // تضمين الأنواع المولدة تلقائيًا  ],}
      # تجاهل الملفات المولدة بواسطة Intlayer.intlayer
      npx intlayer extract
      import { defineConfig } from "vite";import { intlayer, intlayerCompiler } from "vite-intlayer";export default defineConfig({ plugins: [   intlayer(),   intlayerCompiler(), // Adds the compiler plugin ],});
      npm run build # Or npm run dev