
Ask your question and get a summary of the document by referencing this page and the AI provider of your choice
Version History
- "Update Solid useIntlayer API usage to direct property access"v8.9.004/05/2026
- "Add init command"v7.5.930/12/2025
- "Initial history"v5.5.1029/06/2025
The content of this page was translated using an AI.
See the last version of the original content in EnglishIf you have an idea for improving this documentation, please feel free to contribute by submitting a pull request on GitHub.
GitHub link to the documentationCopy doc Markdown to clipboard
Translate your Vite and React website using Intlayer | Internationalization (i18n)
Table of Contents
Why Intlayer over alternatives?
Compared to main solutions like react-i18next or i18next, Intlayer is a solution that comes with integrated optimizations such as:
Intlayer is optimized to work perfectly with Vite and React by offering component-level content scoping, lazy-loaded translations, and all the features needed for scaling internationalization (i18n).
Instead of loading massive JSON files into your pages, load only the necessary content. Intlayer helps reduce your bundle and page sizes by up to 50%.
Scoping your application's content facilitates maintenance for large-scale applications. You can duplicate or delete a single feature folder without the mental burden of reviewing your entire content codebase. Additionally, Intlayer is fully typed to ensure your content's accuracy.
Co-locating content reduces the context needed by Large Language Models (LLMs). Intlayer also comes with a suite of tools, such as a CLI to test for missing translations,LSP, MCP, and agent skills, to make the developer experience (DX) even smoother for AI agents.
Use automation to translate in your CI/CD pipeline using the LLM of your choice at the cost of your AI provider. Intlayer also offers a compiler to automate content extraction, as well as a web platform to help translate in the background.
Connecting massive JSON files to components can lead to performance and reactivity issues. Intlayer optimizes your content loading at build time.
More than just an i18n solution, Intlayer provides an self-hosted visual editor and a full CMS to help you manage your multilingual content in real-time, making collaboration with translators, copywriters, and other team members seamless. Content can be stored locally and/or remotely.
Step-by-Step Guide to Set Up Intlayer in a Vite and React Application
See Application Template on GitHub.
Install Dependencies
Install the necessary packages using npm:
bashCopy codeCopy the code to the clipboard
intlayer The core package that provides internationalization tools for configuration management, translation, content declaration, transpilation, and CLI commands.
react-intlayer The package that integrates Intlayer with React applications. It provides context providers and hooks for React internationalisation.
vite-intlayer Includes the Vite plugin for integrating Intlayer with the Vite bundler, as well as middleware for detecting the user's preferred locale, managing cookies, and handling URL redirection.
Configuration of your project
Create a config file to configure the languages of your application:
intlayer.config.tsCopy codeCopy the code to the clipboard
import { Locales, type IntlayerConfig } from "intlayer";

const config: IntlayerConfig = {
  internationalization: {
    locales: [
      Locales.ENGLISH,
      Locales.FRENCH,
      Locales.SPANISH,
      // Your other locales
    ],
    defaultLocale: Locales.ENGLISH,
  },
};

export default config;
Through this configuration file, you can set up localised URLs, middleware redirection, cookie names, the location and extension of your content declarations, disable Intlayer logs in the console, and more. For a complete list of available parameters, refer to the configuration documentation.
Integrate Intlayer in Your Vite Configuration
Add the intlayer plugin into your configuration.
vite.config.tsCopy codeCopy the code to the clipboard
import { defineConfig } from "vite";
import react from "@vitejs/plugin-react-swc";
import { intlayer } from "vite-intlayer";

// https://vitejs.dev/config/
export default defineConfig({
  plugins: [react(), intlayer()],
});
The
intlayer()Vite plugin is used to integrate Intlayer with Vite. It ensures the building of content declaration files and monitors them in development mode. It defines Intlayer environment variables within the Vite application. Additionally, it provides aliases to optimise performance.Declare Your Content
Create and manage your content declarations to store translations:
src/app.content.tsxCopy codeCopy the code to the clipboard
import { t, type Dictionary } from "intlayer";
import type { ReactNode } from "react";

const appContent = {
  key: "app",
  content: {
    viteLogo: t({
      "en-GB": "Vite logo",
      en: "Vite logo",
      fr: "Logo Vite",
      es: "Logo Vite",
    }),
    reactLogo: t({
      "en-GB": "React logo",
      en: "React logo",
      fr: "Logo React",
      es: "Logo React",
    }),

    title: "Vite + React",

    count: t({
      "en-GB": "count is ",
      en: "count is ",
      fr: "le compte est ",
      es: "el recuento es ",
    }),

    edit: t<ReactNode>({
      "en-GB": (
        <>
          Edit <code>src/App.tsx</code> and save to test HMR
        </>
      ),
      en: (
        <>
          Edit <code>src/App.tsx</code> and save to test HMR
        </>
      ),
      fr: (
        <>
          Éditez <code>src/App.tsx</code> et enregistrez pour tester HMR
        </>
      ),
      es: (
        <>
          Edita <code>src/App.tsx</code> y guarda para probar HMR
        </>
      ),
    }),

    readTheDocs: t({
      "en-GB": "Click on the Vite and React logos to learn more",
      en: "Click on the Vite and React logos to learn more",
      fr: "Cliquez sur les logos Vite et React pour en savoir plus",
      es: "Haga clic en los logotipos de Vite y React para obtener más información",
    }),
  },
} satisfies Dictionary;

export default appContent;
Your content declarations can be defined anywhere in your application as soon as they are included in the
contentDirdirectory (by default,./src). And match the content declaration file extension (by default,.content.{json,ts,tsx,js,jsx,mjs,cjs,md,mdx,yaml,yml}).For more details, refer to the content declaration documentation.
If your content file includes TSX code, you should consider importing
import React from "react";in your content file.Utilise Intlayer in Your Code
Access your content dictionaries throughout your application:
src/App.tsxCopy codeCopy the code to the clipboard
import { useState, type FC } from "react";
import reactLogo from "./assets/react.svg";
import viteLogo from "/vite.svg";
import "./App.css";
import { IntlayerProvider, useIntlayer } from "react-intlayer";

const AppContent: FC = () => {
  const [count, setCount] = useState(0);
  const content = useIntlayer("app");

  return (
    <>
      <div>
        <a href="https://vitejs.dev" target="_blank">
          <img src={viteLogo} className="logo" alt={content.viteLogo.value} />
        </a>
        <a href="https://react.dev" target="_blank">
          <img
            src={reactLogo}
            className="logo react"
            alt={content.reactLogo.value}
          />
        </a>
      </div>
      <h1>{content.title}</h1>
      <div className="card">
        <button onClick={() => setCount((count) => count + 1)}>
          {content.count}
          {count}
        </button>
        <p>{content.edit}</p>
      </div>
      <p className="read-the-docs">{content.readTheDocs}</p>
    </>
  );
};

const App: FC = () => (
  <IntlayerProvider>
    <AppContent />
  </IntlayerProvider>
);

export default App;
If you want to use your content in a
stringattribute, such asalt,title,href,aria-label, etc., you can use the value of the function, like:htmlCopy codeCopy the code to the clipboard
To learn more about the
useIntlayerhook, refer to the documentation.Change the language of your content
OptionalTo change the language of your content, you can use the
setLocalefunction provided by theuseLocalehook. This function allows you to set the locale of the application and update the content accordingly.src/components/LocaleSwitcher.tsxCopy codeCopy the code to the clipboard
import type { FC } from "react";
import { Locales } from "intlayer";
import { useLocale } from "react-intlayer";

const LocaleSwitcher: FC = () => {
  const { setLocale } = useLocale();

  return (
    <button onClick={() => setLocale(Locales.English)}>
      Change Language to English
    </button>
  );
};
To learn more about the
useLocalehook, refer to the documentation.Add localised Routing to your application
OptionalThe purpose of this step is to create unique routes for each language. This is useful for SEO and SEO-friendly URLs. Example:
plaintextCopy codeCopy the code to the clipboard
By default, the routes are not prefixed for the default locale. If you want to prefix the default locale, you can set the
middleware.prefixDefaultoption totruein your configuration. See the configuration documentation for more information.To add localised routing to your application, you can create a
LocaleRoutercomponent that wraps your application's routes and handles locale-based routing. Here is an example using React Router:src/components/LocaleRouter.tsxCopy codeCopy the code to the clipboard
// Importing necessary dependencies and functions
import { type Locales, configuration, getPathWithoutLocale } from "intlayer"; // Utility functions and types from 'intlayer'
import type { FC, PropsWithChildren } from "react"; // React types for functional components and props
import { IntlayerProvider } from "react-intlayer"; // Provider for internationalisation context
import {
  BrowserRouter,
  Routes,
  Route,
  Navigate,
  useLocation,
} from "react-router-dom"; // Router components for managing navigation

// Destructuring configuration from Intlayer
const { internationalization, middleware } = configuration;
const { locales, defaultLocale } = internationalization;

/**
 * A component that handles localisation and wraps children with the appropriate locale context.
 * It manages URL-based locale detection and validation.
 */
const AppLocalized: FC<PropsWithChildren<{ locale: Locales }>> = ({
  children,
  locale,
}) => {
  const { pathname, search } = useLocation(); // Get the current URL path

  // Determine the current locale, falling back to the default if not provided
  const currentLocale = locale ?? defaultLocale;

  // Remove the locale prefix from the path to construct a base path
  const pathWithoutLocale = getPathWithoutLocale(
    pathname // Current URL path
  );

  /**
   * If middleware.prefixDefault is true, the default locale should always be prefixed.
   */
  if (middleware.prefixDefault) {
    // Validate the locale
    if (!locale || !locales.includes(locale)) {
      // Redirect to the default locale with the updated path
      return (
        <Navigate
          to={`/${defaultLocale}/${pathWithoutLocale}${search}`}
          replace // Replace the current history entry with the new one
        />
      );
    }

    // Wrap children with the IntlayerProvider and set the current locale
    return (
      <IntlayerProvider locale={currentLocale}>{children}</IntlayerProvider>
    );
  } else {
    /**
     * When middleware.prefixDefault is false, the default locale is not prefixed.
     * Ensure that the current locale is valid and is not the default locale.
     */
    if (
      currentLocale.toString() !== defaultLocale.toString() &&
      !locales
        .filter(
          (locale) => locale.toString() !== defaultLocale.toString() // Exclude the default locale
        )
        .includes(currentLocale) // Check if the current locale is in the list of valid locales
    ) {
      // Redirect to the path without locale prefix
      return <Navigate to={`${pathWithoutLocale}${search}`} replace />;
    }

    // Wrap children with the IntlayerProvider and set the current locale
    return (
      <IntlayerProvider locale={currentLocale}>{children}</IntlayerProvider>
    );
  }
};

/**
 * A router component that sets up locale-specific routes.
 * It uses React Router to manage navigation and render localised components.
 */
export const LocaleRouter: FC<PropsWithChildren> = ({ children }) => (
  <BrowserRouter>
    <Routes>
      {locales
        .filter(
          (locale) => middleware.prefixDefault || locale !== defaultLocale
        )
        .map((locale) => (
          <Route
            // Route pattern to capture the locale (e.g., /en/, /fr/) and match all subsequent paths
            path={`/${locale}/*`}
            key={locale}
            element={<AppLocalized locale={locale}>{children}</AppLocalized>} // Wraps children with locale management
          />
        ))}

      {
        // If prefixing the default locale is disabled, render the children directly at the root path
        !middleware.prefixDefault && (
          <Route
            path="*"
            element={
              <AppLocalized locale={defaultLocale}>{children}</AppLocalized>
            } // Wraps children with locale management
          />
        )
      }
    </Routes>
  </BrowserRouter>
);
Note: If you use
routing.mode: 'no-prefix' | 'search-params', you probably don't need to use thelocaleMapfunction.Then, you can use the
LocaleRoutercomponent in your application:src/App.tsxCopy codeCopy the code to the clipboard
import { LocaleRouter } from "./components/LocaleRouter";
import type { FC } from "react";

// ... Your AppContent component

const App: FC = () => (
  <LocaleRouter>
    <AppContent />
  </LocaleRouter>
);
In parallel, you can also use the
intlayerProxyto add server-side routing to your application. This plugin will automatically detect the current locale based on the URL and set the appropriate locale cookie. If no locale is specified, the plugin will determine the most appropriate locale based on the user's browser language preferences. If no locale is detected, it will redirect to the default locale.Note that to use the
intlayerProxyin production, you need to switch thevite-intlayerpackage fromdevDependenciestodependencies.vite.config.tsCopy codeCopy the code to the clipboard
import { defineConfig } from "vite"; import react from "@vitejs/plugin-react-swc"; import { intlayer, intlayerProxy } from "vite-intlayer"; // https://vitejs.dev/config/ export default defineConfig({ plugins: [ intlayerProxy(), // should be placed first react(), intlayer(), ], });Change the URL when the locale changes
OptionalTo change the URL when the locale changes, you can use the
onLocaleChangeprop provided by theuseLocalehook. In parallel, you can use theuseLocationanduseNavigatehooks fromreact-router-domto update the URL path.src/components/LocaleSwitcher.tsxCopy codeCopy the code to the clipboard
import { useLocation, useNavigate } from "react-router-dom";
import {
  Locales,
  getHTMLTextDir,
  getLocaleName,
  getLocalizedUrl,
} from "intlayer";
import { useLocale } from "react-intlayer";
import { type FC } from "react";

const LocaleSwitcher: FC = () => {
  const { pathname, search } = useLocation(); // Get the current URL path. Example: /fr/about?foo=bar
  const navigate = useNavigate();

  const { locale, availableLocales, setLocale } = useLocale({
    onLocaleChange: (locale) => {
      // Construct the URL with the updated locale
      // Example: /es/about?foo=bar
      const pathWithLocale = getLocalizedUrl(`${pathname}${search}`, locale);

      // Update the URL path
      navigate(pathWithLocale);
    },
  });

  return (
    <div>
      <button popoverTarget="localePopover">{getLocaleName(locale)}</button>
      <div id="localePopover" popover="auto">
        {availableLocales.map((localeItem) => (
          <a
            href={getLocalizedUrl(location.pathname, localeItem)}
            hrefLang={localeItem}
            aria-current={locale === localeItem ? "page" : undefined}
            onClick={(e) => {
              e.preventDefault();
              setLocale(localeItem);
            }}
            key={localeItem}
          >
            <span>
              {/* Locale - e.g. FR */}
              {localeItem}
            </span>
            <span>
              {/* Language in its own Locale - e.g. Français */}
              {getLocaleName(localeItem, locale)}
            </span>
            <span dir={getHTMLTextDir(localeItem)} lang={localeItem}>
              {/* Language in current Locale - e.g. Francés with current locale set to Locales.SPANISH */}
              {getLocaleName(localeItem)}
            </span>
            <span dir="ltr" lang={Locales.ENGLISH}>
              {/* Language in English - e.g. French */}
              {getLocaleName(localeItem, Locales.ENGLISH)}
            </span>
          </a>
        ))}
      </div>
    </div>
  );
};
Documentation references:
Below is the updated Step 9 with added explanations and refined code examples:
Switch the HTML Language and Direction Attributes
OptionalWhen your application supports multiple languages, it is crucial to update the
<html>tag'slanganddirattributes to correspond with the current locale. Doing so ensures:- Accessibility: Screen readers and assistive technologies depend on the correct
langattribute to pronounce and interpret content accurately. - Text Rendering: The
dir(direction) attribute guarantees that text is rendered in the correct order (e.g., left-to-right for English, right-to-left for Arabic or Hebrew), which is essential for readability. - SEO: Search engines use the
langattribute to identify the language of your page, helping to deliver the appropriate localised content in search results.
By updating these attributes dynamically when the locale changes, you guarantee a consistent and accessible experience for users across all supported languages.
Implementing the Hook
Create a custom hook to manage the HTML attributes. The hook listens for locale changes and updates the attributes accordingly:
src/hooks/useI18nHTMLAttributes.tsxCopy codeCopy the code to the clipboard
import { useEffect } from "react";
import { useLocale } from "react-intlayer";
import { getHTMLTextDir } from "intlayer";

/**
 * Updates the HTML <html> element's `lang` and `dir` attributes based on the current locale.
 * - `lang`: Informs browsers and search engines of the page's language.
 * - `dir`: Ensures the correct reading order (e.g., 'ltr' for English, 'rtl' for Arabic).
 *
 * This dynamic update is essential for proper text rendering, accessibility, and SEO.
 */
export const useI18nHTMLAttributes = () => {
  const { locale } = useLocale();

  useEffect(() => {
    // Update the language attribute to the current locale.
    document.documentElement.lang = locale;

    // Set the text direction based on the current locale.
    document.documentElement.dir = getHTMLTextDir(locale);
  }, [locale]);
};
Using the Hook in Your Application
Integrate the hook into your main component so that the HTML attributes update whenever the locale changes:
src/App.tsxCopy codeCopy the code to the clipboard
import type { FC } from "react";
import { IntlayerProvider, useIntlayer } from "react-intlayer";
import { useI18nHTMLAttributes } from "./hooks/useI18nHTMLAttributes";
import "./App.css";

const AppContent: FC = () => {
  // Apply the hook to update the <html> tag's lang and dir attributes based on the locale.
  useI18nHTMLAttributes();

  // ... Rest of your component
};

const App: FC = () => (
  <IntlayerProvider>
    <AppContent />
  </IntlayerProvider>
);

export default App;
By applying these changes, your application will:
- Ensure the language (
lang) attribute correctly reflects the current locale, which is important for SEO and browser behaviour. - Adjust the text direction (
dir) according to the locale, enhancing readability and usability for languages with different reading orders. - Provide a more accessible experience, as assistive technologies depend on these attributes to function optimally.
- Accessibility: Screen readers and assistive technologies depend on the correct
Creating a Localised Link Component
OptionalTo ensure that your application’s navigation respects the current locale, you can create a custom
Linkcomponent. This component automatically prefixes internal URLs with the current language. For example, when a French-speaking user clicks on a link to the "About" page, they are redirected to/fr/aboutinstead of/about.This behaviour is useful for several reasons:
- SEO and User Experience: Localised URLs help search engines index language-specific pages correctly and provide users with content in their preferred language.
- Consistency: By using a localised link throughout your application, you guarantee that navigation stays within the current locale, preventing unexpected language switches.
- Maintainability: Centralising the localisation logic in a single component simplifies the management of URLs, making your codebase easier to maintain and extend as your application grows.
Below is the implementation of a localised
Linkcomponent in TypeScript:src/components/Link.tsxCopy codeCopy the code to the clipboard
import { getLocalizedUrl } from "intlayer";
import {
  forwardRef,
  type DetailedHTMLProps,
  type AnchorHTMLAttributes,
} from "react";
import { useLocale } from "react-intlayer";

export interface LinkProps extends DetailedHTMLProps<
  AnchorHTMLAttributes<HTMLAnchorElement>,
  HTMLAnchorElement
> {}

/**
 * Utility function to check whether a given URL is external.
 * If the URL starts with http:// or https://, it's considered external.
 */
export const checkIsExternalLink = (href?: string): boolean =>
  /^https?:\/\//.test(href ?? "");

/**
 * A custom Link component that adapts the href attribute based on the current locale.
 * For internal links, it uses `getLocalizedUrl` to prefix the URL with the locale (e.g., /fr/about).
 * This ensures that navigation stays within the same locale context.
 */
export const Link = forwardRef<HTMLAnchorElement, LinkProps>(
  ({ href, children, ...props }, ref) => {
    const { locale } = useLocale();
    const isExternalLink = checkIsExternalLink(href);

    // If the link is internal and a valid href is provided, get the localized URL.
    const hrefI18n =
      href && !isExternalLink ? getLocalizedUrl(href, locale) : href;

    return (
      <a href={hrefI18n} ref={ref} {...props}>
        {children}
      </a>
    );
  }
);

Link.displayName = "Link";
How It Works
Detecting External Links:
The helper functioncheckIsExternalLinkdetermines whether a URL is external. External links are left unchanged because they do not require localisation.Retrieving the Current Locale:
TheuseLocalehook provides the current locale (e.g.,frfor French).Localising the URL:
For internal links (i.e., non-external),getLocalizedUrlis used to automatically prefix the URL with the current locale. This means that if your user is in French, passing/aboutas thehrefwill transform it to/fr/about.Returning the Link:
The component returns an<a>element with the localised URL, ensuring that navigation is consistent with the locale.
By integrating this
Linkcomponent across your application, you maintain a coherent and language-aware user experience while also benefiting from improved SEO and usability.
(Optional) Sitemap and robots.txt (build-time)
Intlayer includes formatters such as generateSitemap and getMultilingualUrls that produce crawler-ready multilingual sitemap.xml and robots.txt output you can write into your project’s public/ folder. In practice you run a small Node script before Vite (for example predev / prebuild npm hooks) so those files exist when you build or serve the app.
Sitemap
Intlayer’s sitemap generator respects your locale setup and includes the usual metadata for crawlers.
The generated sitemap supports thexhtml:linknamespace (hreflang XML extensions). Unlike basic generators that only emit flat URLs, Intlayer wires bidirectional links between every localized variant of each page (for example/about,/fr/about, or/about?lang=fr, depending on your routing mode), which helps search engines relate localized URLs.
Robots.txt
Use getMultilingualUrls so Disallow entries cover every localized spelling of sensitive paths.
1. Add generate-seo.mjs at the project root
Copy the code to the clipboard
intlayer must be installed so the script can import it. Set SITE_URL in the environment for production (for example in CI).
Prefergenerate-seo.mjsfor Node ESM. If you usegenerate-seo.jsinstead, ensure"type": "module"is set inpackage.json, or run Node with ESM enabled.
2. Run the script before Vite
Copy the code to the clipboard
Adjust if you use pnpm or yarn. You can also invoke the same script from CI or another step if that fits your workflow.
Configure TypeScript
Intlayer uses module augmentation to take advantage of TypeScript and make your codebase stronger.

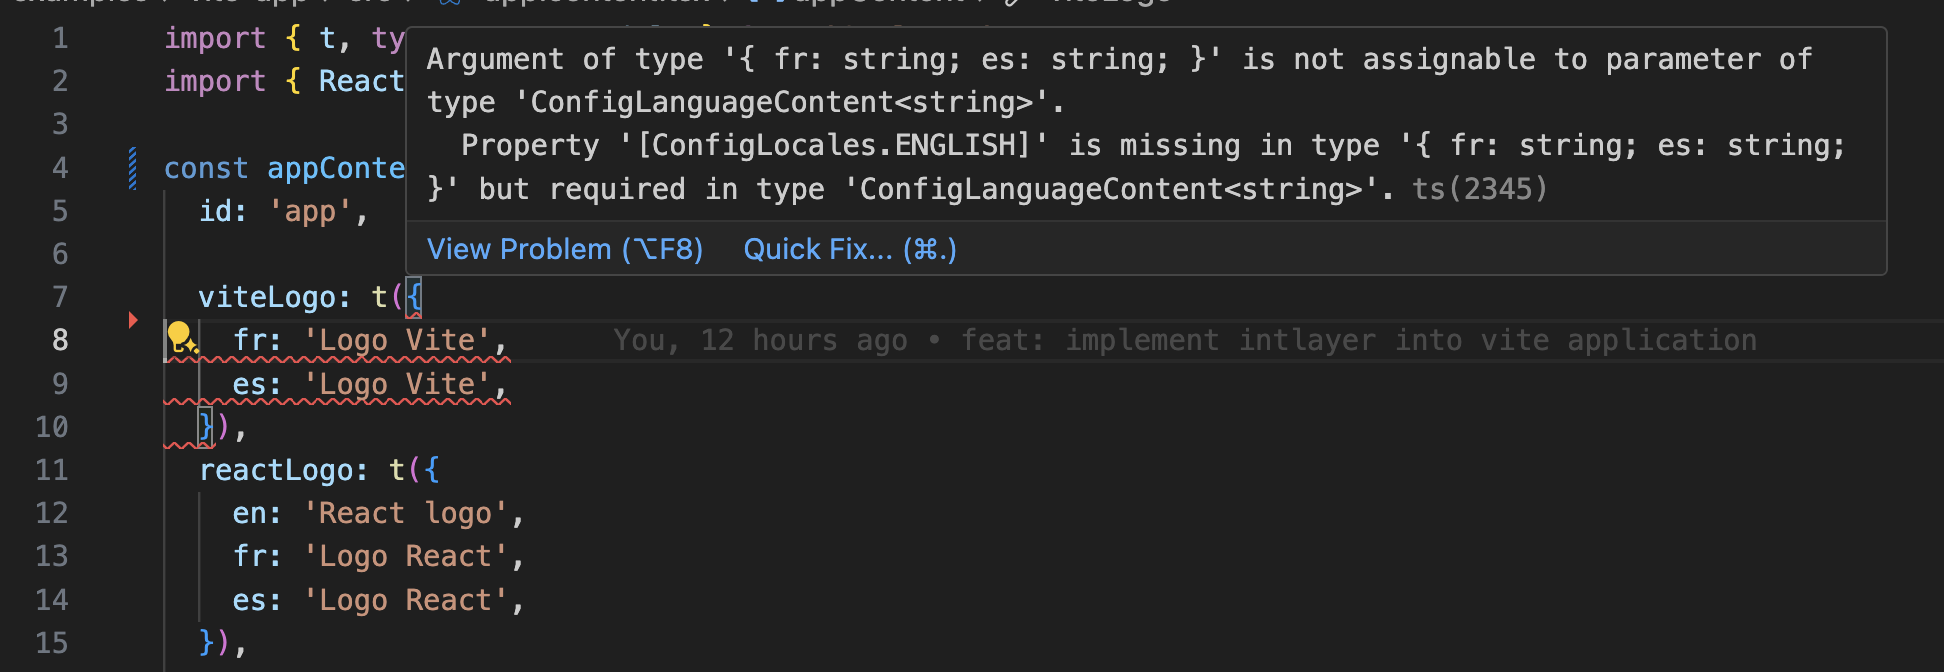
Ensure your TypeScript configuration includes the autogenerated types.
Copy the code to the clipboard
Git Configuration
It is recommended to ignore the files generated by Intlayer. This prevents you from committing them to your Git repository.
To do this, you can add the following instructions to your .gitignore file:
Copy the code to the clipboard
VS Code Extension
To enhance your development experience with Intlayer, you can install the official Intlayer VS Code Extension.
Install from the VS Code Marketplace
This extension provides:
- Autocompletion for translation keys.
- Real-time error detection for missing translations.
- Inline previews of translated content.
- Quick actions to easily create and update translations.
For more details on how to use the extension, refer to the Intlayer VS Code Extension documentation.
Go Further
To go further, you can implement the visual editor or externalise your content using the CMS.