HomeSandboxShowcaseAppDocBlog
    • EnglishEnglish
      EN
    • русскийRussian
      RU
    • 日本語Japanese
      JA
    • françaisFrench
      FR
    • 한국어Korean
      KO
    • 中文Chinese
      ZH
    • españolSpanish
      ES
    • DeutschGerman
      DE
    • العربيةArabic
      AR
    • italianoItalian
      IT
    • British EnglishBritish English
      EN-GB
    • portuguêsPortuguese
      PT
    • हिन्दीHindi
      HI
    • TürkçeTurkish
      TR
    • polskiPolish
      PL
    • IndonesiaIndonesian
      ID
    • Tiếng ViệtVietnamese
      VI
    • українськаUkrainian
      UK
    /
    Filter docs by framework
    Alt+←
    Why Intlayer ?
    Get Started
    Concept
    • How Intlayer Works
    • Configuration
    • TestFillBuildWatchExtractLoginPushPullConfigurationListVersionEditorLiveDebugDoc ReviewDoc TranslateSDK
    • Visual Editor
    • CMS
    • CI/CD Integration
    • TranslationPluralEnumerationConditionGenderInsertionFileNestingMarkdownHTMLFunction Fetching
    • Per Locale File
    • Compiler
    • Auto Fill
    • Testing
    • Bundle Optimization
    Environment
    • Next.js 14 and App Router
      Next.js 15
      Next.js no locale path
      Next.js and Page Router
      Compiler
    • Tanstack Start Solid
    • Astro and React
      Astro and Svelte
      Astro and Vue
      Astro and Solid
      Astro and Preact
      Astro and Lit
      Astro and Vanilla JS
    • React Router v7
      React Router v7 (fs-routes)
      Compiler
    • Nuxt and Vue
    • Vite and Solid
    • SvelteKit
    • Vite and Preact
    • Vite and Vanilla JS
    • Vite and Lit
    • Angular 19 (Webpack)
      Analog
    • React CRA
    • React Native and Expo
    • Express.js
      NestJS
      Fastify
      Hono
      Adonis
    • Lynx and React
    Plugins
    • JSON
    • gettext (.po)
    VS Code Extension
    Agent
    • MCP Server
    • Agent skills
    Releases
    • v8
    • v7
    • v6
    Benchmark
    • Next.js
    • TanStack
    • Vue
    • Solid
    • Svelte
    Blog
    Ask a question
    1. Documentation
    2. Environment
    3. Astro
    4. Lit
    \n```\n\n> If you want to use your content in a `string` attribute, such as `alt`, `title`, `href`, `aria-label`, etc., you can use the value of the function, like:\n\n> ```html\n> \"{content.image.value}\"\n> \"{content.image.toString()}\"\n> \"{String(content.image)}\"\n> ```\n\n> **Note on routing setup:**\n> The directory structure you use depends on the `middleware.routing` setting in `intlayer.config.ts`:\n>\n> - **`prefix-no-default` (default):** keeps the default language at the root (no prefix) and prefixes others. Use `[...locale]` to catch all cases.\n> - **`prefix-all`:** all URLs get a language prefix. You can use standard `[locale]` if you don't need to handle the root separately.\n> - **`search-param` or `no-prefix`:** no language directories are needed. The language is handled via query parameters or cookies.\n\n### Step 6: Create a Lit Custom Element Component\n\nCreate a Lit custom element. Call `installIntlayer` in the `connectedCallback` using the server-based `locale` attribute to initialise the client-side translation singleton.\n\n```typescript fileName=\"src/components/lit/LitDemo.ts\"\nimport { LitElement, html } from \"lit\";\nimport { installIntlayer, useIntlayer, useLocale } from \"lit-intlayer\";\nimport { getLocalizedUrl, getLocaleName, type LocalesValues } from \"intlayer\";\n\nclass LitDemo extends LitElement {\n static properties = {\n locale: { type: String },\n };\n\n locale: LocalesValues = \"en\" as LocalesValues;\n\n private _content = useIntlayer(this, \"lit-demo\");\n private _localeCtrl = useLocale(this, {\n onLocaleChange: (newLocale: LocalesValues) => {\n window.location.href = getLocalizedUrl(\n window.location.pathname,\n newLocale\n );\n },\n });\n\n override connectedCallback() {\n super.connectedCallback();\n // Initialise with server-detected locale\n installIntlayer({ locale: this.locale as any });\n }\n\n override render() {\n const { greeting, description } = this._content;\n const {\n locale: currentLocale,\n availableLocales,\n setLocale,\n } = this._localeCtrl;\n\n return html`\n
    \n

    ${greeting}

    \n

    ${description}

    \n \n
    \n Change language:\n
    \n ${availableLocales.map(\n (localeItem) => html`\n setLocale(localeItem)}\n >\n ${getLocaleName(localeItem)}\n ${getLocaleName(localeItem, currentLocale)}\n ${localeItem.toUpperCase()}\n \n `\n )}\n
    \n
    \n
    \n `;\n }\n}\n\ncustomElements.define(\"lit-demo\", LitDemo);\n```\n\n> The `locale` attribute is passed from the Astro page (server detection) and used to initialise `installIntlayer` in the `connectedCallback`, which sets the initial language for all `ReactiveController` hooks within the element.\n\n> `useIntlayer` is registered as a `ReactiveController`. It automatically requests an element re-render when the language changes, so no additional subscription logic is required.\n\n### Step 7: Add a Language Switcher\n\nThe language switching functionality is integrated directly within the Lit custom element's `render()` method (see step 6 above). It uses `useLocale` from `lit-intlayer` and navigates to the localised URL when a user selects a new language:\n\n```typescript fileName=\"src/components/lit/LitDemo.ts\"\n// Inside the LitElement class, after useLocale setup in step 6:\n\nprivate _localeCtrl = useLocale(this, {\n onLocaleChange: (newLocale: LocalesValues) => {\n // Navigate to the localised URL on language change\n window.location.href = getLocalizedUrl(window.location.pathname, newLocale);\n },\n});\n\noverride render() {\n const { locale: currentLocale, availableLocales, setLocale } = this._localeCtrl;\n\n return html`\n
    \n Change language:\n
    \n ${availableLocales.map(\n (localeItem) => html`\n setLocale(localeItem)}\n >\n ${getLocaleName(localeItem)}\n ${getLocaleName(localeItem, currentLocale)}\n ${localeItem.toUpperCase()}\n \n `\n )}\n
    \n
    \n `;\n}\n```\n\n> **Note on Lit reactivity:**\n> `useLocale` returns a `ReactiveController`. When `setLocale` is called, the controller automatically requests a re-render, updating the active button state without manual DOM manipulation.\n\n> **Note on persistence:**\n> Using `onLocaleChange` to redirect via `window.location.href` ensures the new linguistic URL is visited, allowing the Intlayer middleware to set the language cookie and remember the user's preference in future visits.\n\n### Step 8: Sitemap and Robots.txt\n\nIntlayer offers utilities to dynamically create your localised sitemap and robots.txt files.\n\n#### Sitemap\n\nIntlayer comes with a built-in sitemap generator to help you create a sitemap for your application easily. It handles localized routes and adds the necessary metadata for search engines.\n\n> The Intlayer generated sitemap supports the `xhtml:link` namespace (Hreflang XML Extensions). Unlike the default sitemap generators that only list raw URLs, Intlayer automatically creates the required bidirectional links between all language versions of a page (e.g., `/about`, `/about?lang=fr`, and `/about?lang=es`). This ensures search engines correctly index and serve the right language version to the right audience.\n\nCreate `src/pages/sitemap.xml.ts` to generate a sitemap including all your localised routes.\n\n```typescript fileName=\"src/pages/sitemap.xml.ts\"\nimport type { APIRoute } from \"astro\";\nimport { generateSitemap, type SitemapUrlEntry } from \"intlayer\";\n\nconst pathList: SitemapUrlEntry[] = [\n { path: \"/\", changefreq: \"daily\", priority: 1.0 },\n { path: \"/about\", changefreq: \"monthly\", priority: 0.7 },\n];\n\nconst SITE_URL = import.meta.env.SITE ?? \"http://localhost:4321\";\n\nexport const GET: APIRoute = async ({ site }) => {\n const xmlOutput = generateSitemap(pathList, { siteUrl: SITE_URL });\n\n return new Response(xmlOutput, {\n headers: { \"Content-Type\": \"application/xml\" },\n });\n};\n```\n\n#### Robots.txt\n\nCreate `src/pages/robots.txt.ts` to control search engine crawling.\n\n```typescript fileName=\"src/pages/robots.txt.ts\"\nimport type { APIRoute } from \"astro\";\nimport { getMultilingualUrls } from \"intlayer\";\n\nconst getAllMultilingualUrls = (urls: string[]) =>\n urls.flatMap((url) => Object.values(getMultilingualUrls(url)) as string[]);\n\nconst disallowedPaths = getAllMultilingualUrls([\"/admin\", \"/private\"]);\n\nexport const GET: APIRoute = ({ site }) => {\n const robotsTxt = [\n \"User-agent: *\",\n \"Allow: /\",\n ...disallowedPaths.map((path) => `Disallow: ${path}`),\n \"\",\n `Sitemap: ${new URL(\"/sitemap.xml\", site).href}`,\n ].join(\"\\n\");\n\n return new Response(robotsTxt, {\n headers: { \"Content-Type\": \"text/plain\" },\n });\n};\n```\n\n### TypeScript Configuration\n\nIntlayer uses module augmentation to leverage TypeScript, making your codebase more robust. If you use decorator syntax, ensure you enable `experimentalDecorators` in your compiler options.\n\n![Autocompletion](https://github.com/aymericzip/intlayer/blob/main/docs/assets/autocompletion.png?raw=true)\n\n![Translation Error](https://github.com/aymericzip/intlayer/blob/main/docs/assets/translation_error.png?raw=true)\n\nEnsure your TypeScript configuration includes the autogenerated types.\n\n```json5 fileName=\"tsconfig.json\"\n{\n compilerOptions: {\n // ...\n experimentalDecorators: true,\n useDefineForClassFields: false, // Required for decorator support in Lit\n },\n include: [\n // ... your existing TypeScript configuration\n \".intlayer/**/*.ts\", // Include autogenerated types\n ],\n}\n```\n\n### Git Configuration\n\nIt is recommended to ignore the files generated by Intlayer. This avoids committing them to your Git repository.\n\nTo do this, add the following instructions to your `.gitignore` file:\n\n```bash\n# Ignore the files generated by Intlayer\n.intlayer\n```\n\n### VS Code Extension\n\nTo improve your development experience with Intlayer, you can install the **official Intlayer VS Code extension**.\n\n[Installation from the VS Code Marketplace](https://marketplace.visualstudio.com/items?itemName=intlayer.intlayer-vs-code-extension)\n\nThis extension provides:\n\n- **Autocompletion** for translation keys.\n- **Real-time error detection** for missing translations.\n- **Inline preview** of translated content.\n- **Quick actions** for easily creating and updating translations.\n\nFor more information on using the extension, refer to the [VS Code Extension documentation](https://intlayer.org/doc/vs-code-extension).\n\n---\n\n### (Optional) Step 15: Extract the content of your components\n\nIf you have an existing codebase, transforming thousands of files can be time-consuming.\n\nTo ease this process, Intlayer propose a [compiler](/en-GB/doc/compiler) / [extractor](/en-GB/doc/concept/cli/extract) to transform your components and extract the content.\n\nTo set it up, you can add a `compiler` section in your `intlayer.config.ts` file:\n\n```typescript fileName=\"intlayer.config.ts\" codeFormat={[\"typescript\", \"esm\", \"commonjs\"]}\nimport { type IntlayerConfig } from \"intlayer\";\n\nconst config: IntlayerConfig = {\n // ... Rest of your config\n compiler: {\n /**\n * Indicates if the compiler should be enabled.\n */\n enabled: true,\n\n /**\n * Defines the output files path\n */\n output: ({ fileName, extension }) => `./${fileName}${extension}`,\n\n /**\n * Indicates if the components should be saved after being transformed.\n *\n * - If `true`, the compiler will rewrite the component file in the disk. So the transformation will be permanent, and the compiler will skip the transformation for the next process. That way, the compiler can transform the app, and then it can be removed.\n *\n * - If `false`, the compiler will inject the `useIntlayer()` function call into the code in the build output only, and keep the base codebase intact. The transformation will be done only in memory.\n */\n saveComponents: false,\n\n /**\n * Dictionary key prefix\n */\n dictionaryKeyPrefix: \"\",\n },\n};\n\nexport default config;\n```\n\n\n \n\nRun the extractor to transform your components and extract the content\n\n```bash packageManager=\"npm\"\nnpx intlayer extract\n```\n\n```bash packageManager=\"pnpm\"\npnpm intlayer extract\n```\n\n```bash packageManager=\"yarn\"\nyarn intlayer extract\n```\n\n```bash packageManager=\"bun\"\nbun x intlayer extract\n```\n\n \n \n\nUpdate your `vite.config.ts` to include the `intlayerCompiler` plugin:\n\n```ts fileName=\"vite.config.ts\"\nimport { defineConfig } from \"vite\";\nimport { intlayer, intlayerCompiler } from \"vite-intlayer\";\n\nexport default defineConfig({\n plugins: [\n intlayer(),\n intlayerCompiler(), // Adds the compiler plugin\n ],\n});\n```\n\n```bash packageManager=\"npm\"\nnpm run build # Or npm run dev\n```\n\n```bash packageManager=\"pnpm\"\npnpm run build # Or pnpm run dev\n```\n\n```bash packageManager=\"yarn\"\nyarn build # Or yarn dev\n```\n\n```bash packageManager=\"bun\"\nbun run build # Or bun run dev\n```\n\n \n\n\n---\n\n### Deepen Your Knowledge\n\nIf you want to learn more, you can also implement the [Visual Editor](/en-GB/doc/concept/editor) or use the [CMS](/en-GB/doc/concept/cms) to externalise your content.\n","about":"Learn how to add internationalisation (i18n) to your Astro + Lit site with Intlayer. Follow this guide to make your site multilingual.","url":"https://intlayer.org/en-GB/doc/environment/astro/lit","datePublished":"24-04-2026","dateModified":"06-05-2026","keywords":"internationalisation, documentation, Intlayer, Astro, Lit, Web Components, i18n, JavaScript","license":"https://raw.githubusercontent.com/aymericzip/intlayer/refs/heads/main/LICENSE","audience":{"@type":"Audience","audienceType":"Developers, Content Managers"}}
    Creation:2026-04-24Last update:2026-05-06
    See the application template on GitHub

    This page has an application template available.

    See the showcase application

    This page links to a live demo of the template.

    Reference this doc to your favorite AI assistant
    ChatGPT
    Claude
    DeepSeek
    Google AI mode
    Gemini
    Perplexity
    Mistral
    Grok

    Ask your question and get a summary of the document by referencing this page and the AI provider of your choice

    Version History

    1. "Update Solid useIntlayer API usage to direct property access"
      v8.9.004/05/2026
    2. "Initial documentation for Astro + Lit"
      v8.7.724/04/2026

    The content of this page was translated using an AI.

    See the last version of the original content in English
    Edit this doc

    If you have an idea for improving this documentation, please feel free to contribute by submitting a pull request on GitHub.

    GitHub link to the documentation
    Copy

    Copy doc Markdown to clipboard

    Translate your Astro + Lit site with Intlayer | Internationalisation (i18n)

    ide.intlayer.org
    intlayer-astro-template.vercel.app

    Table of Contents

    What is Intlayer?

    Intlayer is an innovative, open-source internationalisation (i18n) library designed to simplify multilingual support in modern web applications.

    With Intlayer, you can:

    • Manage translations easily: Using declarative dictionaries at the component level.
    • Localise metadata, routes and content dynamically.
    • Ensure TypeScript support: With autogenerated types for better autocompletion and error detection.
    • Benefit from advanced features: Such as dynamic language detection and switching.

    Step-by-Step Guide to Configure Intlayer in Astro + Lit

    Check out the application template on GitHub.

    Step 1: Install Dependencies

    Install the necessary packages using your preferred package manager:

    bash
    Copy code

    Copy the code to the clipboard

    npm install intlayer astro-intlayer lit lit-intlayer @astrojs/litnpx intlayer init
    • intlayer The core package that provides i18n tools for configuration management, translations, content declaration, transpilation, and CLI commands.

    • astro-intlayer Includes the Astro integration plugin to link Intlayer with the Vite bundler, as well as the middleware to detect the user's preferred language, manage cookies, and handle URL redirects.

    • lit Core Lit package for building fast, lightweight Web Components.

    • lit-intlayer Package to integrate Intlayer into Lit applications. It provides ReactiveController-based hooks (useIntlayer, useLocale, etc.) that automatically instruct the LitElement to re-render when the language changes.

    • @astrojs/lit Official Astro integration that allows the use of Lit custom elements within Astro pages.

    Step 2: Configure Your Project

    Create a configuration file to define your application's languages:

    intlayer.config.ts
    Copy code

    Copy the code to the clipboard

    import { Locales, type IntlayerConfig } from "intlayer";const config: IntlayerConfig = {  internationalization: {    locales: [      Locales.ENGLISH,      Locales.FRENCH,      Locales.SPANISH,      Locales.ENGLISH_UNITED_KINGDOM,      // Your other languages    ],    defaultLocale: Locales.ENGLISH,  },};export default config;
    Through this configuration file, you can configure localised URLs, middleware redirects, cookie names, location and extensions of content declarations, disable Intlayer logs in the console, and more. For a full list of available parameters, refer to the configuration documentation.

    Step 3: Integrate Intlayer into Your Astro Configuration

    Add the intlayer plugin and Lit integration to your Astro configuration.

    astro.config.ts
    Copy code

    Copy the code to the clipboard

    // @ts-checkimport { intlayer } from "astro-intlayer";import lit from "@astrojs/lit";import { defineConfig } from "astro/config";// https://astro.build/configexport default defineConfig({  integrations: [intlayer(), lit()],});
    The intlayer() integration plugin is used to integrate Intlayer with Astro. It ensures the generation of the content declaration files and monitors them in development mode. It defines Intlayer environment variables within the Astro application and provides aliases to optimise performance.
    The lit() integration allows for using Lit custom elements within Astro pages.

    Step 4: Declare Your Content

    Create and manage your content declarations to store translations:

    src/components/lit/app.content.ts
    Copy code

    Copy the code to the clipboard

    import { t, type Dictionary } from "intlayer";const litDemoContent = {  key: "lit-demo",  content: {    greeting: t({      en: "Hello World",      fr: "Bonjour le monde",      es: "Hola mundo",      "en-GB": "Hello World",    }),    description: t({      en: "Welcome to my multilingual Astro + Lit site.",      fr: "Bienvenue sur mon site Astro + Lit multilingue.",      es: "Bienvenido a mi sitio Astro + Lit multilingüe.",      "en-GB": "Welcome to my multilingual Astro + Lit site.",    }),  },} satisfies Dictionary;export default litDemoContent;
    Content declarations can be defined anywhere in your application, as long as they are included in the contentDir (by default ./src) and match the content declaration file extension (by default .content.{json,ts,tsx,js,jsx,mjs,cjs}).
    For more information, refer to the content declaration documentation.

    Step 5: Using Content in Astro

    You can consume the dictionaries directly in your .astro files using the core helpers exported from intlayer. You should also add SEO metadata (such as hreflang and canonical links) to every page. Lit custom elements are imported via a client <script> and placed in the body.

    src/pages/[...locale]/index.astro
    Copy code

    Copy the code to the clipboard

    ---import {  getIntlayer,  getLocaleFromPath,  getLocalizedUrl,  getHTMLTextDir,  getPrefix,  localeMap,  defaultLocale,  type LocalesValues,} from "intlayer";export const getStaticPaths = () => {  return localeMap(({ locale }) => ({    params: { locale: getPrefix(locale).localePrefix },  }));};const locale = getLocaleFromPath(Astro.url.pathname) as LocalesValues;const { greeting } = getIntlayer("lit-demo", locale);---<!doctype html><html lang={locale} dir={getHTMLTextDir(locale)}>  <head>    <meta charset="utf-8" />    <meta name="viewport" content="width=device-width" />    <link rel="icon" type="image/svg+xml" href="/favicon.svg" />    <title>{greeting}</title>    <!-- Canonical Link -->    <link      rel="canonical"      href={new URL(getLocalizedUrl(Astro.url.pathname, locale), Astro.site)}    />    <!-- Hreflang Links -->    {      localeMap(({ locale: mapLocale }) => (        <link          rel="alternate"          hreflang={mapLocale}          href={new URL(            getLocalizedUrl(Astro.url.pathname, mapLocale),            Astro.site          )}        />      ))    }    <link      rel="alternate"      hreflang="x-default"      href={new URL(        getLocalizedUrl(Astro.url.pathname, defaultLocale),        Astro.site      )}    />  </head>  <body>    <!-- Lit custom element - receives server-detected locale as a property -->    <lit-demo locale={locale}></lit-demo>  </body></html><script>  import "../../components/lit/LitDemo";</script>
    If you want to use your content in a string attribute, such as alt, title, href, aria-label, etc., you can use the value of the function, like:
    html
    Copy code

    Copy the code to the clipboard

    <img src="{content.image.src.value}" alt="{content.image.value}" /><img src="{content.image.src.toString()}" alt="{content.image.toString()}" /><img src="{String(content.image.src)}" alt="{String(content.image)}" />

    Note on routing setup: The directory structure you use depends on the middleware.routing setting in intlayer.config.ts:

    • prefix-no-default (default): keeps the default language at the root (no prefix) and prefixes others. Use [...locale] to catch all cases.
    • prefix-all: all URLs get a language prefix. You can use standard [locale] if you don't need to handle the root separately.
    • search-param or no-prefix: no language directories are needed. The language is handled via query parameters or cookies.

    Step 6: Create a Lit Custom Element Component

    Create a Lit custom element. Call installIntlayer in the connectedCallback using the server-based locale attribute to initialise the client-side translation singleton.

    src/components/lit/LitDemo.ts
    Copy code

    Copy the code to the clipboard

    import { LitElement, html } from "lit";import { installIntlayer, useIntlayer, useLocale } from "lit-intlayer";import { getLocalizedUrl, getLocaleName, type LocalesValues } from "intlayer";class LitDemo extends LitElement {  static properties = {    locale: { type: String },  };  locale: LocalesValues = "en" as LocalesValues;  private _content = useIntlayer(this, "lit-demo");  private _localeCtrl = useLocale(this, {    onLocaleChange: (newLocale: LocalesValues) => {      window.location.href = getLocalizedUrl(        window.location.pathname,        newLocale      );    },  });  override connectedCallback() {    super.connectedCallback();    // Initialise with server-detected locale    installIntlayer({ locale: this.locale as any });  }  override render() {    const { greeting, description } = this._content;    const {      locale: currentLocale,      availableLocales,      setLocale,    } = this._localeCtrl;    return html`      <div>        <h1>${greeting}</h1>        <p>${description}</p>        <!-- Language switcher rendered inside the LitElement -->        <div class="locale-switcher">          <span class="switcher-label">Change language:</span>          <div class="locale-buttons">            ${availableLocales.map(              (localeItem) => html`                <button                  class="locale-btn ${localeItem === currentLocale                    ? "active"                    : ""}"                  ?disabled=${localeItem === currentLocale}                  @click=${() => setLocale(localeItem)}                >                  <span class="ls-own-name">${getLocaleName(localeItem)}</span>                  <span class="ls-current-name"                    >${getLocaleName(localeItem, currentLocale)}</span                  >                  <span class="ls-code">${localeItem.toUpperCase()}</span>                </button>              `            )}          </div>        </div>      </div>    `;  }}customElements.define("lit-demo", LitDemo);
    The locale attribute is passed from the Astro page (server detection) and used to initialise installIntlayer in the connectedCallback, which sets the initial language for all ReactiveController hooks within the element.
    useIntlayer is registered as a ReactiveController. It automatically requests an element re-render when the language changes, so no additional subscription logic is required.

    Step 7: Add a Language Switcher

    The language switching functionality is integrated directly within the Lit custom element's render() method (see step 6 above). It uses useLocale from lit-intlayer and navigates to the localised URL when a user selects a new language:

    src/components/lit/LitDemo.ts
    Copy code

    Copy the code to the clipboard

    // Inside the LitElement class, after useLocale setup in step 6:private _localeCtrl = useLocale(this, {  onLocaleChange: (newLocale: LocalesValues) => {    // Navigate to the localised URL on language change    window.location.href = getLocalizedUrl(window.location.pathname, newLocale);  },});override render() {  const { locale: currentLocale, availableLocales, setLocale } = this._localeCtrl;  return html`    <div class="locale-switcher">      <span class="switcher-label">Change language:</span>      <div class="locale-buttons">        ${availableLocales.map(          (localeItem) => html`            <button              class="locale-btn ${localeItem === currentLocale ? "active" : ""}"              ?disabled=${localeItem === currentLocale}              @click=${() => setLocale(localeItem)}            >              <span class="ls-own-name">${getLocaleName(localeItem)}</span>              <span class="ls-current-name">${getLocaleName(localeItem, currentLocale)}</span>              <span class="ls-code">${localeItem.toUpperCase()}</span>            </button>          `        )}      </div>    </div>  `;}

    Note on Lit reactivity: useLocale returns a ReactiveController. When setLocale is called, the controller automatically requests a re-render, updating the active button state without manual DOM manipulation.

    Note on persistence: Using onLocaleChange to redirect via window.location.href ensures the new linguistic URL is visited, allowing the Intlayer middleware to set the language cookie and remember the user's preference in future visits.

    Step 8: Sitemap and Robots.txt

    Intlayer offers utilities to dynamically create your localised sitemap and robots.txt files.

    Sitemap

    Intlayer comes with a built-in sitemap generator to help you create a sitemap for your application easily. It handles localized routes and adds the necessary metadata for search engines.

    The Intlayer generated sitemap supports the xhtml:link namespace (Hreflang XML Extensions). Unlike the default sitemap generators that only list raw URLs, Intlayer automatically creates the required bidirectional links between all language versions of a page (e.g., /about, /about?lang=fr, and /about?lang=es). This ensures search engines correctly index and serve the right language version to the right audience.

    Create src/pages/sitemap.xml.ts to generate a sitemap including all your localised routes.

    src/pages/sitemap.xml.ts
    Copy code

    Copy the code to the clipboard

    import type { APIRoute } from "astro";import { generateSitemap, type SitemapUrlEntry } from "intlayer";const pathList: SitemapUrlEntry[] = [  { path: "/", changefreq: "daily", priority: 1.0 },  { path: "/about", changefreq: "monthly", priority: 0.7 },];const SITE_URL = import.meta.env.SITE ?? "http://localhost:4321";export const GET: APIRoute = async ({ site }) => {  const xmlOutput = generateSitemap(pathList, { siteUrl: SITE_URL });  return new Response(xmlOutput, {    headers: { "Content-Type": "application/xml" },  });};

    Robots.txt

    Create src/pages/robots.txt.ts to control search engine crawling.

    src/pages/robots.txt.ts
    Copy code

    Copy the code to the clipboard

    import type { APIRoute } from "astro";import { getMultilingualUrls } from "intlayer";const getAllMultilingualUrls = (urls: string[]) =>  urls.flatMap((url) => Object.values(getMultilingualUrls(url)) as string[]);const disallowedPaths = getAllMultilingualUrls(["/admin", "/private"]);export const GET: APIRoute = ({ site }) => {  const robotsTxt = [    "User-agent: *",    "Allow: /",    ...disallowedPaths.map((path) => `Disallow: ${path}`),    "",    `Sitemap: ${new URL("/sitemap.xml", site).href}`,  ].join("\n");  return new Response(robotsTxt, {    headers: { "Content-Type": "text/plain" },  });};

    TypeScript Configuration

    Intlayer uses module augmentation to leverage TypeScript, making your codebase more robust. If you use decorator syntax, ensure you enable experimentalDecorators in your compiler options.

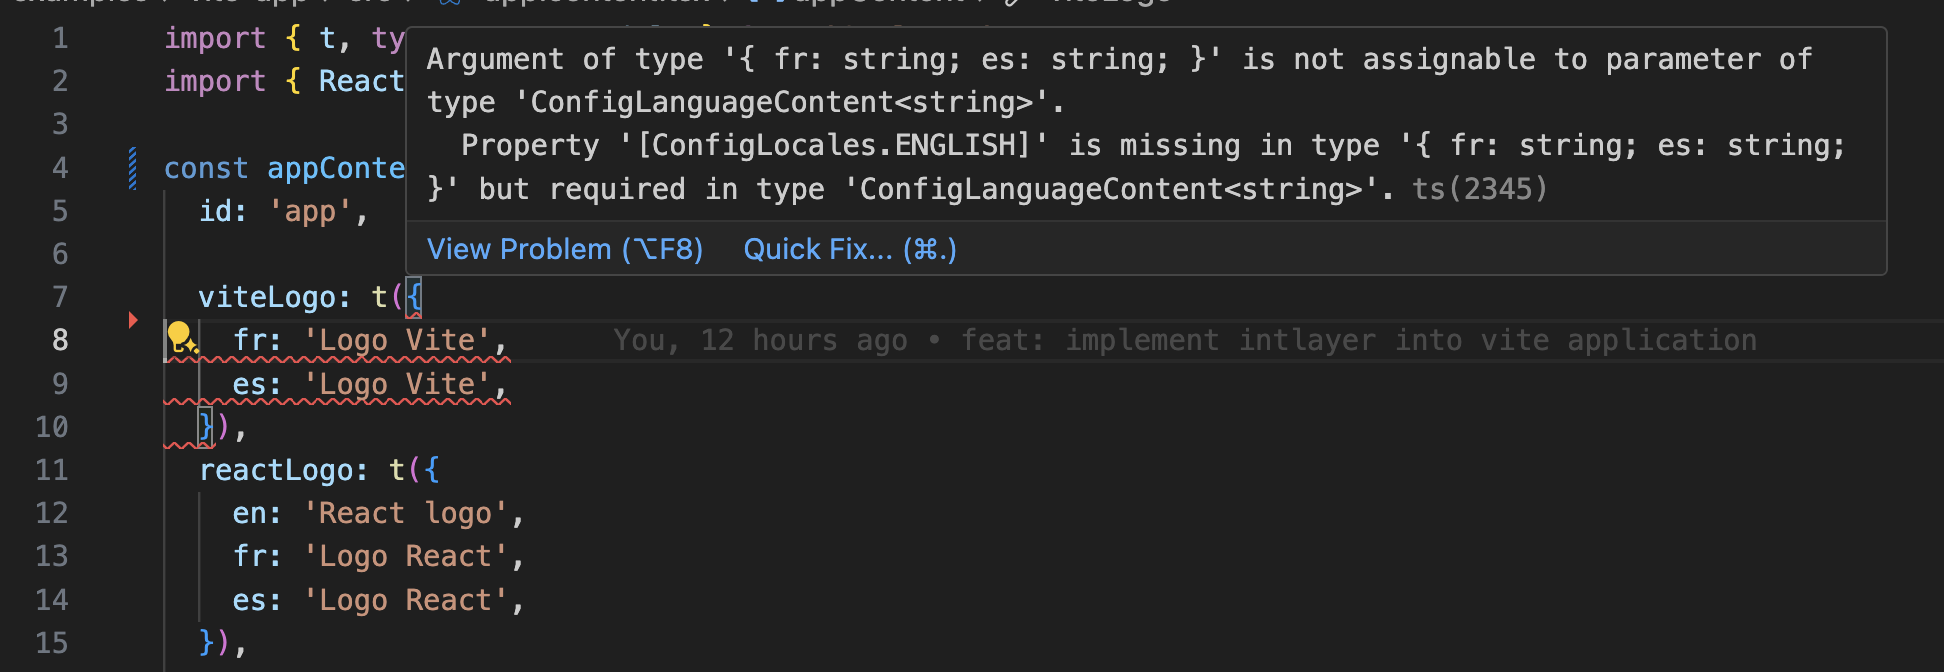
    Autocompletion

    Translation Error

    Ensure your TypeScript configuration includes the autogenerated types.

    tsconfig.json
    Copy code

    Copy the code to the clipboard

    {  compilerOptions: {    // ...    experimentalDecorators: true,    useDefineForClassFields: false, // Required for decorator support in Lit  },  include: [    // ... your existing TypeScript configuration    ".intlayer/**/*.ts", // Include autogenerated types  ],}

    Git Configuration

    It is recommended to ignore the files generated by Intlayer. This avoids committing them to your Git repository.

    To do this, add the following instructions to your .gitignore file:

    bash
    Copy code

    Copy the code to the clipboard

    # Ignore the files generated by Intlayer.intlayer

    VS Code Extension

    To improve your development experience with Intlayer, you can install the official Intlayer VS Code extension.

    Installation from the VS Code Marketplace

    This extension provides:

    • Autocompletion for translation keys.
    • Real-time error detection for missing translations.
    • Inline preview of translated content.
    • Quick actions for easily creating and updating translations.

    For more information on using the extension, refer to the VS Code Extension documentation.


    (Optional) Step 15: Extract the content of your components

    If you have an existing codebase, transforming thousands of files can be time-consuming.

    To ease this process, Intlayer propose a compiler / extractor to transform your components and extract the content.

    To set it up, you can add a compiler section in your intlayer.config.ts file:

    intlayer.config.ts
    Copy code

    Copy the code to the clipboard

    import { type IntlayerConfig } from "intlayer";
    
    const config: IntlayerConfig = {
      // ... Rest of your config
      compiler: {
        /**
         * Indicates if the compiler should be enabled.
         */
        enabled: true,
    
        /**
         * Defines the output files path
         */
        output: ({ fileName, extension }) => `./${fileName}${extension}`,
    
        /**
         * Indicates if the components should be saved after being transformed.
         *
         * - If `true`, the compiler will rewrite the component file in the disk. So the transformation will be permanent, and the compiler will skip the transformation for the next process. That way, the compiler can transform the app, and then it can be removed.
         *
         * - If `false`, the compiler will inject the `useIntlayer()` function call into the code in the build output only, and keep the base codebase intact. The transformation will be done only in memory.
         */
        saveComponents: false,
    
        /**
         * Dictionary key prefix
         */
        dictionaryKeyPrefix: "",
      },
    };
    
    export default config;

    Run the extractor to transform your components and extract the content

    bash
    Copy code

    Copy the code to the clipboard

    npx intlayer extract

    Update your vite.config.ts to include the intlayerCompiler plugin:

    vite.config.ts
    Copy code

    Copy the code to the clipboard

    import { defineConfig } from "vite";import { intlayer, intlayerCompiler } from "vite-intlayer";export default defineConfig({ plugins: [   intlayer(),   intlayerCompiler(), // Adds the compiler plugin ],});
    bash
    Copy code

    Copy the code to the clipboard

    npm run build # Or npm run dev

    Deepen Your Knowledge

    If you want to learn more, you can also implement the Visual Editor or use the CMS to externalise your content.

    Astro and Preact
    Astro and Vanilla JS
    Alt+→

    On this page

      Discussions are anonymous and regularly reviewed to address common issues. Feel free to share feature ideas, feedback on the documentation, or anything related to Intlayer, we use this input to shape our roadmap and improve the product.

      npm install intlayer astro-intlayer lit lit-intlayer @astrojs/litnpx intlayer init
      import { Locales, type IntlayerConfig } from "intlayer";const config: IntlayerConfig = {  internationalization: {    locales: [      Locales.ENGLISH,      Locales.FRENCH,      Locales.SPANISH,      Locales.ENGLISH_UNITED_KINGDOM,      // Your other languages    ],    defaultLocale: Locales.ENGLISH,  },};export default config;
      // @ts-checkimport { intlayer } from "astro-intlayer";import lit from "@astrojs/lit";import { defineConfig } from "astro/config";// https://astro.build/configexport default defineConfig({  integrations: [intlayer(), lit()],});
      import { t, type Dictionary } from "intlayer";const litDemoContent = {  key: "lit-demo",  content: {    greeting: t({      en: "Hello World",      fr: "Bonjour le monde",      es: "Hola mundo",      "en-GB": "Hello World",    }),    description: t({      en: "Welcome to my multilingual Astro + Lit site.",      fr: "Bienvenue sur mon site Astro + Lit multilingue.",      es: "Bienvenido a mi sitio Astro + Lit multilingüe.",      "en-GB": "Welcome to my multilingual Astro + Lit site.",    }),  },} satisfies Dictionary;export default litDemoContent;
      ---import {  getIntlayer,  getLocaleFromPath,  getLocalizedUrl,  getHTMLTextDir,  getPrefix,  localeMap,  defaultLocale,  type LocalesValues,} from "intlayer";export const getStaticPaths = () => {  return localeMap(({ locale }) => ({    params: { locale: getPrefix(locale).localePrefix },  }));};const locale = getLocaleFromPath(Astro.url.pathname) as LocalesValues;const { greeting } = getIntlayer("lit-demo", locale);---<!doctype html><html lang={locale} dir={getHTMLTextDir(locale)}>  <head>    <meta charset="utf-8" />    <meta name="viewport" content="width=device-width" />    <link rel="icon" type="image/svg+xml" href="/favicon.svg" />    <title>{greeting}</title>    <!-- Canonical Link -->    <link      rel="canonical"      href={new URL(getLocalizedUrl(Astro.url.pathname, locale), Astro.site)}    />    <!-- Hreflang Links -->    {      localeMap(({ locale: mapLocale }) => (        <link          rel="alternate"          hreflang={mapLocale}          href={new URL(            getLocalizedUrl(Astro.url.pathname, mapLocale),            Astro.site          )}        />      ))    }    <link      rel="alternate"      hreflang="x-default"      href={new URL(        getLocalizedUrl(Astro.url.pathname, defaultLocale),        Astro.site      )}    />  </head>  <body>    <!-- Lit custom element - receives server-detected locale as a property -->    <lit-demo locale={locale}></lit-demo>  </body></html><script>  import "../../components/lit/LitDemo";</script>
      <img src="{content.image.src.value}" alt="{content.image.value}" /><img src="{content.image.src.toString()}" alt="{content.image.toString()}" /><img src="{String(content.image.src)}" alt="{String(content.image)}" />
      import { LitElement, html } from "lit";import { installIntlayer, useIntlayer, useLocale } from "lit-intlayer";import { getLocalizedUrl, getLocaleName, type LocalesValues } from "intlayer";class LitDemo extends LitElement {  static properties = {    locale: { type: String },  };  locale: LocalesValues = "en" as LocalesValues;  private _content = useIntlayer(this, "lit-demo");  private _localeCtrl = useLocale(this, {    onLocaleChange: (newLocale: LocalesValues) => {      window.location.href = getLocalizedUrl(        window.location.pathname,        newLocale      );    },  });  override connectedCallback() {    super.connectedCallback();    // Initialise with server-detected locale    installIntlayer({ locale: this.locale as any });  }  override render() {    const { greeting, description } = this._content;    const {      locale: currentLocale,      availableLocales,      setLocale,    } = this._localeCtrl;    return html`      <div>        <h1>${greeting}</h1>        <p>${description}</p>        <!-- Language switcher rendered inside the LitElement -->        <div class="locale-switcher">          <span class="switcher-label">Change language:</span>          <div class="locale-buttons">            ${availableLocales.map(              (localeItem) => html`                <button                  class="locale-btn ${localeItem === currentLocale                    ? "active"                    : ""}"                  ?disabled=${localeItem === currentLocale}                  @click=${() => setLocale(localeItem)}                >                  <span class="ls-own-name">${getLocaleName(localeItem)}</span>                  <span class="ls-current-name"                    >${getLocaleName(localeItem, currentLocale)}</span                  >                  <span class="ls-code">${localeItem.toUpperCase()}</span>                </button>              `            )}          </div>        </div>      </div>    `;  }}customElements.define("lit-demo", LitDemo);
      // Inside the LitElement class, after useLocale setup in step 6:private _localeCtrl = useLocale(this, {  onLocaleChange: (newLocale: LocalesValues) => {    // Navigate to the localised URL on language change    window.location.href = getLocalizedUrl(window.location.pathname, newLocale);  },});override render() {  const { locale: currentLocale, availableLocales, setLocale } = this._localeCtrl;  return html`    <div class="locale-switcher">      <span class="switcher-label">Change language:</span>      <div class="locale-buttons">        ${availableLocales.map(          (localeItem) => html`            <button              class="locale-btn ${localeItem === currentLocale ? "active" : ""}"              ?disabled=${localeItem === currentLocale}              @click=${() => setLocale(localeItem)}            >              <span class="ls-own-name">${getLocaleName(localeItem)}</span>              <span class="ls-current-name">${getLocaleName(localeItem, currentLocale)}</span>              <span class="ls-code">${localeItem.toUpperCase()}</span>            </button>          `        )}      </div>    </div>  `;}
      import type { APIRoute } from "astro";import { generateSitemap, type SitemapUrlEntry } from "intlayer";const pathList: SitemapUrlEntry[] = [  { path: "/", changefreq: "daily", priority: 1.0 },  { path: "/about", changefreq: "monthly", priority: 0.7 },];const SITE_URL = import.meta.env.SITE ?? "http://localhost:4321";export const GET: APIRoute = async ({ site }) => {  const xmlOutput = generateSitemap(pathList, { siteUrl: SITE_URL });  return new Response(xmlOutput, {    headers: { "Content-Type": "application/xml" },  });};
      import type { APIRoute } from "astro";import { getMultilingualUrls } from "intlayer";const getAllMultilingualUrls = (urls: string[]) =>  urls.flatMap((url) => Object.values(getMultilingualUrls(url)) as string[]);const disallowedPaths = getAllMultilingualUrls(["/admin", "/private"]);export const GET: APIRoute = ({ site }) => {  const robotsTxt = [    "User-agent: *",    "Allow: /",    ...disallowedPaths.map((path) => `Disallow: ${path}`),    "",    `Sitemap: ${new URL("/sitemap.xml", site).href}`,  ].join("\n");  return new Response(robotsTxt, {    headers: { "Content-Type": "text/plain" },  });};
      {  compilerOptions: {    // ...    experimentalDecorators: true,    useDefineForClassFields: false, // Required for decorator support in Lit  },  include: [    // ... your existing TypeScript configuration    ".intlayer/**/*.ts", // Include autogenerated types  ],}
      # Ignore the files generated by Intlayer.intlayer
      npx intlayer extract
      import { defineConfig } from "vite";import { intlayer, intlayerCompiler } from "vite-intlayer";export default defineConfig({ plugins: [   intlayer(),   intlayerCompiler(), // Adds the compiler plugin ],});
      npm run build # Or npm run dev